Text paths are built into each text clip. You just need to turn them on.
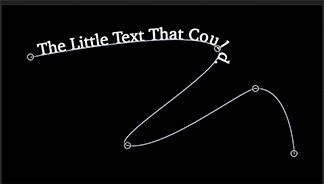
Text on a curve in Motion, using five control dots.
I discovered this tip while researching a recent PowerUP webinar presenting “Advanced Techniques in Apple Motion 5.5.”
All curves in Motion are created using paths. While there are a variety of tools we can use to draw paths – the paint brush, pen and shape tools, for example – there is no “Text-on-a-Curve” tool.
That’s because text paths are built into the text clip itself. To create text on a curve:
Select the text tool and type some text in the Viewer.
Leave the Text tool active in the text and go to Inspector > Text > Layout and change Layout Method (under Layout Controls) to Path.
Under the text a horizontal path line appears with three dots:
Left dot. End point of text animation
Middle dot. The opportunity to create a Curve
Right dot. Start point of text animation
Drag each dot to create the path you want the text to follow.
EXTRA CREDIT
Add more control dots by Option-clicking anywhere along the path.
Control-click a dot (control point) to delete a dot or reveal handles you can drag to change the shape of the curve.
Animate text to move along the curve by keyframing Path Offset, lower in the Layout pane.
Please rate the helpfulness of this tip.
Click on a star to rate it!
https://www.theinsidetips.com/wp-content/uploads/2019/09/Tips-Logo-700x150.jpg00Larry Jordanhttps://www.theinsidetips.com/wp-content/uploads/2019/09/Tips-Logo-700x150.jpgLarry Jordan2021-02-11 01:30:002021-02-11 01:30:00Tip #1390: Put Text on a Curve
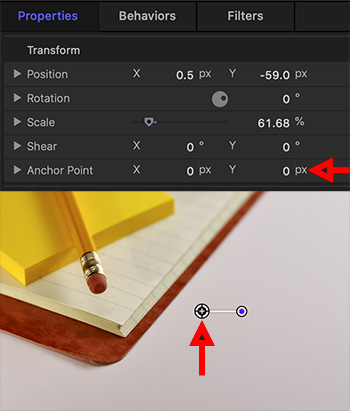
Scaling and rotation often look better when you move the Anchor Point.
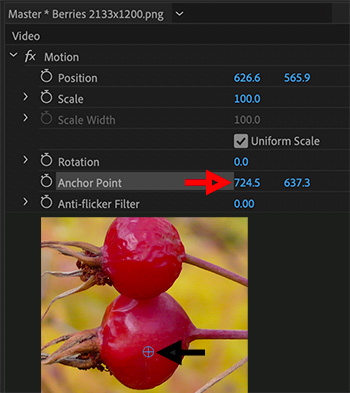
The Anchor Point indicator (lower red arrow) and the Anchor Point Inspector settings.
I discovered this tip while researching a recent PowerUP webinar presenting “Advanced Techniques in Apple Motion 5.5.”
The Anchor Point is that position around which an image rotates or scales. (It is indicated by a plus sign – red arrow in the lower screen shot – whenever you select an image or video in the Layers pane.)
You adjust the position of the Anchor Point by selecting an element in the Layers pane, then modify Inspector > Properties > Anchor Point. (Red arrow in the top screen shot) Sadly, there’s no way to move the Anchor Point by dragging.
I find scaling or rotating an image looks MUCH more interesting when you move the Anchor Point to a corner, rather than the center.
Please rate the helpfulness of this tip.
Click on a star to rate it!
https://www.theinsidetips.com/wp-content/uploads/2019/09/Tips-Logo-700x150.jpg00Larry Jordanhttps://www.theinsidetips.com/wp-content/uploads/2019/09/Tips-Logo-700x150.jpgLarry Jordan2021-02-11 01:30:002021-02-06 13:24:24Tip #1389: Move the Anchor Point for Better Zooms
In depth training in Apple Motion from beginning to the end.
The Apple Motion 5.5. logo.
You can learn Motion – if you take it in easy steps; and I have exactly the training you need.
I specifically created these six titles as a set to provide consistent content and coverage. These start at the very beginning, then keep adding more and more techniques until you are introduced to every major element in the program.
Apple totally revised the Apple Motion interface and its operation with version 5.3. Since then, the rate of change in the software has slowed down. This means that, while the videos are a bit older, the information is still accurate – and I can save you money
Compositor Marijn Eken, who compared Nuke, Fusion and After Effects.
This article, written by Ian Failes and Marijn Eken, first appeared in VFXVoice.com. This is a summary.
Visual effects artists already know there are often many ways you can pull off a particular shot via different filming methods and with different tools and techniques. That’s certainly the case with compositing, where several pieces of software and compositing workflows can be used.
Here, visual effects artist Marijn Eken – who has worked as a compositor at studios including DNEG, Scanline VFX and RISE | Visual Effects Studios, and currently teaches at the Netherlands Film Academy – explains how he might tackle compositing of the same shot in three separate packages. These are Foundry’s Nuke, Blackmagic Design’s Fusion (inside DaVinci Resolve) and Adobe After Effects, arguably the three most accessible compositing tools.
The elements supplied to Eken were stock footage of a woman pinch-zooming a greenscreen and the marker-covered tablet, and a photograph of the space shuttle Endeavour taken at California Science Center, with the idea being that she would be zooming into an area of the photograph on the device.
In coming up with a methodology for approaching this relatively simple composite in the three different packages, Eken generally followed these steps:
Track the four corners.
Use the corner pin method to composite the image over the screen.
Track the two fingers on the screen and use that to position and zoom the image.
Apply grading on the inserted image to match the black levels and white point.
Use the greenscreen and some roto to separate the hand and composite it on top.
The article then illustrates in detail how he approached this task in each of the three software. (Link)
Please rate the helpfulness of this tip.
Click on a star to rate it!
https://www.theinsidetips.com/wp-content/uploads/2019/09/Tips-Logo-700x150.jpg00Larry Jordanhttps://www.theinsidetips.com/wp-content/uploads/2019/09/Tips-Logo-700x150.jpgLarry Jordan2021-02-10 01:30:002021-02-06 10:37:55Tip #1404: How to Comp a Shot in 3 Different Tools
A system to streamline production and post workflows for Mank.
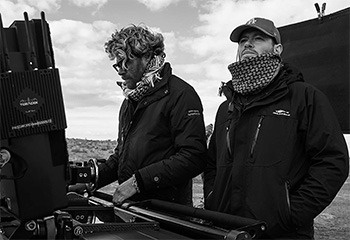
Cinematographer Erik Messerschmidt, ASC, on location with Mank.
Thinking about Tip #1402, the folks at X2X Media wrote a series of four detailed blog posts about the effects and remote workflow they created to support production and post for the film Mank. Here’s the link to start the series. This is a summary.
Making a movie during a pandemic requires a little innovation. During the production of Mank, David Fincher’s team needed to work remotely while retaining the ability to collaborate and also to consult with Fincher at a moment’s notice. In addition, they needed secure access to footage and associated metadata.
X2X engineered a bespoke solution to streamline the production and post-production workflow. Craig Mumma, Director of X2X LABS, summarized the requirements, “Our original remit was first and foremost to securely collect and store all data from pre-production through to the completed movie. Then, because of the pandemic, the Mank team needed to work remotely but still wanted to have super easy connections between themselves and with third-party contributors. The final piece of the puzzle was to upgrade an existing VFX turnover process and automate it.”
The workflow saw data from the RED RANGER cameras transferred on shuttle drives from production to post, where the near-set team used Fotokems’ nextLAB to manage the image QC, sound synchronization and metadata updates. They generated deliverables for the editor, who could then assemble the timelines in Adobe Premiere Pro.
Running alongside the main workflow and also feeding into the CODEX Media Vault, PIX software allowed contributors to upload information and share it with the team.
PIX RT (Real-Time) creates media that is immediately available to the director so that he or she can make annotations and notes on the image right after it has been captured. This media and metadata are synchronized to PIX to all the approved members of the production who can review them along with image files.
The article details the gear and workflow, then continues into a discussion of how they shot black-and-whate images with a RED RANGER camera brain equipped with a HELIUM 8K MONOCHROME sensor that can record 8192×4320 resolution at up to 60 fps.
“The monochrome was so spectacular and yielded such preferable results that it was absolutely the choice.”
EXTRA CREDIT
X2X wrote four detailed articles on the Mank VFX workflow:
An in-depth look at how effects for this black-and-white movie were created.
The “Mank” movie logo.
Mank co-producer and VFX Producer Peter Mavromates shares his thoughts on creating the visual effects in Mank. This is a summary of the article, written by Trevor Hogg, that first appeared in VFXVoice.
Visual effects and DI are done in-house. “When we’re doing tests during pre-production,” Mavromates says, “a lot of the time they are shot in the parking lot and we bring the files right into the DI in the building.
That’s also the advantage to having in-house visual effects. I can call David upstairs where our visual effects are and say, ‘I want you to look at these three shots.’ I can give feedback to the artist right there, and maybe the artist can immediately do his note and get him to sign off.
The PIX workflow came in handy when the COVID-19 pandemic caused the production that had finished principal photography on February 22, 2020 to work remotely in mid-March. “David has never wanted to spend the time and money to travel to post-production when he’s on location,” says Mavromates. “Once the flag came down, we were up and running in three days. A lot of times David likes stuff on PIX even if we’re in the same building. We were 80% trained already. It didn’t impact our schedule. We delivered at the beginning of September.”
About half of the job for Mavromates is selecting and dividing the work among the vendors. “When I decide what stays in-house, usually it’s the smaller stuff that I can put through quickly,” he says. “When stuff gets bigger, that’s when I want a facility that has more bandwidth in terms of bodies and rendering. Over time, I have a checklist of things that these vendors have done successfully, so a lot of the choices have become easier over time. David likes to add a lot of lens flaring to his stuff, and I know that I’m going to go to Savage for that because we’ve designed lens flares over so many projects with them. In the birthday scene, there are 65 fireplaces that had flames added. That’s the kind of throughput that Ollin can handle.” The CG animals were produced by ILM, driving sequences by Territory Studio, and Artemple did everything from digital water to a close-up of a neon sign.
In total there were 753 visual effects shots. “A lot of that is ‘body and fender work,’ which encompasses getting rid of actor’s marks, straightening out curtains, removing metallic reflections that were unintended,” remarks Mavromates.
EXTRA CREDIT
The article then details how different effects were created and, espeically, the challenges because the film was shot in black-and-white, which prevented green screen effects from being used. Instead, they relied on LED projection panels.
The future of media is streaming – but what should broadcasters do?
The Next TV logo.
This article, written by Alan Wolk, first appeared in NextTV.com. This is a summary.
There are a few ways you can look at NBCUniversal’s decision to shut down its NBC Sports Network channel and distribute NBCSN’s programming to the USA network and Peacock.
On one level, it’s a cost-saving measure and a way to boost USA and Peacock at a time when both could use a little love.
On another, it’s the first of many similar decisions NBCU and other big networks are going to be making as they consolidate their offerings on linear and prepare to migrate the bulk of their business to streaming.
The powers that be at all of the major networks seem to understand that the future belongs to streaming. Their goal is to make the switch-over as painless as possible by gradually reducing their footprint on linear TV while increasing it on streaming. The process of reducing their linear footprint is a lot like one of those peg board games, the ones you find at Cracker Barrel, where the goal is to jump one piece over another and remove the piece you’ve jumped, till you’re left with just a single piece.
At the same time, they’ve got to keep their traditional linear businesses in shape, as that is still (for now) their major source of revenue.
In addition to viewers, networks are going to have to manage advertiser expectations during the switchover, as well. Today’s conventional wisdom is that younger, more affluent audiences are on streaming, while older and less affluent audiences are still on linear.
On the programming end, we’re already seeing how traditional networks are making excellent use of their streaming networks to promote their linear properties, giving them a strategic advantage over tech-only players like Amazon and Apple, especially when it comes to those viewers who are still primarily on linear but thinking of making the switch.
EXTRA CREDIT
The entire article is worth readiing, as is the NextTV website itself.
Please rate the helpfulness of this tip.
Click on a star to rate it!
https://www.theinsidetips.com/wp-content/uploads/2019/09/Tips-Logo-700x150.jpg00Larry Jordanhttps://www.theinsidetips.com/wp-content/uploads/2019/09/Tips-Logo-700x150.jpgLarry Jordan2021-02-09 01:30:002021-02-09 01:30:00Tip #1401: The Future of Media is Streaming
AI-driven, automatic audio mixing for Premiere and Resolve.
Alex Audio Butler product logo.
Alex Audio Butler just released an upgrade to its automatic audio mixing package for Adobe Premiere Pro and DaVinci Resolve.
Alex Audio Butler consists of 4 unique plug-ins that, combined, can mix most, if not all, types of video projects. Every audio track in your project (including the Master track) will contain exactly one Alex Audio Butler instance based on the type of audio in the track (Voice, Music, Sound FX, Master). All these instances work together by listening to your audio and sharing their internal analyses to create a series of audio settings that will make your audio sound as good as possible.
Using presets you only need to tell Alex Audio Butler high-level choices that fit your project: you want a Pumping Loud video, or something more Natural. Based on these instruction the plugin suite will tune every setting creating the right volume so you don’t have to think about dBs, Hz, et cetera.
A floating Status Window informs you if Alex Audio Butler has enough information for a correct export so you can be sure you never upload videos with audio mistakes.
Prevent accidents – select the setting you want to change first!
Motion settings in Effect Controls can be set on-screen by selecting the setting, then dragging the on-screen icon.
Normally, when we want to change the position, scale or rotation of a clip, we go to the Effect Controls panel and start tweaking numbers.
If, instead, you click the word “Motion” in the Effect Controls panel, several blue on-screen controls light up in the Program Monitor. These allow us to change position, scale or rotation depending upon the control you drag.
However, sometimes you don’t want all that choice. Specifically, you may want to change only one setting – say the Anchor Point – without changing anything else.
We can do that!
Simply click the name of the setting you want to change in the Effect Controls panel, then drag the appropriate icon in the Program Monitor.
For example, in the screen shot, I selected Anchor Point, then dragged the blue cross-hair in the Program Monitor. With only one setting selected, only one setting got changed.
Please rate the helpfulness of this tip.
Click on a star to rate it!
https://www.theinsidetips.com/wp-content/uploads/2019/09/Tips-Logo-700x150.jpg00Larry Jordanhttps://www.theinsidetips.com/wp-content/uploads/2019/09/Tips-Logo-700x150.jpgLarry Jordan2021-02-09 01:30:002021-02-09 01:30:00Tip #1396: Change a Specific Setting – FAST!
Vibrance is a better choice for boosting color saturation for video clips.
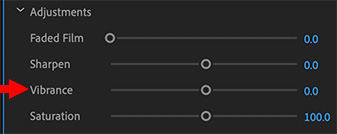
The Vibrance setting in the Lumetri Color > Creative panel.
What’s the difference between Vibrance and Saturation? Something significant, actually. Both these settings are in the Lumetri Color > Creative panel.
The short answer is that when you need to adjust saturation, you may get better results by using Vibrance, than Saturation, especially if there are a lot of highlights or shadows in your image.
Saturation. Adjusts the saturation of all colors in the clip equally from 0 (monochrome) to 200 (double the saturation).
Vibrance. Adjusts the saturation so that color clipping is minimized as colors approach full saturation. This setting changes the saturation of all lower-saturated colors, while having less effect on the higher-saturated colors. Vibrance also prevents skin tones from becoming oversaturated.
Please rate the helpfulness of this tip.
Click on a star to rate it!
https://www.theinsidetips.com/wp-content/uploads/2019/09/Tips-Logo-700x150.jpg00Larry Jordanhttps://www.theinsidetips.com/wp-content/uploads/2019/09/Tips-Logo-700x150.jpgLarry Jordan2021-02-09 01:30:002021-02-06 10:26:25Tip #1395: Saturation vs. Vibrance
We may request cookies to be set on your device. We use cookies to let us know when you visit our websites, how you interact with us, to enrich your user experience, and to customize your relationship with our website.
Click on the different category headings to find out more. You can also change some of your preferences. Note that blocking some types of cookies may impact your experience on our websites and the services we are able to offer.
Essential Website Cookies
These cookies are strictly necessary to provide you with services available through our website and to use some of its features.
Because these cookies are strictly necessary to deliver the website, refuseing them will have impact how our site functions. You always can block or delete cookies by changing your browser settings and force blocking all cookies on this website. But this will always prompt you to accept/refuse cookies when revisiting our site.
We fully respect if you want to refuse cookies but to avoid asking you again and again kindly allow us to store a cookie for that. You are free to opt out any time or opt in for other cookies to get a better experience. If you refuse cookies we will remove all set cookies in our domain.
We provide you with a list of stored cookies on your computer in our domain so you can check what we stored. Due to security reasons we are not able to show or modify cookies from other domains. You can check these in your browser security settings.
Google Analytics Cookies
These cookies collect information that is used either in aggregate form to help us understand how our website is being used or how effective our marketing campaigns are, or to help us customize our website and application for you in order to enhance your experience.
If you do not want that we track your visit to our site you can disable tracking in your browser here:
Other external services
We also use different external services like Google Webfonts, Google Maps, and external Video providers. Since these providers may collect personal data like your IP address we allow you to block them here. Please be aware that this might heavily reduce the functionality and appearance of our site. Changes will take effect once you reload the page.
Google Webfont Settings:
Google Map Settings:
Google reCaptcha Settings:
Vimeo and Youtube video embeds:
Other cookies
The following cookies are also needed - You can choose if you want to allow them:
Privacy Policy
You can read about our cookies and privacy settings in detail on our Privacy Policy Page.