… for Codecs & Media

Tip #1393: LTO 9 – Coming Soon!

Larry Jordan – LarryJordan.com

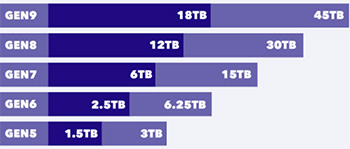
LTO 9: 18 TB storage per tape, coming in the first half of 2021.

The official LTO roadmap. LTO 9 is not yet shipping.

Topic $TipTopic

LTO 9, the latest tape-based archiving standard, should see shipping units arrive in the first half of 2021.

For this generation, the LTO Program has balanced the cost and benefit of new technology by offering an 18 TB tape cartridge to address the current market for storage space. This represents a 50% increase in capacity over LTO–8, but a 1400% increase over LTO–5 technology launched a decade ago.

LTO generation 9 specifications include previously introduced features, such as multi–layer security support via hardware–based encryption, WORM (Write–Once, Read–Many) functionality and support for Linear Tape File System (LTFS). The new LTO generation 9 specifications include full backward read and write compatibility with LTO generation 8 cartridges. These features help LTO tape maintain its unique position of a powerful, scalable, and adaptable open tape storage format that can provide more confidence for safe and secured offline storage, particularly in helping to prevent the impact of increasing cyberattacks.

For media creators with massive media files, hard disks and cloud storage can quickly become very expensive. LTO, by archiving to tape that can last up to 30 years, provides a lower-cost way to preserve assets for the long-term.

Learn more – LTO.org.


Please rate the helpfulness of this tip.

Click on a star to rate it!

… for Adobe Premiere Pro CC

Tip #1370: intoPIX JPEG XS Now Supports Premiere

Larry Jordan – LarryJordan.com

intoPIX offers JPEG codec optimized for large frame sizes and speed.

The intoPIX JPEG XS logo.

Topic $TipTopic

intoPIX, provider of innovative image processing solutions, announced the launch of its JPEG XS Plugin for Adobe Premiere for video editing and live streaming. An innovative solution that significantly speeds up the pre- and post-production pipeline in JPEG XS format.

“Our plugin creates a perfect match between a versatile tool and the low-complexity, low latency codec that will preserve the picture quality” explains Justine Hecq, Product Marketing and Business Development Manager. “It grants Adobe Premiere users hassle-free access to 10 times the data space, compared to using uncompressed video.”

The new Plugin is embedding the FastTICO-XS SDK and meets all the requirements to switch to a JPEG XS-based workflow effortlessly: super-fast encoding and decoding, support of all resolutions from HD, 4K to 8K, a wide range of pixel formats (4:2:2, 4:4:4,…), MXF wrapping and audio support. Moreover, it does not require a high loading process: you can achieve all of this using a normal Intel or AMD processor.

NOTE: Missing from this list is support for M1 Macs.

Here’s a link to learn more.


Please rate the helpfulness of this tip.

Click on a star to rate it!

… for Apple Final Cut Pro X

Tip #1394: Track Your Changes – Faster

Larry Jordan – LarryJordan.com

Projects change constantly. Final Cut tracks and displays change dates.

Custom metadata menu, part of the Browser column headers.

Topic $TipTopic

There’s a new feature in Final Cut that can help you track project changes faster – but it is hidden by default.

Switch to List view in the Browser, then Control-click any column header at the top of the Browser.

This displays a popup menu of all the metadata columns that Final Cut tracks for every project and clip.

New with a recent release of Final Cut is the last modification date of any clip or project.

If you’ve lost control over project file names, this is a fast way to see which project you were working on most recently.

EXTRA CREDIT

Can’t see all your file names? Control-click the Name column header and choose Auto Size Column.

Poof! The column width expands so you can see all your file names again.


Please rate the helpfulness of this tip.

Click on a star to rate it!

… for Apple Final Cut Pro X

Tip #1392: A Quick 3D Rotation

Larry Jordan – LarryJordan.com

Flipped supports rotating on either the X or Y axis in Final Cut.

The Flipped effect settings.

Topic $TipTopic

There is a hidden setting in the Flipped effect that makes it even more useful.

Apply Effects Browser > Distortion > Flipped to a clip.

This flips a clip either horizontally (the default), vertically or both.

However, the Amount slider rotates a clip from not flipped (Amount = 0) to fully flipped (Amount = 100).

What this means is that you can use the Flipped effect to rotate a clip on the X or Y axis in Final Cut, even though FCP does not directly support these rotations using the Transform settings in the Video Inspector.

Very cool.


Please rate the helpfulness of this tip.

Click on a star to rate it!

… for Apple Final Cut Pro X

Tip #1391: Interesting Facts About Audio Meters

Larry Jordan – LarryJordan.com

Excessive audio levels are only a problem when you export a project.

The audio meters in Final Cut Pro, with the right channel exceeding 0 dB.

Topic $TipTopic

Most of us know that the audio meters measure the volume of our sound. But here are some facts you may not know.

  • The green bars measure “peak” audio levels, the instant-by-instant volume (loudness) of each channel of audio.
  • The audio meters measure audio on a scale called “dBFS” (deciBels Full Scale)
  • The horizontal bar above the green is the peak hold indicator. This displays the loudest the audio has been for the last five seconds, or until the audio loudness exceeds the level it is currently displaying.
  • Because the green bars bounce so much, the peak hold indicator makes it easy to see exactly how loud your audio peaks are.
  • To avoid distortion, which is a scratchy, blatty noise in your audio, it is essential to keep all peaks below 0 dB.

NOTE: 0 dB is the loudest your audio can be without causing distortion.

  • If the audio goes over 0 dB, the red indicator glows (see the screen shot) indicating a distortion condition, the affected channel and how many dB too loud the audio is.
  • As long as you haven’t exported your file, no damage is done to your audio; just bring the audio levels down. If the audio is exported, the distortion is permanent. The only way to get rid of it is to adjust audio levels, then reexport the project.

EXTRA CREDIT

Know why audio meters are marked in 6 dB increments? The answer is that when levels change by ±6 dB, the perceived volume of the sound is doubled (+6 dB) or cut in half (-6 dB).

For this reason, all audio meters are marked in 6 dB increments.


Please rate the helpfulness of this tip.

Click on a star to rate it!

… for Random Weirdness

Tip #1379: Keys to Success from an Executive Producer

Larry Jordan – LarryJordan.com

Be prepared, build relationships and leave your ego at the door.

Image courtesy of PremiumBeat.com.

Topic $TipTopic

This article, written by Tanya Jones, first appeared in PremiumBeat.com. This is a summary.

From being prepared to checking your ego, here are a few industry lessons from an executive producer to help you stand out and always make the cut.

Be Prepared for Things to go Wrong and Be Ready to Fix Them. Be ready to think of all possibilities and ask your team to weigh in. You don’t have to come up with the exact solution, but you have to take the lead and gather the players to solve it. You must exercise the maturity and ability to stay calm and keep everyone else calm. Timing is key, as well. Move fast and think on your feet.

Be Likable, Smart, and Have a Good Attitude. My motto has always been this, “It’s not who you know, it’s who you know and how much they like you.” Relationships really matter!

Always Be a Student. You don’t have to master every skill. Just listen and make an effort to understand why every piece matters in the story. How we tell stories and how we deliver stories is changing all the time. Be the first to see how content is changing and why platforms and services are making money.

Know the Audience. It’s important to understand the why. We can’t just tell stories without a vision in mind to lock viewers in. Understand how the content pulls in the audience and the dollars, especially if you want to pitch your own piece of work.

Check Your Ego at the Door. Don’t allow insecurities or fear to take priority over getting the job done. Always try to play well with everyone in the sandbox. Be mindful of your tone and how you speak to folks.

Your Job Isn’t Who You Are. No matter what celebs you work with or how hot your show scores in the ratings, these jobs aren’t our identities.


Please rate the helpfulness of this tip.

Click on a star to rate it!

… for Random Weirdness

Tip #1378: Faster Ways to Edit Audio Files

Larry Jordan – LarryJordan.com

Editing sound bites using text transcripts is faster and more accurate.

Philip Hodgetts (Left) and Dr. Greg Clarke, co-founders of Lumberjack System.

Topic $TipTopic

The big problem with editing a documentary is the VAST amount of material you need to sift through. Or, perhaps you are a podcaster or creating oral history projects. You have the same problem – tracking your content across an almost unlimited number of files. There’s only so much you can keep in your head.

The team at Lumberjack System has created a tutorial on some dynamic features in Lumberjack that can improve your editing and speed finding the right clip. For example, live logging to help you get organized by combining Builder NLE with Premiere or Final Cut, etc.

The key is using Builder NLE. This allows you to put together an entire project from transcripts to finished audio file. There are tools for trimming and fine-tuning an edit within Builder’s Story mode, and it would be entirely feasible (and frankly quite feasible) to finish an audio-only project there.

However, they recommend assembling the story (or “Radio Cut” as they call it) in Builder NLE and then use the many trimming tools available in Final Cut Pro X, or Premiere Pro to make your edits.

Learn more.


Please rate the helpfulness of this tip.

Click on a star to rate it!

… for Random Weirdness

Tip #1374: Unions Approve Resuming Production

Larry Jordan – LarryJordan.com

Media production resumes in Los Angeles – with strict safety protocols.

The SAG-AFTRA Logo

Topic $TipTopic

SAG-AFTRA, the Producers Guild of America and JPC, a bargaining group that represents commercial advertisers and advertising agencies, agreed to resume media production in Southern California effective Feb. 1, 2021, consistent with the expiration of the pause recommendation by the Los Angeles County Department of Public Health.

Learn more about the agreement.

“While commercial and independent production may return to Southern California at this time, the parties maintain that film and television productions must abide by the industry-issued COVID-safety protocols and will continue to monitor and consider orders or recommendations issued by the Public Health Department,” the groups said in a statement.

NOTE: The pandemic caused the lowest number of production days in Los Angeles in 25 years, down 48% from 2019.

The Producers Guild of America’s (PGA) Production Safety Task Force published a comprehensive safety guide for producers as they go back to work titled “COVID Safety Protocols for Producing Independent Productions.” These guidelines offer a comprehensive and detailed recommendation of the steps independent producers should take to help secure the safety of cast and crew during the COVID-19 pandemic.

Learn more about the safety protocols.


Please rate the helpfulness of this tip.

Click on a star to rate it!

… for Apple Motion

Tip #1382: Playing With Gradients

Larry Jordan – LarryJordan.com

Gradients can create the illusion of depth and/or roundness.

The Shape settings needed to create the 3D ball shape.

Topic $TipTopic

This tip started with me wondering: “Um, what happens if I change this?”

I started by drawing a circle.

  • In Inspector > Shape > Style, I switched the color fill from Color to Gradient.
  • Twirl down the Gradient triangle (to the left of the name) to reveal a whole flock of additional controls.
  • Set Type to Radial.
  • Change the Start and End positions to move the highlight off center.
  • Boost feathering a little bit to make the ball seem a bit more rounded.

Ta-DAH! A shape that looks a LOT more like a 3D ball than a simple 2D circle.

NOTE: Gradients which have only two colors work the best for this. Feel free to experiment with changing colors and see what looks best for you.

EXTRA CREDIT

You can keyframe the Start and End positions to make it look like the lighting around the ball is moving.


Please rate the helpfulness of this tip.

Click on a star to rate it!

… for Apple Motion

Tip #1381: Precisely Control the Position of Anything

Larry Jordan – LarryJordan.com

Control Points provide precise position control for selected elements.

The Control Points settings for the Motion Path behavior.

Topic $TipTopic

Most of the time, when we drag objects into position in Motion they look fine. But, sometimes, you need more precise control. The Inspector makes that possible.

For example, when applying the Motion Path behavior, you may need it to be perfectly vertical, or go to very precise pixel positions. This is easy to do.

  • Select the object or behavior in the Layers panel that you need to adjust.
  • Depending upon what you have selected, go to Inspector > Behaviors or Inspector > Shape.
  • In that panel, at the bottom, you’ll find an option titled Control Points.
  • Twirl it down to see a list of all controls points needed to define or configure that object or behavior.
  • The left number sets the X position, the middle number sets the Y and the right number sets the Z. (If there are only two numbers, they represent the X and Y, with the X value on the left.)

NOTE: For horizontal objects or moves, the Y position should match. For vertical elements, the X positions should match.

Remember, the 0,0 position is the center of the frame, for movement, or the center of an element, for objects.


Please rate the helpfulness of this tip.

Click on a star to rate it!