… for Visual Effects

Tip #1511: Adobe Super Resolution for Low-Res Images

Larry Jordan – LarryJordan.com

Super Resolution breathes new life into old images.

Bicubic resampling vs Super Resolution CREDIT: Adobe

Topic $TipTopic

This article, written by James DeRuvo, first appeared in NoFilmSchool.com. This is a summary.

Adobe got an idea on how to harness artificial intelligence to boost the resolution of old, smaller-resolution images and breathe new life into them. It’s called Super Resolution, and the results are pretty impressive.

Using machine learning to analyze millions of sample photographs, Adobe’s Super Resolution can enlarge photos without jagged edges or lost details. The result is that Super Resolution can take an image that has, say, 6 megapixels, and make it look like it came from a 100-megapixel image sensor. And it can do it with a simple touch of a button.

Another benefit is that Super Resolution can bring details to an image shot from too far away, cropping into the image and expanding the image, revealing details that would normally be lost when attempting to blow them up.

All that technical know-how translates into being able to convert a shot from an early generation digital camera, and upscale the resolution with fairly decent results, about double the linear resolution of the original image quality. If you do the math for both height and weight, that equates to four times the resolution. Super Resolution also saves the image in Raw DNG, so that all those details are preserved and can then be adjusted.

Super Resolution is currently limited to 65,000 pixels on the long side with 500 megapixels total, and it’s available right now with the latest version of Adobe Raw.

EXTRA CREDIT

Here’s an Adobe blog with more details.


Please rate the helpfulness of this tip.

Click on a star to rate it!

… for Codecs & Media

Tip #1507: Enable Hardware Acceleration in AME

Larry Jordan – LarryJordan.com

Hardware acceleration for 10-bit HEVC is possible – but requires a very recent computer.

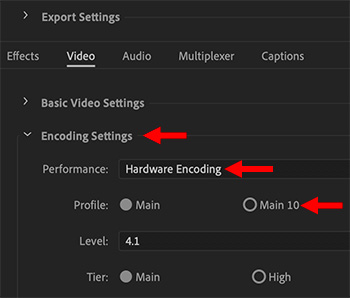
Hardware acceleration settings for HEVC in Adobe Media Encoder.

Topic $TipTopic

Adobe Media Encoder (AME) takes advantage of hardware acceleration for compression that is built into recent Macs. Here’s how to turn it on.

HEVC hardware acceleration for 8-bit media requires a relatively recent Mac. (My 2017 iMac supports accelerating 8-bit, but not 10-bit.) However, HEVC hardware acceleration for 10-bit media, which is required for HDR files, requires a Mac with either a T2 or M1 chip.

NOTE: The T2 chip first appeared in 2018 in MacBooks and 2019 in iMacs.

Assuming you have the right chips in your computer, hardware encoding is enabled in AME via compression settings.

  • Search for an existing HEVC compression setting (it’s in the System Presets > Broadcast category) or create your own using MPEG-4 as the root.
  • In the Export Settings panel (top red arrow):
  • Set Performance to Hardware Encoding
  • Set Profiles to Main for 8-bit video, or Main 10 for 10-bit video.

NOTE: My computer doesn’t support hardware acceleration, which is why Main 10 isn’t selected in the screen shot.

And that’s it. Hardware acceleration will speed encoding anywhere from 10X to 30X.


Please rate the helpfulness of this tip.

Click on a star to rate it!

… for Codecs & Media

Tip #1506: M1 Macs Accelerate 10-bit HEVC Compression

Larry Jordan – LarryJordan.com

HDR requires 10-bit codecs and hardware acceleration.

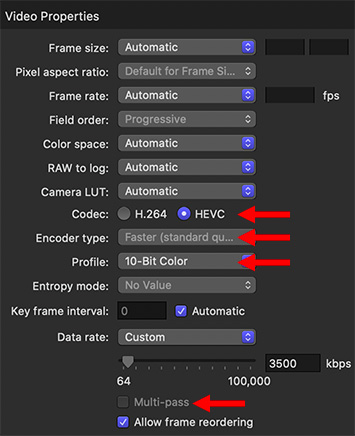
Key settings in Apple Compressor to enable hardware-accelerated HEVC 10-bit compression.

Topic $TipTopic

I spent this last week learning more about the media capabilities of the M1 Mac.

The new M1 chip from Apple (part of the three new Macs launched last week) can accelerate encoding H.264, 8-bit HEVC, and 10-bit HEVC using hardware. This vastly speeds compression of these codecs.

NOTE: HDR media requires using a 10-bit codec, which is why compressing 10-bit HEVC quickly is important.

To enable 10-bit compression in Apple Compressor:

  • Create a new setting using the MPEG-4 category.
  • Change Codec to HEVC (top red arrow)
  • Set Encoder Type to Faster (this enables hardware acceleration)
  • Set Profile to 10-bit (this is bit-depth is required for HDR.
  • Be sure Multi-pass is disabled (Multi-pass disables hardware acceleration)

NOTE: Hardware acceleration for 10-bit HEVC is also possible for any Mac that has a T-2 chip.

EXTRA CREDIT

Here’s a tutorial on configuring an M1 Mac for video editing.


Please rate the helpfulness of this tip.

Click on a star to rate it!

… for Adobe Premiere Pro CC

Tip #1505: New Feature: Faster Warp Stabilizer

Larry Jordan – LarryJordan.com

The actual stabilization is the same, what’s faster is the analysis.

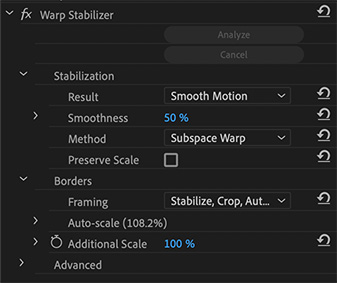
Warp Stabilizer controls in the Effect Panel of Premiere Pro.

Topic $TipTopic

One of the new features in the 2021 update to Premiere Pro is a faster Warp Stabilizer. Here’s what you need to know.

According to Adobe’s release notes:

[We have] “dramatically improved the time it takes to analyze shaky footage while leaving the actual stabilization process unchanged.  The result is that the quality of the stabilization is as good as before – just way faster.”

My guess is that what Adobe has done is move the analysis off the CPU and onto the GPU, which is much faster at analyzing bitmapped media files.

EXTRA CREDIT

Adobe notes: “The Warp Stabilizer effect in Premiere Pro requires that the clip dimensions match the sequence settings. If the clip does not match the sequence settings, you can nest the clip, and then apply the Warp Stabilizer effect to the nest.”

Here’s a link to more details on using the Warp Stabilizer


Please rate the helpfulness of this tip.

Click on a star to rate it!

… for Adobe Premiere Pro CC

Tip #1504: New Feature: Media Replacement

Larry Jordan – LarryJordan.com

This trick is to use the Essential Graphics panel to replace media.

Replacing media in the Essentials Graphics panel.

Topic $TipTopic

The new replaceable media feature in Motion Graphic templates (.mogrt) created in After Effects for use in Premiere Pro is very cool – and easy to use. Once you know one trick. And that trick is HOW to replace the media.

Let me show you.

  • Switch to the Graphics workspace.
  • Using the Browser feature in the Essential Graphics panel, find the template you want to use and drag it into the timeline.
  • Select the template in the Timeline, then click the Edit button in the Essential Graphics panel.
  • Twirl down MEDIA REPLACEMENT, then twirl down Media Replacement (yup, it’s listed twice) until you see the placeholder graphic.
  • Drag the image you want to insert from the Project/Bin panel on top of the placeholder graphic in the Essential Graphics panel.
  • To change the starting time of the inserted video, change the timecode setting for the In, below the image. (Not illustrated in screen shot.)

EXTRA CREDIT

  • This will need plenty of time to render.
  • You can change the image at any time by dragging a different image on top of the placeholder.
  • Trying to change graphics in the Effect Controls panel won’t work.
  • For those that know Apple Motion, this feature is the same as using Drop Zones in Motion.

Please rate the helpfulness of this tip.

Click on a star to rate it!

… for Codecs & Media

Tip #1502: Media Encoder Supports More Codecs

Larry Jordan – LarryJordan.com

Adobe continues to increase its support for HDR.

Topic $TipTopic

With the release of the 2021 update to Adobe Media Encoder, AME now supports more codecs.

Specifically, AME added support for:

  • ARRI Alexa Mini LF (ARRIRAW) footage Adobe Media Encoder now offers a comprehensive, cross-platform (Windows and macOS) solution for workflows, from camera media through to delivery.

Here’s a link to all of AME’s supported codecs.

In January, Adobe took another step in its move to support HDR media more extensively throughout all its applications. The default working color space and Gamma curve has been modified for all RED files.

File type Default working space in older versions of Adobe Media Encoder Default working space in Adobe Media Encoder version 14.8 and later
Red files Color space: Rec 709 Color space: RedWideGamutRGB
Gamma curve- BT.1886 Gamma curve: Log3G10
Komodo files Color space: Rec 709 Color space: RedWideGamutRGB
Gamma curve- Log3G10 Gamma curve: Log3G10

NOTE: All old projects continue to have the previous settings and are not impacted by this change. You can choose to change the colour space and Gamma space as per your requirements.


Please rate the helpfulness of this tip.

Click on a star to rate it!

… for Adobe Premiere Pro CC

Tip #1496: Caption Formats Supported by Premiere Pro

Larry Jordan – LarryJordan.com

All these options exist because there is no single preferred standard.

Topic $TipTopic

The reason there are so many caption formats is that every distributor has a different preference. Here’s a list of the caption formats supported by the 2021 release of Adobe Premiere Pro (v. 15.0.0):

  • SCC
  • MCC
  • XML
    • DFXP (W3C TTML)
    • SMPTE-TT
    • EBU-TT
  • STL
  • SRT
  • DFXMP

Captions can only be embedded in these three pro video formats:

  • MXF OP1a
  • DNxHD
  • ProRes

EXTRA CREDIT

To illustrate the diversity of captions, here’s a link to an article showing which caption formats are preferred and supported by social media.


Please rate the helpfulness of this tip.

Click on a star to rate it!

… for Apple Final Cut Pro X

Tip #1500: Detached vs. Expanded Audio in FCP

Larry Jordan – LarryJordan.com

The big difference between these two is sync.

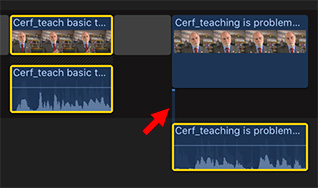
Expanded audio (left) vs. detached audio.

Topic $TipTopic

What’s the difference between “expanded” vs. “detached” audio, and does it make a difference? To answer the second question first: Yes, it makes a big difference.

EXPANDED AUDIO

Double-click the audio for a synced clip (or, select the clip and choose Clip > Expand Audio). This slightly separates the audio from the video without unlinking it; but leaves both clips in the Primary Storyline.

  • When you select either the video or the audio, the entire clip is selected.
  • When you move one side of the clip, the other side moves with it. You can’t get an expanded clip out of sync.
  • What you CAN do, however, is trim each side of the clip differently, which is the essence of a split edit.

NOTE: When you expand an audio clip, there is no connecting line between the audio and video clips.

DETACHED AUDIO

Select a synced clip and choose Clip > Detach audio. The audio separates into a discreet clip, connected via a link to the video clip (see screen shot). This separates the two clips and moves the audio out of the Primary Storyline and turns it into a Connected clip.

A detached audio clip can be selected, moved, deleted, or trimmed without affecting the video clip.

HOWEVER, if a detached audio clip is moved, such that it is out of sync with the video clip, there is no indicator these two clips are out of sync and there is no way – short of Undo – to get the two clips back into sync.

SUMMARY

If you need a standalone audio clip, detach it.

If you need a clip to remain in sync with the video, expand it.


Please rate the helpfulness of this tip.

Click on a star to rate it!

… for Apple Final Cut Pro X

Tip #1498: Fixing a Zoom Audio Problem

Patrick Flaherty

Zoom can cause audio drop out. Here’s a quick fix.

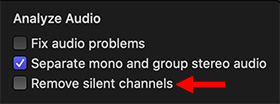
Analyze Audio options in the Media Import window.

Topic $TipTopic

Patrick Flaherty shared this tip.

Larry, I’ve been editing videos of interviews that were done on Zoom. I found that because of either buffering or digital drop out, I’m not sure what causes it, but some of the audio disappears, it gives me a small loss. i

I found that when I changed the import preferences by unchecking the Remove Silent Channels it imported without a problem.

Larry replies: Patrick, I’m not sure why this drop-out is occurring, but this is a great tip to help us fix it when it does. Thanks!

You’ll find this option in two places in Final Cut Pro:

  • Preferences > Import
  • Media Import window > Analyze Audio settings on the far right side.

Please rate the helpfulness of this tip.

Click on a star to rate it!

… for Apple Final Cut Pro X

Tip #1497: Edit Using 3-4 Monitors on an M1 Mac

Rick Dupea

Multi-monitor editing is possible even on “low-end” M1 systems.

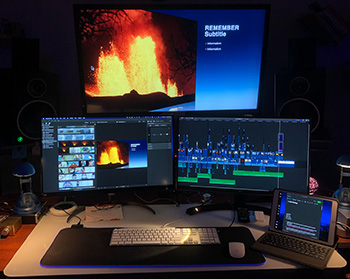
Rick Dupea’s Final Cut Pro four monitor setup. (Courtesy: Rick Dupea.)

Topic $TipTopic

I’ve been running my Final Cut M1 edit station for two weeks now with four monitors. No it isn’t impossible, but it is a little convoluted and there are some glitches. For me the trade offs are worth it for the extra screen real estate.

In my system I am using the HDMI port to drive a large 1080P program monitor, and one USB3 port to drive a StarTech USB to Dual Display Port converter. This feeds two 27′ 4k monitors. The fourth monitor is actually my 2020 iPad running Sidecar on USB.

I have full access to monitor arrangement, placing the menu bar, and color calibration. The iPad is responsive with no lag. The only downsides so far have been that the HDMI monitor will forget its desktop picture on login, and the StarTech sometimes needs to be disconnected and reconnected to wake the 4k monitors from sleep.

I also was able to get a 4th HDMI monitor running off Airplay on a 3rd gen Apple TV, instead of Sidecar, but this would crash FCPX. All other apps seemed to work fine.


Please rate the helpfulness of this tip.

Click on a star to rate it!