… for Random Weirdness

Tip #1489: 3 Stories About Optics, Sight & Lenses

Larry Jordan – LarryJordan.com

Lenses do far more than simply “capture” light.

Detail from “Impression”: sunrise (1872) by Claude Monet, Museé Marmottan Monet, Paris, France.

Topic $TipTopic

Zeiss recently launched a new website called: Zeiss Stories. These profile all the different ways that lenses are changing modern life – and helping us reconstruct the past — LINK

Here are three stories you might like:

The First Lady of OpticsLINK

Women have faced a glass ceiling in many fields, but the glass ceiling in glasses may have been the toughest to break through. During the first half of the twentieth century, only one woman managed to overcome the obstacles and rise to the top in the field of eyewear lens design, Dr. Estelle Glancy (1883-1975). Glancy’s brilliance in mathematics and lab skills helped create some of the significant advance in vision correction of the 1920s. This includes the design of progressive lenses as early as in the 1920s.

Imagine an African American John WayneLINK

American photographer Rory Doyle has been documenting the life of African American cowboys and cowgirls in the Mississippi delta since 2017. With his series “Delta Hill Riders” he won this year’s ZEISS Photography Award themed “Seeing Beyond – The Unexpected”. Doyle’s photos astound with an unexpected reassessment of the American cowboy myth – and break with stereotypes that still distort the public image of Afro-American culture. An interview.
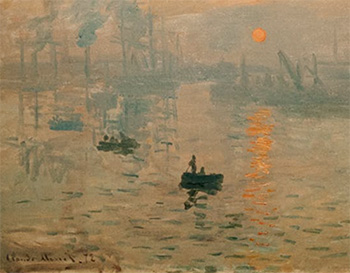
More Than a Pair of GlassesLINK

Claude Monet was the poster child for impressionism. But the French artist initially lacked both fame and a steady income. In the winter of his artistic career, he even had to contend with cataracts. But he never gave up on painting the world as he saw it – until he almost went blind, in fact. Finally, it was a pair of glasses with ZEISS lenses that helped him see the world in color once more.


Please rate the helpfulness of this tip.

Click on a star to rate it!

… for Random Weirdness

Tip #1488: Totally Off-the-Wall Fun Fact

Larry Jordan – LarryJordan.com

Camera lenses are also vital in the life sciences.

Image courtesy of Zeiss.com.

Topic $TipTopic

As I was researching this week’s tips, I came across the following from Zeiss.com:

To image a human brain with a microscope requires about 3 BILLION TERABYTES of storage!

And we’re worried about expanding frame sizes…?


Please rate the helpfulness of this tip.

Click on a star to rate it!

… for Random Weirdness

Tip #1487: 8 Filmmaking Lessons from “Mission: Impossile”

Larry Jordan – LarryJordan.com

8 Ways to Improve Your Story-telling

Tom Cruise, Mission: Impossible. Credit: Paramount Pictures

Topic $TipTopic

This article, written by Jason Hellerman, first appeared in NoFilmSchool.com. This is a summary.

Perhaps my favorite film franchise of all time is Mission: Impossible. There are lots of amazing lessons to learn from [this first film], but today we will focus on eight of them.

  1. Embrace canted angles. When it comes time to do your movie, think about shaking up the camera angles from the boring norm.
  2. Set pieces must be memorable. One of the best things about the first Mission: Impossible is that it set the standard for set pieces. When you set out to make your movie, think about how the set pieces stand out.
  3. Write yourself into a corner. When you write your story, get the character to a place where you have no idea how to get them out of it… and then get them out of it.
  4. Stars still have power. In this era, we think about the faces that can sell movies. If you are trying to sell [your film] to studios, consider packaging with a star. Or at least someone with a face that has star power.
  5. Practical effects hold up. When in doubt, do your effects practically. They will stand the test of time.
  6. You don’t owe the original anything. When you are adapting an idea, you do not owe anything to the original. You owe the audience the best story you can muster. Focus on that, always.
  7. Collaboration is key. [This] first movie really was a collaboration between the star, director, writers, and the studio. Everyone had their own agendas going into this movie. [Still,] everyone acted like professionals and made appropriate concessions for the vision [of the film].
  8. Know when you’ve had enough. Mission: Impossible became a very successful series of films, but Brian De Palma only directed one of the installments. In an interview with AP News, De Palma said sequels were about money, and he wasn’t in it for that. Is there a lesson here for you? Choose your projects with your heart, not your wallet.

EXTRA CREDIT

The original article includes more details and multiple videos illustrating these points.


Please rate the helpfulness of this tip.

Click on a star to rate it!

… for Apple Motion

Tip #1483: Quick Lighting Trick

Larry Jordan – LarryJordan.com

A 3D Object (Lounge Chair) lit with a single Point light in the top left corner.

Topic $TipTopic

Here’s a quick lighting trick to add visual interest to 3D text or 3D objects: Add a light.

The default light is “Ambient.” This means equal light from all directions. It makes everything visible, but there’s very limited modeling.

Instead, add a 3D element (object or text):

  • Select the object and turn off Environmental Lighting in the Inspector. (Don’t panic if everything goes black.!)
  • Choose Object > New Light (an alternative is to use Object > New Light Group).
  • Select the light element in the Layers panel.
  • In Inspector > Light, change the Light Type to either Point (used in the screen shot) or Directional. Then change either the position (Point) or rotation (Directional) for the light.
  • Keep moving the light until you get a more interesting visual look.

EXTRA CREDIT

Adding lights does not also require adding a camera. Point lights can only be moved, while Directional lights can only be rotated.

You can also use lights for 2D elements, like video, but it won’t be as effective.


Please rate the helpfulness of this tip.

Click on a star to rate it!

… for Apple Motion

Tip #1466: 10 Motion Shortcuts I Wish I Knew Earlier

Larry Jordan – LarryJordan.com

Of these, moving elements up and down are SO helpful!

The Apple Motion logo.

Topic $TipTopic

Over the last four weeks, I presented a series of four webinars on Apple Motion. During that time, there were several features in Motion that I thought could only be done with a mouse. And it drove me nuts, because I kept wanting “a better way!”

There was. And, naturally, I found it AFTER my webinar series was complete. Sigh…

Here are ten keyboard shortcuts that make Motion a whole lot easier to use – and ones I wish I knew a month ago. These all apply to the Layers panel.

Shortcut What It Does
Shift + Cmd + N Create a new group
Cmd + ] Raise the selected element or group up one level
Cmd + [ Lower the selected elements or group down one level
Shift + Cmd + G Place selected Layers panel elements into a new group
Shift + F Display the selected element in the Media panel
Control + L Lock or unlock an element
Control + D Toggle a group between 2D and 3D
Control + T Make selected element visible or invisible
Control + S Solo the selected elements
Up/Down Arrow Move selection up ordown in the Layers panel

The shortcuts to move elements and groups up and down are the ones I’ve needed for a long time.


Please rate the helpfulness of this tip.

Click on a star to rate it!

… for Apple Motion

Tip #1463: Canvas View Options


My two favorite display options are: Active Camera and Top.

The Active Camera display options.

Topic $TipTopic Adding a light or camera to Motion also requires that you switch into 3D. When that happens, a new menu appears in the top left corner of the Canvas. Here’s what the options inside the Active Camera menu mean.

NOTE: These options change the Canvas display. They do not modify your project.

Quoting the Apple Help files:

When you choose Active Camera from the pop-up menu, the topmost camera in the Layers list at the current playhead position (in the Timeline) becomes the active camera. The active camera is the camera through which you view your project in the canvas. It’s also the camera view that’s rendered when you export your project. If a project contains only one scene camera (as shown above), two items appear at the top of this pop-up menu: Active Camera and Camera, which represent the same camera.

If a project contains more than one scene camera, all scene cameras appear at the top of the Camera pop-up menu, under the Active Camera item. To make a different scene camera the active camera, choose a different camera from the top section of the pop-up menu. (Scene cameras listed in this section of the Camera pop-up menu appear in the same order as they do in the Layers list.)


The middle section (Perspective) displays the scene from seven different orthagonal perspectives. These are easier to see in action than to describe.


The bottom section of the Camera pop-up menu allows access to five frequently used commands:

  • Reset View: Resets the camera view to its default orientation. (Control + R)
  • Select Active Camera: Selects the active camera in the project—the topmost camera in the Layers list that is visible at the current frame (when there are multiple cameras existing at the same frame in time). (Control + Option + C)
  • Fit Objects Into View: Reframes the current camera to fit the selected objects into the canvas. (F)
  • Frame Object: Frames the selected objects in the active view. If no objects are selected, Frame Object resets the reference camera to view all objects in the scene. (Shift + Command + F)
  • Focus On Object: Used when a camera has depth of field turned on. Adjusts the camera’s Focus Offset to the selected object. (Control + F)

Please rate the helpfulness of this tip.

Click on a star to rate it!

… for Visual Effects

Tip #1486: 53 After Effects Tutorials – FREE

Larry Jordan – LarryJordan.com

53 tutorials, organized by experience level, and all free.

Image courtesy of Sergiy Maidukov and Creative Bloq.

Topic $TipTopic

Creative Bloq has collected 53 free After Effects video tutorials covering motion graphics – from beginner to expert – and organized them on their website.

Author Tom May writes: “Adobe After Effects is the industry-standard software, used by most VFX, 3D and motion graphics artists, as well as animators. Its vast feature-set includes capability for creating everything from simple titles to full 3D stereo compositing. Since there are so many tutorials out there, we’ve put the best ones in one place (here), which will save you time and effort searching out the ones you need. Plus, we’ve grouped them together in sections so you have no trouble finding what you’re looking for.

“You might want to get started by familiarising yourself with the interface or basic features, or perhaps you’re yearning to understand techniques like text write-on, custom transitions and warp stabilisation. Or if you’re more advanced user, you might need projects like rotoscoping nature footage or mocking up AR effects. We’ve found tutorials for all these goals, and more.”

Tutorials are organized by experience level:

  • Beginner: Get started with AE
  • Beginner: Build your skills
  • Intermediate: Use AE tools
  • Intermediate: Connect other apps
  • Intermediate: Create effects
  • Advanced: After Effects projects

Here’s the link. This includes descriptions, links and demos.


Please rate the helpfulness of this tip.

Click on a star to rate it!

… for Visual Effects

Tip #1485: 5 Resources for Color Palettes

Larry Jordan – LarryJordan.com

Picking the right colors from 16 million just got easier.

A sample set of palettes from Adobe Color CC.

Topic $TipTopic

This article first appeared in MotionArray.com. This is a summary.

When you open the color picker on your favorite piece of software, you are hit with what seems like an unlimited number of options. To be exact, there are 16,777,216 hex code color options to choose from. Which you gonna pick?

Fortunately, there are lots of great online resources for finding and creating your own color palettes. When it comes time for your next color palette, check out these sites first.

  • Adobe Color CC. A great place to start is with Adobe’s color tool. Some of you may have used it when it was called Kuler. Adobe has since updated the name to match the rest of the CC branding. The Adobe Color CC “Create” tool uses fundamental color theory principles to help you build palettes with up to 5 colors. You simply pick a base color from the color wheel, and you’ll be given a harmonious “analogous” palette.
  • Coolors. Coolors is another palette generator similar to Adobe Color but with a different look and feel. When you visit the site, you simply hit “Start The Generator” to load a random color palette. Palette colors are presented in large strips across the screen that can be dragged into different orders, and each has its own set of controls for shifting the individual color. You can even see the values for HSB, RGB, CMYK, PMS, and COPIC.
  • Paletton. One more generator to take a look at is Paletton. Their layout is a little more similar to Adobe Color CC than Coolor’s. The Paletton color wheel gives you the choice of working with 1, 2, 3, or 4 colors evenly spaced on the color wheel. You can then rotate around the wheel adjusting all of the colors at once. You can adjust the angle between the color choices within the wheel, or adjust the hue variances along the wheel axis.
  • Colourlovers. Colourlovers is an entire community built around appreciating colors and recognizing trends in color usage. There are loads and loads of pre-made palettes to choose from, created by Colourlovers users. And palettes can be browsed in a number of ways including shapes, patterns, and individual color swatches.
  • Color Hunt. Color Hunt is the simplest of the resources on the list, but a great way to get inspired or just stumble across the perfect palette for your next project. You can browse through the newest selected palettes or sort by the most popular, and upon clicking a palette, you’ll see it used in a variety of ways like in a ring and on a map. There is no export function, so you’ll just want to copy the hex codes for a palette you like or take a screenshot.

EXTRA CREDIT

The MotionArray article contains video demos of each service, along with links and more details.


Please rate the helpfulness of this tip.

Click on a star to rate it!

… for Visual Effects

Tip #1484: No One Said Visual Effects Are Easy

Larry Jordan – LarryJordan.com

Over 1,300 VFX shots – because the on-set practical effects didn’t work.

DNEG visited the HMS Belfast in London to get a sense of how the Fletcher-class destroyers were actually built and applied that knowledge to the CG versions. The sky was mapped out for the entire duration of the film’s journey across the Atlantic and determined the light source for each shot. (Images courtesy of DNEG. Final image courtesy of Apple)

Topic $TipTopic

“Greyhound,” written by and starring Tom Hanks, is a World War II seafaring adventure of a destroyer escorting a convoy of 37 ships across the North Atlantic.

While there were a lot of practical effects used during the shoot, most of them didn’t work well. This meant they needed to be replaced digitally during post over the course of six months.

“The interiors and a lot of the exterior immediate deck [of the Greyhound] were shot on an actual Fletcher-class destroyer [USS Kidd in Baton Rouge] but it was landlocked,” states VFX Producer Mike Chambers. “There was no motion or background to speak of. The bridge was built on a gimbal to try to help with the motion, but a lot of the practical stuff didn’t work as well as it needed to. That’s why we had to work over all of those shots.”

There were over 1,300 visual effects shots, with the water and exteriors being entirely CG. “One of the hardest parts is the motion of the ocean as well as the camera placement,” Visual Effect Supervisor Nathan McGuinness says.

Balancing readability and believability of what the lighting conditions would be like in the North Atlantic was hard. [Visual Effects house] DNEG had 10 Canon 5D cameras each placed upon an individual tripod which took time-lapse HDRs every 30 seconds to produce a 60K sky. “We put that on the top of the office in London and a team was sent to Brighton Beach to do the same thing because we needed a clean horizon,” explains Visual Effects Supervisor Pete Bebb. “It gave us the exact time, clouds, and light which were then offered to Nathan. He picked specific ones and that gave us an HDR map per scene and time of day.”

VFXVoice has a lengthy article about the entire post process. Here’s the link.


Please rate the helpfulness of this tip.

Click on a star to rate it!

… for Codecs & Media

Tip #1492: Shift to Digital Media Accelerating

Larry Jordan – LarryJordan.com

The world changes. Thought you’d like to know.

Average time US adults spent daily with media. (Courtesy: eMarketer/Axios)

Topic $TipTopic

As reported by Axios, the COVID-19 crisis drove digital media consumption to new heights, while traditional media stagnated, according to data from eMarketer.

What’s happening: Even before the pandemic, but especially after, time American adults spent on smartphones and smart TVs skyrocketed while time spent on devices like radio and linear television continued to decline.

Why it matters: Media companies that hadn’t already begun to realign their businesses around streaming and mobile were caught flat-footed by the pandemic’s digital boom. Those that did have been rewarded.

Driving the news: Disney said Tuesday that its streaming service Disney+ surpassed 100 million subscribers in just 16 months.

What to watch: eMarketer predicts that that these formats will claim even more daily media time going forward. Traditional TV, social media, tablets, and desktops/laptops will likely decrease in usage this year compared to 2020.

EXTRA CREDIT

Here’s the link.


Please rate the helpfulness of this tip.

Click on a star to rate it!