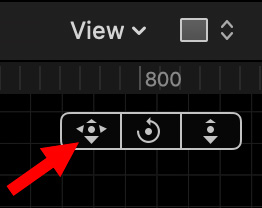
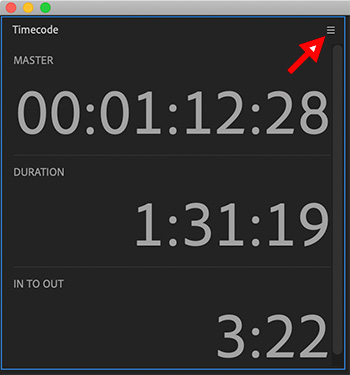
Once you add a camera to a Motion project, three new navigation controls appear in the top right corner of the Canvas (Viewer). Here’s what they do.
The three controls – indicated by the red arrow in the screen shot – are designed to be clicked and dragged with the mouse. In all cases, these shift the display in the Canvas, they do not change the composition of elements in the project.
From left to right:
Move the Canvas up/down/left right.
Rotate the Canvas on the Z axis. (This is the traditional way to rotate anything.)
Move view either closer or farther away, again, along the Z axis.
EXTRA CREDIT
Double-click any icon to reset the screen to the default 0,0,0 centered location.
You can experiment with these by adding a camera (Object > New Camera), switch the Canvas from Active Camera to, say, Top view then tweak one of these controls.
Please rate the helpfulness of this tip.
Click on a star to rate it!
https://www.theinsidetips.com/wp-content/uploads/2019/09/Tips-Logo-700x150.jpg00Larry Jordanhttps://www.theinsidetips.com/wp-content/uploads/2019/09/Tips-Logo-700x150.jpgLarry Jordan2021-03-04 01:30:002021-02-26 17:26:24Tip #1448: 3D Navigation Controls
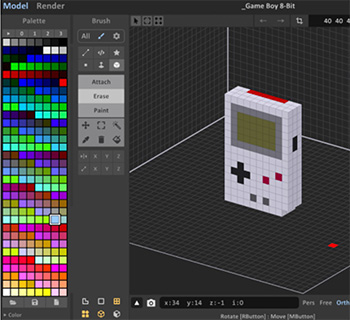
Voxel art is easy to learn, simple to create and very, very deep.
Image courtesy of PremiumBeat.com
This article, written by Charles Yeager, first appeared in PremiumBeat.com. This is a summary.
MagicaVoxel offers a GPU-based path-tracing renderer, which allows you to quickly create some beautiful renders.
The minimalistic beauty of voxel art is more popular than ever. It’s a fun medium between 2D pixel art and more realistic 3D creations. One of the most popular voxel art applications is MagicaVoxel, which is FREE for anyone to download and use.
The highlight of this article are several video tutorials illustrating how to install and use MagicaVoxel. This free utility for Mac and Windows allows you to create these stylized images.
The article also includes:
How to Download and Install MagicaVoxel
Voxel Art is Like Building With Legos
Render Options
Export Options
And a wide variety of tips, techniques and overall good ideas
Please rate the helpfulness of this tip.
Click on a star to rate it!
https://www.theinsidetips.com/wp-content/uploads/2019/09/Tips-Logo-700x150.jpg00Larry Jordanhttps://www.theinsidetips.com/wp-content/uploads/2019/09/Tips-Logo-700x150.jpgLarry Jordan2021-03-03 01:30:002021-03-03 01:30:00Tip #1462: Create 3D Voxel Art
Replacing a sky is a typical request even for smaller projects.
Image courtesy Motion Array.com
Replacing an undercast or overexposed sky is one of those techniques that, if your client sees you doing it once, they’ll want it every time! Luckily, there are plenty of tools built-in to DaVinci Resolve that make replacing a sky a breeze.
This article first appeared in MotionArray.com. This is a summary.
First up, there are multiple ways that this can be done. A composite like this can be achieved in the Cut, Edit, Color, and Fusion pages – and each toolset offers its own strengths and weaknesses. Today, we are going to use the Color page because it’s the most straightforward way to pull out the sky and draw a garbage matte around the buildings.
Here are the steps. The article provides step-by-step instructions, along with screen shots.
Step 1: Prepare Your Clips
Step 2: Key the Sky
Step 3: Place the Background
Step 4: Refine the Key with a Power Window
Step 5: Match the Elements with Color Correction
Step 6: Track an Object for the Sky
Step 7: Apply the Track Data to the New Sky
Now you know how to replace a sky in DaVinci Resolve using the Color page. What makes the Color page unique is that tools can easily be used in tandem. In our exercise we keyed the sky, refined the key with a Power Window as a Garbage Matte, and tracked the Garbage Matte – all in the same node.
In-camera effects are not the norm, but Christopher Nolan prefers them.
Where possible, director Christopher Nolan prefers in-camera effects.
This article, written by Kevin H. Martin, first appeared in VFXVoice.com. This is a summary.
“Even after reading the script four times, I was still working out the complexities of it,” Tenet Visual Effects Supervisor Andrew Jackson admits. “Tenet was a case of just when you think you’ve gotten things clear in your mind, then you catch yourself and realize, ‘Oh no!’ And so you’ve got to think a bit harder.”
Writer/Producer/Director Christopher Nolan’s return to technothriller territory a la Inception boasts James Bond-sized full-scale set pieces while not stinting on effects magic – though with the focus primarily on in-camera work. Editor Jennifer Lame estimates only 300 VFX shots in the whole picture, while director Nolan says the level of VFX – created at DNEG, which has worked on Nolan’s films since Batman Begins in 2005 – is less than what would be found in most romantic comedies.
Visual Effects Producer Mike Chambers began working with Nolan on Inception. “He’s very tech-savvy with all aspects of production, and sees VFX as just one tool in the toolbox. He has always been happy with DNEG and likes the idea of avoiding multiple vendors unless something unusual comes up. Organizing early on for a Nolan project starts with knowing the ideal is to get as much in-camera as possible, but then to plan alternate routes that can get us to where we need if in-camera approach doesn’t get us all the way.”
“When you break down a script for a Chris Nolan movie, it’s a different process than when you work on any other film,” he continues. “There are aspects that for anybody else, the default solution today would be to go CG, but that’s not necessarily the case with Chris – almost the opposite is true, which I find refreshing and exciting and really gives me and everyone in my crew a sense of challenge. In this day and age, there is so much effects being done as VFX is the go-to mindset, I couldn’t be in a better spot with a more willing boss than Chris when it comes to practicing my craft properly, getting the time to do all these tests and get things right for the camera.”
EXTRA CREDIT
The article includes much more detail, as well as production stills and links.
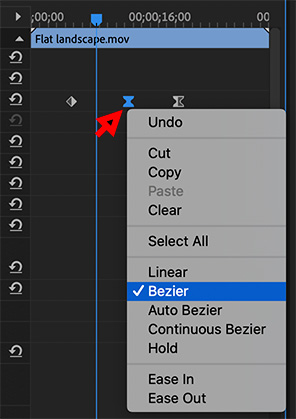
Control-click a keyframe to reveal the keyframe controls menu.
Control-click a keyframe to view the keyframe control menu in Effect Controls.
Most of the time, we add a keyframe and move on. But, hidden in the Effect Controls panel is a wide range of keyframe options that can add life to your visual effects.
After applying a keyframe to an effect, scroll to the right in the Effect Controls window and Control-click the keyframe you want to adjust.
The options in this menu support:
Copying and pasting keyframe settings
Adding curves to keyframes
Adding acceleration and deceleration to a keyframe
As you change settings the icon applied to the modified keyframe changes as well.
Please rate the helpfulness of this tip.
Click on a star to rate it!
https://www.theinsidetips.com/wp-content/uploads/2019/09/Tips-Logo-700x150.jpg00Larry Jordanhttps://www.theinsidetips.com/wp-content/uploads/2019/09/Tips-Logo-700x150.jpgLarry Jordan2021-03-02 01:30:002021-02-26 17:12:48Tip #1459: A Hidden Keyframe Menu
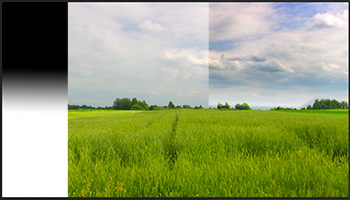
Gradients, combined with blend modes, can quickly create amazing looks.
The gradient (top), original image (center) and composite using Overlay blend mode.
Here’s a fast way to improve the look of a cloud-filled sky, using a simple gradient and a blend mode in Premiere.
Take a look at the middle image in the screen shot. It is an OK shot of the sky, but doesn’t have any “pop.”
Create a simple gradient in Photoshop, similar to the screen shot, that roughly corresponds to the position of the sky.
Stack the gradient above the clip with the sky in the timeline.
Apply Effect Controls > Opacity > Blend mode > Overlay to the gradient clip. This darkens the sky and brightens the foreground.
As you can see in the right side of the screen shot, the sky is a LOT more dramatic!
EXTRA CREDIT
If you don’t want the foreground brightened, either replace the white in the gradient with transparency, or use an Opacity mask to cut the gradient at the horizon line. (This was what we did here.)
WebM is a container format that uses VP8 or VP9 codecs for video and Vorbis or Opus codecs for audio. So, what are these audio codecs?
VORBIS
Developed by Xiph.org, Ogg Vorbis is a fully open, non-proprietary, patent-and-royalty-free, general-purpose compressed audio format for mid to high quality (8kHz-48.0kHz, 16+ bit, polyphonic) audio and music at fixed and variable bitrates from 16 to 128 kbps/channel. This places Vorbis in the same competitive class as audio representations such as MPEG-4 (AAC), and similar to, but higher performance than MPEG-1/2 audio layer 3, MPEG-4 audio (TwinVQ), WMA and PAC.
The bitstream format for Vorbis I was frozen Monday, May 8th 2000. All bitstreams encoded since will remain compatible with all future releases of Vorbis.
Developed by opus-codec.org, Opus is a totally open, royalty-free, highly versatile audio codec. Opus is unmatched for interactive speech and music transmission over the Internet, but is also intended for storage and streaming applications. It is standardized by the Internet Engineering Task Force (IETF) as RFC 6716 which incorporated technology from Skype’s SILK codec and Xiph.Org’s CELT codec.
https://www.theinsidetips.com/wp-content/uploads/2019/09/Tips-Logo-700x150.jpg00Larry Jordanhttps://www.theinsidetips.com/wp-content/uploads/2019/09/Tips-Logo-700x150.jpgLarry Jordan2021-03-02 01:30:002021-03-02 01:30:00Tip #1437: What are Vorbis or Opus Codecs?
According to reports on MacRumors and other sites, beta versions of macOS Big Sur 11.3 support playing WebM videos in Safari.
MacRumors reports: “In Safari, there’s support for WebM video playback, allowing users to play WebM videos using Apple’s browser. WebM is a niche video format designed to be a royalty-free alternative to the H.264 codec used in the MP4 format. WebM allows video files to remain small without sacrificing quality and can be played with little processing power, making it ideal for webpages and browsers.”
WebM was first released in 2010. Apple Safari was the lone holdout among major browsers in supporting this format. There’s no announced date for when macOS 11.3 will be released, nor any indication if WebM will be supported by Apple’s media applications.
https://www.theinsidetips.com/wp-content/uploads/2019/09/Tips-Logo-700x150.jpg00Larry Jordanhttps://www.theinsidetips.com/wp-content/uploads/2019/09/Tips-Logo-700x150.jpgLarry Jordan2021-03-02 01:30:002021-02-26 17:01:05Tip #1436: Safari to Support WebM on Macs
WebM is supported by Mozilla, Firefox, Opera, Google Chrome and, soon, Safari.
The WEbM logo
Developed and owned by Google, WebM is, according to the WebM website: “an open, royalty-free, media file format designed for the web. WebM defines the file container structure, video and audio formats. WebM files consist of video streams compressed with the VP8 or VP9 video codecs and audio streams compressed with the Vorbis or Opus audio codecs.”
Serving video on the web is different from traditional broadcast and offline mediums. Existing video formats were designed to serve the needs of these mediums and do it very well. WebM is focused on addressing the unique needs of serving video on the web.
Low computational footprint to enable playback on any device, including low-power netbooks, handhelds, tablets, etc.
Simple container format
Highest quality real-time video delivery
Click and encode. Minimal codec profiles and sub-options. When possible, let the encoder make the tough choices.
WebM has a sister project WebP for images. The development of the format is sponsored by Google, and the corresponding software is distributed under a BSD license. There is some dispute, however, if WebM is truly royalty-free.
According to Wikipedia, native WebM support by Mozilla Firefox, Opera, and Google Chrome was announced at the 2010 Google I/O conference. Internet Explorer 9 requires third-party WebM software. Safari for macOS, which relied on QuickTime to play web media until Safari 12. However, Safari in Big Sur 11.3 beta 2 has native support for WebM. While iOS does not natively play WebM, Android does.
VLC media player, MPlayer, K-Multimedia Player, JRiver Media Center and ffMPEG also support playing WebM files .
https://www.theinsidetips.com/wp-content/uploads/2019/09/Tips-Logo-700x150.jpg00Larry Jordanhttps://www.theinsidetips.com/wp-content/uploads/2019/09/Tips-Logo-700x150.jpgLarry Jordan2021-03-02 01:30:002021-02-26 17:02:48Tip #1435: What Is WebM
We may request cookies to be set on your device. We use cookies to let us know when you visit our websites, how you interact with us, to enrich your user experience, and to customize your relationship with our website.
Click on the different category headings to find out more. You can also change some of your preferences. Note that blocking some types of cookies may impact your experience on our websites and the services we are able to offer.
Essential Website Cookies
These cookies are strictly necessary to provide you with services available through our website and to use some of its features.
Because these cookies are strictly necessary to deliver the website, refuseing them will have impact how our site functions. You always can block or delete cookies by changing your browser settings and force blocking all cookies on this website. But this will always prompt you to accept/refuse cookies when revisiting our site.
We fully respect if you want to refuse cookies but to avoid asking you again and again kindly allow us to store a cookie for that. You are free to opt out any time or opt in for other cookies to get a better experience. If you refuse cookies we will remove all set cookies in our domain.
We provide you with a list of stored cookies on your computer in our domain so you can check what we stored. Due to security reasons we are not able to show or modify cookies from other domains. You can check these in your browser security settings.
Google Analytics Cookies
These cookies collect information that is used either in aggregate form to help us understand how our website is being used or how effective our marketing campaigns are, or to help us customize our website and application for you in order to enhance your experience.
If you do not want that we track your visit to our site you can disable tracking in your browser here:
Other external services
We also use different external services like Google Webfonts, Google Maps, and external Video providers. Since these providers may collect personal data like your IP address we allow you to block them here. Please be aware that this might heavily reduce the functionality and appearance of our site. Changes will take effect once you reload the page.
Google Webfont Settings:
Google Map Settings:
Google reCaptcha Settings:
Vimeo and Youtube video embeds:
Other cookies
The following cookies are also needed - You can choose if you want to allow them:
Privacy Policy
You can read about our cookies and privacy settings in detail on our Privacy Policy Page.