… for Adobe Premiere Pro CC

Tip #1571: Video Limiter Settings

Larry Jordan – LarryJordan.com

The Video Limiter keeps video levels legal.

Video Limiter settings in the Effect Controls panel.

Topic $TipTopic

This post was written by Simon Walker on the Adobe forums. Simon is based in London.

In my experience, Premiere Pro’s Video Limiter effect has proven very useful as a method to keep luma and chroma levels legal for broadcast.

Video Limiter is only really meant to catch stray illegal pixels, and isn’t a replacement for properly colour correcting the clips, which is the best method to manage luma and chroma levels. However, I do think there is a place for a legalising check, especially if you’re on a deadline, and I’ve seen it used successfully on time sensitive projects.

The trick to getting a good result out of Video Limiter is to set the Reduction Axis parameter to Chroma and Luma, rather than the default setting of Smart Limit. It’s also useful to apply the effect to an adjustment layer, set to the duration of the sequence. Video Limiter is a Mercury Playback accelerated effect, and therefore GPU enabled, so it won’t slow down playback or final output.

One thing that’s worth noting is that if you’re dealing with bright saturated colours the limiter can affect the final colour output, so be prepared to adjust the Chroma Max setting to compensate.

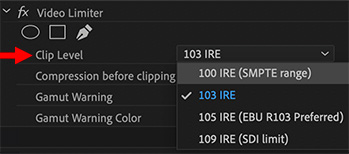
On sport productions I’ve been involved with, I’ve found that the Chroma Max default setting of +130% can display an RGB gamut error on the scopes, and reducing this to around 100% removes the error (which is one of the techniques we used at the World Cup in Rio last year). However it also can desaturate the brightest colors. Whilst this will give a reliable result in most cases, it’s important to keep an eye on those bright orange and red saturated colours which turn up on football shirts and racing cars (yes, I’m looking at you Netherlands and Ferrari).

EXTRA CREDIT

The Video Limiter filter is located in Effects > Video Effects > Color Correction > Video Limiter.

Here’s a tutorial on how this works.


Please rate the helpfulness of this tip.

Click on a star to rate it!

… for Adobe Premiere Pro CC

Tip #1569: A Wrench, or Two, in the Works

Larry Jordan – LarryJordan.com

These two wrenches provide custom text and graphic options.

Text engine wrench (top), graphics wrench (bottom).

Topic $TipTopic

In the Essential Graphics panel, part of the Graphics workspace, are two wrenches that you’ve probably overlooked.

The top wrench, about half-way down the panel, determines which text engine to use in aligning text.

Here is also where you can turn ligatures (blended glyphs like “fi” or “ff”) on or off. The default is on.

Lower in the panel is the graphics wrench. This determines how edges and corners meet.

Most of the time, the defaults are fine. But, when you need to change them, now you know now.


Please rate the helpfulness of this tip.

Click on a star to rate it!

… for Adobe Premiere Pro CC

Tip #1568: Adjust Title Gradient Edge Softness

Larry Jordan – LarryJordan.com

Double-click a color chip for a wealth of customization options.

Appearance color chip (top) the floating Color Picker window (bottom).

Topic $TipTopic

Philippa asks:

How do I adjust the edge softness of gradients in Premiere so they fade out, rather than use hard lines?

Many of the Motion Graphic templates have a “Shape” attached to them.

  • Add a template to the timeline and select it
  • Switch to the Graphics workspace
  • Select the Shape element at the top of the panel
  • Scroll down to the Appearance section where Fill is checked
  • Double-click the Fill color chip (top red arrow)

This opens the floating Color Picker window (see screen shot). The icons at the top of the color bar determine opacity, those at the bottom determine the colors in the gradient.

  • To add a new opacity setting, click above the line.
  • To remove an opacity setting, drag the opacity chip up.
  • To change an opacity setting, click it once, then change the Opacity values (lower red arrow)
  • To change where the opacity changes, select one of the opacity “chips,” then drag the small diamond (right red arrow).

Please rate the helpfulness of this tip.

Click on a star to rate it!

… for Apple Final Cut Pro X

Tip #1574: The Video Scope View Menu

Larry Jordan – LarryJordan.com

Pick the display options that work best for you.

The Video Scope View menu.

Topic $TipTopic

Looking at the Video Scopes in Final Cut reminds me of the small View menu in the top right corner of the scopes pane. Here’s a quick look at what this does.

The geometric shapes at the top (see screen shot) illustrate all the different ways to arrange the video scopes. My preference is the side-by-side option in the top right corner. I like seeing both the Vectorscope and Waveform Monitor at the same time.

  • Vertical Layout puts the scopes under the Viewer. While this is really cramped for a single monitor, it is often the best choice when using two monitors and displaying the Viewer on the second monitor.
  • Show Guides displays a thin white line as you hover the mouse over a video scope, allowing you to read pixel values as you move the cursor.
  • Monochrome removes all color display from the scopes, though it does not alter your media or timeline.
  • The slider, at the bottom, determines the brightness of the trace, that is the data from your video, in the video scope display.

Final Cut will remember these settings from one project to the next, until you change them.


Please rate the helpfulness of this tip.

Click on a star to rate it!

… for Apple Final Cut Pro X

Tip #1573: The Broadcast Safe Effect

Larry Jordan – LarryJordan.com

Broadcast Safe makes sure there are no illegal video levels in your project.

Settings for the Broadcast Safe effect.

Topic $TipTopic

The Broadcast Safe effect clamps video levels so that they do not exceed safe levels. (See Tip #1572.) This works, but there are limitations.

The Broadcast Safe filter is located in Effects browser > Color > Broadcast Safe. You apply it the same as any other effect.

NOTE: However, if you are applying other effects to the same clip, be sure that the Broadcast Safe filter is listed last. This prevents another filter from sending video levels into illegal levels after the Broadcast Safe effect is applied.

In the effect, select the color space of your project. For HD projects, select Rec. 709. For SD projects, choose one of the two Rec. 601 options. All HDR projects should use Rec. 2020.

For Rec. 601 or 709 footage, this clamps any video levels over 100% IRE to exactly 100%, and clamps any video levels below 0% IRE to exactly 0%.

Clamping means that all excessive video levels are locked to the same value, which will remove any detail in the clamped areas. A better option is to adjust levels using the Color Board, Curves or Color Wheels. However, the Broadcast Safe filter is MUCH faster and, most of the time, you don’t need to retain that texture detail.

CAUTION

The big limitation of the Broadcast Safe filter is that if you adjust the Amount slider, you will adjust both highlights and shadows. This will lead to bad results. What Apple needs to do is provide two separate sliders, one for highlights and one for shadows.

My general recommendation is not to change the Amount slider to avoid degrading your image.

EXTRA CREDIT

The best way to apply the Broadcast Safe filter in Final Cut is to use an adjustment layer. Here’s a tutorial from my website that describes this in more detail.


Please rate the helpfulness of this tip.

Click on a star to rate it!

… for Apple Final Cut Pro X

Tip #1572: What Is Range Check?

Larry Jordan – LarryJordan.com

Safe video levels are essential for any video not posted to the web.

The Zebra or Herringbone pattern flags shadow or highlight levels that are illegal.

Topic $TipTopic

Range check is a special option in the Viewer > View menu that flags shadow or highlight levels that are “illegal” for the timeline video clip containing the playhead.

If you only post video to the web, you don’t need to worry about video levels, the web will play anything.

However, if you need to submit programs to broadcast, cable, DVD, digital cinema or many streaming services, such as NetFlix, you need to be SURE your video levels are within spec.

There are four options:

  • Off. This is the default setting.
  • Luma. This flags luminance levels that are excessive.
  • Chroma. This flags color levels (mostly saturation) that are excessive.
  • All. This flags all illegal levels.

Excessive luma levels are those above 100% IRE or below 0% IRE (for Rec. 709 media) .

Excessive chroma levels are those that are over-saturated. (Saturation levels will vary by luminance levels.)

EXTRA CREDIT

Range check simply flags problematic footage. You correct this using either one of the color grading tools or Broadcast Safe. (See Tip #1573).


Please rate the helpfulness of this tip.

Click on a star to rate it!

… for Random Weirdness

Tip #1562: Instagram Reel Editing Tips

Larry Jordan – LarryJordan.com

Sometimes, you gotta work with the tools you’re given.

The Instagram logo.

Topic $TipTopic

This article first appeared in Shutterstock.com. This is a summary.

In 2020, Instagram Reels was launched. While successful, the popularity of Instagram Reels didn’t take off until Instagram adjusted the layout so the Reels feed appeared as the central button of the app. Now, nearly every sports team, celebrity, and influencer is using Reels to grow their brand. Let’s look at six editing tips so you can get the best out of the Instagram app, as well.

Here are six tips to improve your video editing on Instagram. (The article has sample videos that illustrate each technique.)

  1. Learn how to edit using Instagram. The article contains a quick, three-minute tutorial that will give you a step-by-step guide on using the application.
  2. Cut Action on Transitions. Cutting on action is one of the core fundamentals of film editing to create a sense of fluid and continuous movement. Cutting on action is also the perfect technique for when you’re creating transitions of yourself. However, it does require pre-emptive planning.
  3. Smooth Wipe. A method that allows filmmakers to trick the audience into thinking that a long, complex shot was captured in one take, as they pass the camera in front of something, stop recording, then start again from behind the object. The editor will then cut the two shots together when both the first shot and second shot are behind the thing.
  4. Align Tool. Instagram has a built-in tool for you to do this easily—the Align tool. Simply open the app and create your first recording. Change outfits, remove the object, and then select the Align tool. You’ll now see an overlay of the prior video clip, allowing you to align yourself in the overlay position correctly.
  5. Cut to the Beat. Cutting to the beat is a tried and tested formula for music video editing to create a rhythmic form of visuals. While you don’t have to cut to every single beat, when you’re switching scenes, cutting on a beat is aesthetically pleasing.
  6. If You Can’t Beat Them, Join Them. If you find yourself endlessly scrolling through the presented Reels that Instagram algorithmically shows you, you’ll notice a recurring theme with both editing techniques and music used. While it won’t promote originality, the familiar conventions of following popular trends are a good way to engage non-followers.

Please rate the helpfulness of this tip.

Click on a star to rate it!

… for Random Weirdness

Tip #1560: Female Filmmakers: Sony Has $$ For You

Larry Jordan – LarryJordan.com

Contest open to female filmmakers or photographers over age 18.

Sony’s Alpha Female logo.

Topic $TipTopic

This article, written by Oakley Anderson-Moore, first appeared in NoFilmSchool.com. This is a summary.

In 2018, Sony launched the Alpha Female line. Now in 2021, they’ve added a “+” to the newest iteration of their lady-creatives residency, which comes with more grants for more filmmakers.

Who is this for? Female filmmakers and photographers over 18 who live in the United States or Canada. How do you get the cash and gear? You send in some details about who you are and a description of your next video project. If you are one of the 12 filmmakers selected, you’ll get $8,000 in cash and gear!

Sony’s Michaela Ion explains: “If you’re new to Alpha Female, here is the view from above: Our lives are richer when we can see the world through different perspectives. In the photography and video industry there’s a substantial disparity in gender and minority representation, which means some perspectives don’t see the light of day and we’re the poorer for it. Alpha Female was created to help close the gap and make our industry an environment where all voices have an opportunity to thrive.”

For details, links and contest video, vist here.


Please rate the helpfulness of this tip.

Click on a star to rate it!

… for Random Weirdness

Tip #1559: Top 10 Filmmaking News Sites

Larry Jordan – LarryJordan.com

These provide outstanding resources for filmmakers.

(Image courtesy of Kyle Loftus, Pexels.com.)

Topic $TipTopic

This article, written by Jourdan Aldredge, first appeared in PremiumBeat.com. This is a summary.

Filmmakers should always be striving to improve their skillset. Whether that means staying up-to-date on the latest camera and tech releases and breakthroughs, or constantly on the lookout for new lighting techniques or editing tutorials, it’s good advice for filmmakers to have several website resources they can check up on regularly.

So, here are the recommendations from PremiumBeat:

  1. Filmmaker IQ
  2. Filmmaker Magazine
  3. Newsshooter
  4. No Film School
  5. Motionographer
  6. Film School Rejects
  7. Provideo Coalition
  8. PremiumBeat
  9. Shutterstock Blog and Tutorials
  10. Rocketstock

The article – linked above – also includes more links, sample videos and more details.


Please rate the helpfulness of this tip.

Click on a star to rate it!

… for Apple Motion

Tip #1555: Spins Can Also Be 3D

Larry Jordan – LarryJordan.com

Video is always 2D, but particles and 3D objects are 3D.

The tumbling Space Rock, and the Spin > Axis setting that makes it possible.

Topic $TipTopic

When we work with video in Motion, it is easy to overlook that the Spin behavior actually works in 3D. But it does.

In Tip #1554, I created the “Flying Space Rock.” But, the Rock itself needs to spin. Since this is a 3D object, it makes sense to show its 3D nature.

So, I added Behaviors > Basic Motion > Spin.

Then, while I could adjust this using the HUD, instead I used Inspector > Behaviors > Spin and changed the rotation Axis to X.

This made the rock tumble in a way we would not normally expect.

EXTRA CREDIT

You can achieve the same results by dragging the inner blue circle for the Spin behavior in the HUD.


Please rate the helpfulness of this tip.

Click on a star to rate it!