… for Adobe Premiere Pro CC

Tip #1556: Use Curves to Create Custom Gradients

Larry Jordan – LarryJordan.com

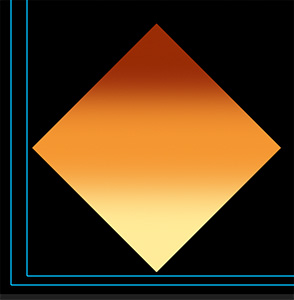
This technique would also work with gradients of other colors or shapes.

Custom curve settings (bottom) and the color results it created in a gradient (top).

Topic $TipTopic

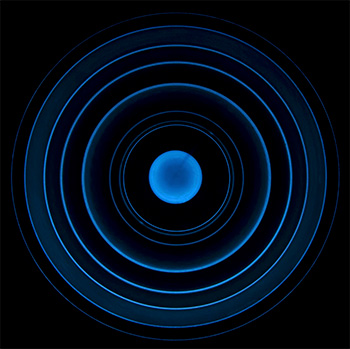
I was messing with curves to create a screen shot for an ad promoting my new Color Techniques for Adobe Premiere Pro training bundle. What I discovered, totally by accident, is that this is also a great way to create custom gradients.

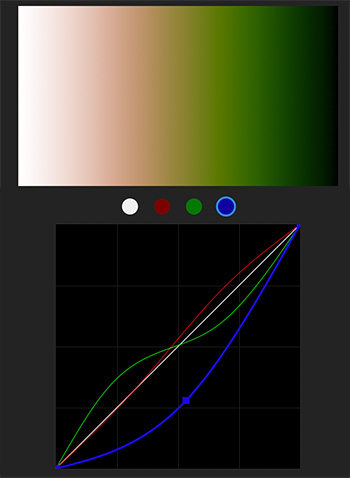
To start, I added a white-to-black gradient to the timeline. I created this in Photoshop; though you could also create it in Premiere.

Then, with the gradient clip selected in the timeline:

  • Switch to the Color workspace
  • Click the Curves text button
  • Select the color curve you want to adjust (Luma, Red, Green or Blue).
  • Option-click to create a keyframe in a curve, then drag the keyframe to a new location. As you do, you’ll see the color results reflected in the gradient.

EXTRA CREDIT

There’s no “right” way to adjust curves. Play with these and see what you can create.


Please rate the helpfulness of this tip.

Click on a star to rate it!

… for Apple Final Cut Pro X

Tip #1552: Add Rain Drops to Your Video

Larry Jordan – LarryJordan.com

When adding rain, be sure not to show sky or ground unless they look appropriately rainy.

Water Pane settings (top) and the effect applied to a clip (bottom).

Topic $TipTopic

Shooting video in the rain is rarely a pleasant experience. Fortunately, Final Cut offers the ability to add rain later, in post, where things are warm and dry.

Select the clip you want to add rain drops to, then apply Effects > Distortion > Water Pane.

This creates the effect of looking at the scene through a window with rain pouring down.

Fast and very effective.


Please rate the helpfulness of this tip.

Click on a star to rate it!

… for Apple Final Cut Pro X

Tip #1542: More Hidden Uses of the Tilde Key

Larry Jordan – LarryJordan.com

The Tilde key simplifies moving images in the Primary Storyline.

Topic $TipTopic

In Tip #1514, I illustrated how the Tilde key allows moving clips in the Primary Storyline without moving the clips attached to it.

After reading this, Stefan Sonnekus shared another use of the Tilde key:

The tilde key also works when deleting clips from the primary storyline.

Usually any video/audio clips connected to a clip you delete, will be deleted as well, but if you hold down the tilde key when you press Delete, the connected clips will remain in place in relation to the primary storyline. The clips to the right (i.e. coming after the clip you’ve deleted) on the primary storyline will then move to the left to fill the gap and the connected clip(s) will then be connected to the clip(s) that have filled the position of the clip(s) deleted from the primary storyline.


Please rate the helpfulness of this tip.

Click on a star to rate it!

… for Apple Final Cut Pro X

Tip #1541: Create Shapes Filled with Video

Larry Jordan – LarryJordan.com

This nested compound clip effect is also good for filling logos with moving video.

Photoshop shape (top), with video inserted (middle), a nested compound clip (bottom).

Topic $TipTopic

OK, this is tricky, but worth trying. Here’s how to create a shape in Photoshop, fill it with moving video in Final Cut, then place it over a background.

In Photoshop:

  • Select the custom shape tool, then, from the menubar at the top, pick a shape you like. (The top screen shot shows a flower image.)
  • Make the background layer transparent.
  • Save the image as a PNG or PSD.

In Final Cut:

  • Create a new project.
  • Put the video you want to insert into the shape into the Primary storyline.
  • Stack the shape above it.
  • Select the shape and apply Video Inspector > Blend Mode > Stencil Alpha. The shape fills with the video.
  • Select both shape and video and choose File > New > Compound clip. Give this any name you like.
  • Place the shape, again, on top of the compound clip in the timeline.
  • Select the top shape and apply Effects > Keying > Keyer. It should automatically knock out the black background, leaving the red lines on top of the image from the compound clip. (Illustrated in the middle screen shot.)
  • Select both the new shape and the compound clip and choose File > New > Compound clip. (Yup, a nested compound clip!) Give this any name you like.
  • Stack that nested compound clip on top of the video you want to appear in the background (The barn, in the bottom screen shot.)

Done.

EXTRA CREDIT

This trick works with logos, text, custom shapes – the possibilities are endless.


Please rate the helpfulness of this tip.

Click on a star to rate it!

… for Random Weirdness

Tip #1545: What Media Tech Can Expect Post-Pandemic

Larry Jordan – LarryJordan.com

Life will not be the same – hopefully, it will be better.

(Image courtesy of Pixabay at Pexels.com.)

Topic $TipTopic

This article, written by Jenny Priestley, first appeared in TVBEurope.com. This is a summary.

TVBEurope wanted to find how the industry is feeling about the future. We asked a number of key industry figures how they view the next 12 months and whether the industry will return to pre-pandemic workflows.

“A lot of what has been put in place to cope with the pandemic, will become established ways of working and doing business, including home and remote working, remote production workflows, increased streaming volumes and direct to consumer propositions,” says James Arnold, chief commercial officer at Red Bee Media.

“On the vendor side there have been some excellent changes made during the last 12 months,” said Ciaran Doran, Rohde & Schwarz’s director of marketing, broadcast and media. “Such as improving how we demonstrate products and solutions via cloud technology and video conferencing – meaning we don’t all jump on a plane as fast as before. This not only improves efficiencies but saves the planet. But it’s crucially important that we return to getting to meet each other because creativity is at its peak when we engage with each other – and business flows from that human interaction too. Overall, we don’t see the future as a challenge, we see it as exciting. When the day to day rules get broken new opportunities arise and that’s when innovation takes a leap forward.”

“I think we learnt that change is possible if we really have to and used in the right way, technology is a facilitator of quick change more than we think,” adds Erik Ahlin, head of sales and marketing at Vidispine. “I think we also learnt that face-to-face meetings and interaction is still very important. It seems highly unlikely that even as travel restrictions and social distancing measure ease that any business, including the media industry, will return completely to pre-pandemic ways of working – not least because we were already trending towards many of the changes that have been made, those trends have just been accelerated.”

Yvonne Monterroso, director product management, at Dejero believes the pandemic has accelerated the adoption of new technologies and transformed future workflows into the workflows of today. For her, the key word for the next 12 months is enablement: “In the longer term, I don’t think we’re going to be talking about bit-rates or encoding formats or networks speeds or if it’s cloud or on-premise, we’re just going to be talking about enablement – talking about people and how their jobs can be simplified from a technical and content perspective, no matter where they are located.”


Please rate the helpfulness of this tip.

Click on a star to rate it!

… for Random Weirdness

Tip #1544: Pick the Best SloMo Frame Rate

Larry Jordan – LarryJordan.com

Not all frame rates are created equal.

(Image courtesy of Lisa Fotios, Pexels.com.)

Topic $TipTopic

This article, written by Lewis McGregor, first appeared in ShutterStock.com. This is a summary.

NOTE: The key feature of this article is a video tutorial illustrating all these frame rates.

It wasn’t too long ago that shooting in slow motion was reserved only for cinema cameras. Or, at the very least, high-definition slow motion was reserved for cinema cameras. Today’s cameras now provide higher frame rates as a matter of course. However, which slow motion frame rate should you use for your online content? Too slow and a simple footstep may take five seconds to complete. Too fast and you may not slow down your footage enough.

  • 48/50 fps. Double the frame rate is, in fact, perfectly adequate to capture several elements in slow motion. Because it doubles a single second, it’s not slow enough to become fully evident that slow motion is taking place. Still, contradictory to that, it’s slow enough to emphasize a moment in time.
  • 60 fps. So, 60fps are great for the dramatic character moments. It’s slow enough to be noticeable and put emphasis on the given moment. Whether that’s the hero shot, closing in on an emotional moment, or slowing downtime in an important scene. Essentially, where there’s a human character involved and bringing you into the character’s frame of mind in a human moment.
  • 120 fps. Typically, any time something is happening faster than we can humanly see, or at least any subject that becomes obscured with motion blur—like animals running, liquid, or fast-action sports—can benefit from 120fps.
  • 180 fps. The same principles apply as 120fps, as we’ve moved out of the region of reasonable purpose to film humans at this speed. So, it’ll be useful for elements that have many fast-moving subjects that need to be slowed even further. When we push past 180, we’re moving into special use frame rates typically used for advertising, wildlife, and sports.

IN SUMMARY

  • 48/50fps for emphasizing small moments to mean something bigger.
  • 60fps for character/scene importance and bringing the audience into the bubble of the character.
  • 120fps for fast-moving subjects, elements, and sports.
  • 180fps will pull from above, but with greater emphasis on slowing things down.

Please rate the helpfulness of this tip.

Click on a star to rate it!

… for Random Weirdness

Tip #1543: Use B-Roll More Effectively

Larry Jordan – LarryJordan.com

B-roll illustrates what your audio is talking about.

(Image courtesy of Pexels.com.)

Topic $TipTopic

This article, written by Anthony Najera, first appeared in PremiumBeat.com. This is a summary.

B-roll, in a straightforward definition, is supplementary footage or alternative shots used in a video, in contrast to your “A-roll,” which is your main footage or primary shot. By definition, B-roll is secondary to the main image, but that doesn’t mean it’s not important to the storytelling. I’d argue B-roll can be just as important—or even more impactful—than A-roll when used properly.

The importance of B-roll is multifaceted. There are quite a few reasons we use B-roll in video creation—in practical terms, for storytelling, and for aesthetics. But, if you boil B-roll down to one practical purpose, it would be its importance in editing. B-roll gives the editor options when cutting up a video and a way to mask cuts when just using main footage won’t work.

Not every cut and piece of information has to be rapid-fire, back-to-back. Let the visuals do some work and let the story breathe a bit. B-roll can be the perfect way to pace a story and give the information on screen a little time to settle in with the viewer. The video isn’t a sprint to the finish line, it should be an enjoyable experience.

[ Editor’s Note: AMEN! So many editors cut like they are being paid by the edit. Drives me nuts!!! ]

When used correctly, B-roll can supply the audience with information or context to the main subject of the video. B-roll can show the literal act of what’s being discussed on camera or show the location of where an event is taking place.

Types of B-roll:

  • Exteriors/Establishing Shot
  • Cutaways/Inserts
  • Reenactments
  • Stock Footage

Although its called “B” roll, that doesn’t mean it can’t be the main visuals doing most of the storytelling. B-roll isn’t inherently second string—give the B-roll footage an opportunity to do the heavy lifting within a project. An editor can create a sense of tone and environment through the use of B-roll that the main footage wouldn’t be able to accomplish. Lean into that.

EXTRA CREDIT

The article has lots more ideas on how to use B-roll effectively, along with several links on capturing and editing effective B-roll.


Please rate the helpfulness of this tip.

Click on a star to rate it!

… for Apple Motion

Tip #1540: Create Movement with a Zoom Blur

Larry Jordan – LarryJordan.com

Zoom blurs create the illusion of movement from a point.

Zoom blur settings (top) and the results applied to a diamond (bottom).

Topic $TipTopic

Here’s a fast way to make a still image – or other element – look like it’s moving: a Zoom Blur.

Filters > Blur > Zoom Blur creates the illusion of movement from a specific point. By default, this blur is located at the center of the frame.

However, as you can see from the screen shot, moving the Center of the Zoom blur to the edge of an object makes it look like the image itself is moving.

Apply the blur to an element, then:

  • Drag the white circle (the Center setting) to the edge you want to remain in focus.
  • Adjust Amount to vary the amount of the blur.
  • Be sure Crop is unchecked to allow the blur to extend past the boundaries of the element.
  • Tweak other settings and watch what happens.

Especially for elements that are moving around the frame, this increases the illusion of the speed of  the movement.


Please rate the helpfulness of this tip.

Click on a star to rate it!

… for Apple Motion

Tip #1539: Quickly Fill a Shape with a Gradient

Larry Jordan – LarryJordan.com

Who Knew… um, that this would work?

A shape filled with a gradient.

Topic $TipTopic

Here’s a very fast way to fill a shape with a gradient in Apple Motion.

Add a Library shape to the Viewer. (In the screen shot, I used a diamond.)

Then, from Library > Gradients, drag the gradient you want on top of the shape in the Viewer.

NOTE: You could also drag and drop the gradient on top of the element name in the Layer’s panel.

Poof! Done.

EXTRA CREDIT

You can change the gradient colors by selecting the shape in the Layers panel, then using Inspector > Shape > Fill to change the gradient.

Cool.


Please rate the helpfulness of this tip.

Click on a star to rate it!

… for Apple Motion

Tip #1538: Working with PDFs in Motion

Larry Jordan – LarryJordan.com

Motion handles PDFs, but not well. Convert them to PNG first.

Topic $TipTopic

Motion handles PDFs differently from both Final Cut and Premiere. But, it still doesn’t handle them well.

Unlike Premiere, Motion supports importing a PDF.

Unlike Final Cut, it only imports the first page of a multiple page PDF. Worse, any white background is imported as transparent, which makes reading black text impossible.

Like Final Cut, though, Motion creates, essentially, a PNG of that first page of a PDF file that matches the size of your project. This means that if you scale the PNG, image quality quickly deteriorates.

Here are two workarounds that make using PDFs in a Motion project easier and with higher quality.

TWO WORKAROUNDS

If all you need to do is import the entire PDF page and fill all empty areas with white, use this workaround.

Workaround #1: Open the PDF in Preview, choose File > Export and set the export format to PNG. This exports the PDF at the size it was created and with a white background.

NOTE: Ignore the Resolution setting on export, even if you choose a higher number, the size and resolution of the exported image won’t change. I consider this a bug.

If you need to zoom into elements on the page – for example to provide closeups of an embedded image – this workaround is a better option:

Workaround #2: Open the file in Photoshop, or another image editing program. In the Page Options dialog (see screen shot) that appears: Set the Resolution to at least 400 Pixels/inch. This enlarges the image – while retaining image quality – so that you can easily zoom in or out of the PDF in the timeline.

EXTRA CREDIT

There are two types of PDFs: those that originated as bitmaps and those that originated as vectors.

Photos, scans and Photoshop documents will not scale very well, if at all. Text, Illustrator files or images created using musical notation should scale perfectly.


Please rate the helpfulness of this tip.

Click on a star to rate it!