Rethink projects LCEVC to achieve 30% penetration by 2030.
The V-Nova logo.
StreamingMedia.com reports that V-Nova, the primary developer of the Low Complexity Enhancement Video Codec (LCEVC), announced royalty terms, which apply a capped, low per-user fee on the streaming service actually using the codec, and is free for encoder and decoder vendors.
V-Nova’s royalty involves different prices for different types of entities, like subscription and advertising-based services, and TV Everywhere, all capped at US $3.7 million per year.
They spoke with Alex Davies, senior analyst at Rethink about the V-Nova announcement, and a coauthor of the recently released Media & Entertainment Transcoding Workload and Device Royalty Forecast 2020-2030 which predicts codec deployments and usage through 2030. In preparing the report, Davies spoke with codec developers, phone and TV manufacturers, streaming producers, and other stakeholders, providing a broad-based perspective. For the record, the report predicts that LCEVC will achieve a 30% penetration by 2030.
VVC has the possibility to succeed, but not for a couple of years.
Image courtesy of Pexels.com.
Last week, Tip #1629 introduced the new VVC codec. This codec is designed to take the place of HEVC going forward. But, is it any good?
Jan Ozer, a technology writer and compressionist whom I respect a lot, recently took a deep dive into this subject for TechRadar.com. Here are some of his thoughts.
What’s the codec’s comparative efficiency? It is advertised as half the bandwidth of HEVC. Jan measures it closer to 30%. However, the reason publishers typically adopt new codecs like HEVC is because they open markets for new customers.
What new markets or platforms does the codec enable? Looking back, H.264 was very quickly deployed by streaming publishers because it enabled delivery to mobile devices, which the previous codec, VP6, didn’t. Similarly, most of the publishers that deploy HEVC do so to send 4K SDR/HDR videos to SmartTVs, a market they couldn’t affordably serve with H.264.
As we’ll discuss in a moment, VVC is at least 2-3 years out from meaningful deployments. Perhaps at that time 8K or VR will be new and compelling markets, though it’s generally acknowledged that without high dynamic range, 4K video is tough to distinguish from HD in most configurations. Best case, at this point, we just don’t know if VVC will enable any new markets or not.
Jan goes on to analyze seven more questions to help determine whether a codec will be successful. These include:
How is encoding time?
Can VVC be implemented in software on relevant platforms?
Does the Alliance for Open Media (AOM) support the codec?
Is the codec a MPEG standard?
What’s the technology ownership and monetization model?
How set is the royalty structure?
Is there a content royalty?
The article is excellent, readable and informative. The short take: “If you’re a streaming producer worried about missing the boat on VVC, file that concern in the “worry about in 2022” file.
Please rate the helpfulness of this tip.
Click on a star to rate it!
https://www.theinsidetips.com/wp-content/uploads/2019/09/Tips-Logo-700x150.jpg00Larry Jordanhttps://www.theinsidetips.com/wp-content/uploads/2019/09/Tips-Logo-700x150.jpgLarry Jordan2021-05-25 01:30:002021-05-25 01:30:00Tip #1657: Will the VVC Codec Succeed?
Customer’s value their privacy, but the stats are still coming in.
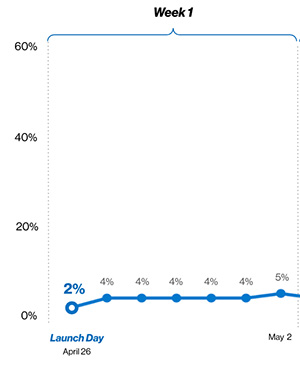
Section of the US opt-in tracking chart. (Courtesy Flurry Analytics.)
One of the most talked-about features in iOS 14.5 is Apple’s insistence that users give their permission for their personal data to be tracked. This created a firestorm of controversy in the industry, especially from developers who’s business plan is based on tracking, compiling or selling user data.
While initial surveys suggested 40% of iOS users would opt out, the reality is far more dramatic. Flurry.com, a company specializing in iOS and Android analytic software, is tracking the results.
There’s a “hidden” option when you change the speed of a clip in the Timeline that can make your editing life easier. But, it is off by default. When you want to change the speed of a clip, for example to create slower or faster motion:
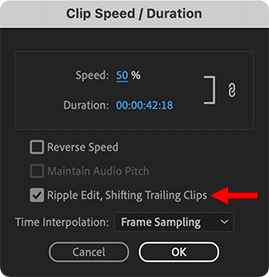
Select the clip in the timeline and type Cmd + R.
This opens the Clip Speed / Duration window (see screen shot).
To alter the speed, change the Speed setting.
However, down lower, is an equally important option.
When Ripple Edit is off, changing the speed of a clip will not change its duration. (Unless you are increasing the speed of the clip and don’t have enough frames to fill the existing duration.) This means that all downstream clips don’t move.
When Ripple Edit is turned on, changing the clip speed will always change the duration of the clip AND adjust the position of all downstream clips so that there is no gaps.
The problem with Ripple Edit turned off is that not all frames in the original clip will be displayed. Once the original duration is reached, any unplayed frames are ignored.
The problem with Ripple Edit turned on is that, while all frames will play, the clip duration will change, altering the position of all downstream clips and, ultimately, the duration of your sequence.
There are reasons for selecting either option – and I’ve used both in projects – but it is important to know you have a choice.
One of the exciting features in mobile phones these days is the easy ability to shoot high-frame rate videos. (The film world calls this “over-cranking.”) This creates extremely high-quality, extremely slow motion videos.
Here’s how to display that glorious slow motion in Adobe Premiere Pro.
Go to Sequence > Sequence Settings and verify your Timebase. This is the frame rate of your sequence.
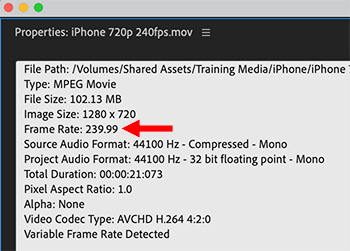
Control-click the clip you want to slow in the Files panel and select Properties.
In Properties, verify the frame rate of the clip. (See screen shot.)
Then, divide the Timebase rate by the clip frame rate to determine the percentage you need to change the clip speed to get every frame to play.
NOTE: As an example, a timebase of 30 fps divided by a clip frame rate of 240 fps equals 0.125, which converts to a percentage of 12.5%. (Multiply the division result by 100. Round 23.98, 29.97 and 59.94 frame rates up to the next whole number.)
Select the timeline clip and type Cmd + R to display the Clip Speed / Duration window.
Change the Speed setting to match the percentage you just calculated.
Now, when you play the clip, you’ll see liquid slow motion, without artifacts or jerkiness, while playing every frame your camera shot.
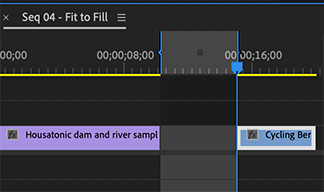
A Fit-to-Fill edit changes the speed of a source clip to match a specific duration in the Timeline. While specialized, they are often used when editing clips to music and you can’t change the timing of the music, but need the action to finish in the duration available.
Here’s how to create one in Premiere Pro:
Set an In and Out (Shortcuts: I and O) for the clip you want to use in the Source Monitor.
Set an In and Out in the Timeline setting the duration you want that clip to fill.
Type [period].
Premiere edits the clip into the Timeline and changes its speed so that the entire duration specified by the In and Out in the Browser is squeezed into the defined space in the Timeline.
EXTRA CREDIT
Fit-to-Fill edits always change the speed of the inserted clip.
Please rate the helpfulness of this tip.
Click on a star to rate it!
https://www.theinsidetips.com/wp-content/uploads/2019/09/Tips-Logo-700x150.jpg00Larry Jordanhttps://www.theinsidetips.com/wp-content/uploads/2019/09/Tips-Logo-700x150.jpgLarry Jordan2021-05-25 01:30:002021-05-25 01:30:00Tip #1644: How to Create a Fit-to-Fill Edit
A speed transition gradually alters the playback speed of a clip, for example, from a Hold frame back to normal speed. Here’s how to add a speed transition to smooth speed changes in Apple Final Cut Pro.
NOTE: Speed transitions are added automatically to speed ramps, but they can also be added to coming into or out of a Hold frame.
In this example, let’s add a speed transition coming out of a Hold frame:
Put the timeline playhead on the frame you want to freeze and type Shift + H. This creates a Hold frame, indicated by a red bar.
At the end of the Hold frame, in the red bar, is a vertical black bar, called the “thumb.” Double-click the thumb.
In the speed menu that appears, check Speed Transition.
A gray bar appears to the right of the Hold frame. This is the speed transition. Grab the right edge and drag it to change the duration of the speed transition.
Play this and you’ll see how it smooths the transition from still to full speed.
EXTRA CREDIT
In the screen shot:
The left arrow indicates the frame that is held (frozen)
The middle arrow indicates the Hold frame “thumb.”
The right arrow indicates the speed transition.
The Speed Transition menu is displayed above the timeline clip.
Speed transitions can be added at any speed thumb by double-clicking.
Please rate the helpfulness of this tip.
Click on a star to rate it!
https://www.theinsidetips.com/wp-content/uploads/2019/09/Tips-Logo-700x150.jpg00Larry Jordanhttps://www.theinsidetips.com/wp-content/uploads/2019/09/Tips-Logo-700x150.jpgLarry Jordan2021-05-24 01:30:002021-05-24 01:30:00Tip #1642: How to Add A Speed Transition
A Fit-to-Fill edit automatically alters the speed of a clip in the Browser to fit a specific duration in the Timeline. While specialized, they are often used when editing clips to music and you can’t change the timing of the music, but need the action to finish in the duration available.
To create it:
Add a gap, placeholder or other clip into the timeline with the duration you need. (For simplicity, I’ll call this the “gap.”)
In the Browser, mark an In and Out for the clip you want to insert into the gap.
Drag the clip from the Browser on top of the gap in the Timeline.
In the pop-up window, select Replace with Retime to Fit.
Because the Browser clip has both an In and an Out, Final Cut can change the speed of the Browser clip so it exactly fills the gap you created in the Timeline.
EXTRA CREDIT
A Fit-to-Fill edit always changes the speed of the Browser clip, unlike any other replace edit.
Please rate the helpfulness of this tip.
Click on a star to rate it!
https://www.theinsidetips.com/wp-content/uploads/2019/09/Tips-Logo-700x150.jpg00Larry Jordanhttps://www.theinsidetips.com/wp-content/uploads/2019/09/Tips-Logo-700x150.jpgLarry Jordan2021-05-24 01:30:002021-05-24 01:30:00Tip #1641: How to Create a Fit-to-Fill Edit
We may request cookies to be set on your device. We use cookies to let us know when you visit our websites, how you interact with us, to enrich your user experience, and to customize your relationship with our website.
Click on the different category headings to find out more. You can also change some of your preferences. Note that blocking some types of cookies may impact your experience on our websites and the services we are able to offer.
Essential Website Cookies
These cookies are strictly necessary to provide you with services available through our website and to use some of its features.
Because these cookies are strictly necessary to deliver the website, refuseing them will have impact how our site functions. You always can block or delete cookies by changing your browser settings and force blocking all cookies on this website. But this will always prompt you to accept/refuse cookies when revisiting our site.
We fully respect if you want to refuse cookies but to avoid asking you again and again kindly allow us to store a cookie for that. You are free to opt out any time or opt in for other cookies to get a better experience. If you refuse cookies we will remove all set cookies in our domain.
We provide you with a list of stored cookies on your computer in our domain so you can check what we stored. Due to security reasons we are not able to show or modify cookies from other domains. You can check these in your browser security settings.
Google Analytics Cookies
These cookies collect information that is used either in aggregate form to help us understand how our website is being used or how effective our marketing campaigns are, or to help us customize our website and application for you in order to enhance your experience.
If you do not want that we track your visit to our site you can disable tracking in your browser here:
Other external services
We also use different external services like Google Webfonts, Google Maps, and external Video providers. Since these providers may collect personal data like your IP address we allow you to block them here. Please be aware that this might heavily reduce the functionality and appearance of our site. Changes will take effect once you reload the page.
Google Webfont Settings:
Google Map Settings:
Google reCaptcha Settings:
Vimeo and Youtube video embeds:
Other cookies
The following cookies are also needed - You can choose if you want to allow them:
Privacy Policy
You can read about our cookies and privacy settings in detail on our Privacy Policy Page.