Here’s a very fast way to create a still frame from any video clip in the Browser and edit it as a connected clip in the Final Cut timeline.
In the Timeline, put the playhead where you want to insert the still frame.
In the Browser, put the playhead (or skimmer) on the frame you want to insert into the timeline.
Type Option + F
EXTRA CREDIT
To create a still frame of the current frame under the playhead in the timeline:
Make sure the timeline is active
Type Shift + F
Type Option + F
If the clip edits into the Primary Storyline, undo, deselect the clip and try again. Done.
Please rate the helpfulness of this tip.
Click on a star to rate it!
https://www.theinsidetips.com/wp-content/uploads/2019/09/Tips-Logo-700x150.jpg00Larry Jordanhttps://www.theinsidetips.com/wp-content/uploads/2019/09/Tips-Logo-700x150.jpgLarry Jordan2021-05-24 01:30:002021-05-24 01:30:00Tip #1640: A Really Fast Still Frame Trick
Fog is the opposite of evaporation, but easy to prevent.
Image courtesy: Pedro Figueras, Pexels.com.
This article, written by Jourdan Aldredge, first appeared in PremiumBeat.com. This is a summary.
Here are the best ways to prevent foggy lenses, and practices for keeping your lenses clean, clear, and ready to shoot in inclement weather.
According to sciencing.com, condensation is simply defined as “the process where water vapor becomes liquid.” You see condensation more often than not on glass surfaces, like a drinking glass or the windows to your house.
Keep Gear Covered and Protected.The first step to combating condensation and the fogging up of your camera lenses is to always remember to keep your gear covered and protected. Safety should always be your first concern.
Get Your Lenses Acclimated to the Weather. The next big step for keeping your lenses fog-free is the most important. Before heading out to start your shoot, get your lenses acclimated to the weather! This is 100% the best, and pretty much only, way for you to truly “de-fog” your lenses in a safe and scientific manner. Don’t try to simply wipe your lenses clear, as this can risk scratching the glass or fogging things up worse.
The article also has videos that illustrate these suggestions, as well as techniques for defogging gear.
Please rate the helpfulness of this tip.
Click on a star to rate it!
https://www.theinsidetips.com/wp-content/uploads/2019/09/Tips-Logo-700x150.jpg00Larry Jordanhttps://www.theinsidetips.com/wp-content/uploads/2019/09/Tips-Logo-700x150.jpgLarry Jordan2021-05-21 01:30:002021-05-21 01:30:00Tip #1628: Tips to Keep Lenses from Fogging Up
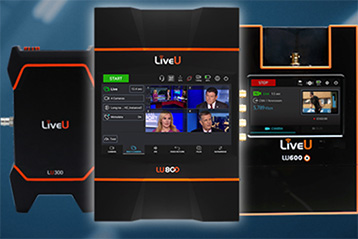
Flexible subscription program with an all-inclusive monthly payment.
LiveU production hardware. (Image courtesy of LiveU.)
LiveU launches LiveU 360° – an all-inclusive subscription-based service package.
The adaptive turnkey package offers a modernized video production solution in a cost-efficient and scalable turnkey package – combining hardware and software, cloud workflow connectivity, unlimited data and value-added services with a new fully managed Platinum Service.
The LiveU 360° offering includes a range of plans under two umbrellas – 360° Essential and 360° Premium – which are optimized for specific markets (news, sports and other live productions) and can be upgraded at any time. An adaptive business model by design, LiveU 360° provides self-service capabilities, for example, multi-camera and roaming activation.
Features:
Field production gear
Unlimited connectivity plan
Physical/cloud channels acting as your video hub
Seamlessly connect with any other IP cloud-based production platforms or solutions
LiveU Central unified management platform and reporting tools.
IP Pipe, Video Return, Audio Connect and Tally Light
This article, written by Tanner Shinnick, first appeared in PremiumBeat.com. This is a summary.
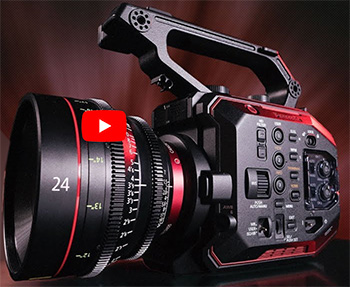
Documentary filmmaking can oftentimes require a unique set of needs, skills, and demands on any production. This is especially true when it comes to the camera system that you choose to utilize. Having the best camera for the job is an age-old adage that’s especially true for the documentary filmmaker.
Some of these common requests and needs of the documentary cinematographer are:
Built-in ND filters
High ISO performance
XLR/audio capabilities
Robust features (high-speed, in-camera IS)
Plus, general ease of use
Here’s the list:
Blackmagic Pocket Cinema Camera 6K Pro
Canon C70
Panasonic EVA-1
Sony FX6/FX9
Canon C300 MIII & C500 MII
The article has details on each camera, along with a video illustrating each cameras’s strengths.
Please rate the helpfulness of this tip.
Click on a star to rate it!
https://www.theinsidetips.com/wp-content/uploads/2019/09/Tips-Logo-700x150.jpg00Larry Jordanhttps://www.theinsidetips.com/wp-content/uploads/2019/09/Tips-Logo-700x150.jpgLarry Jordan2021-05-21 01:30:002021-05-21 01:30:00Tip #1617: Best Cinema Cameras for Docs
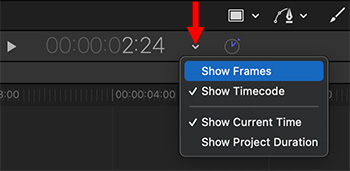
Internally, Motion tracks everything in frames, but can easily display timecode.
Click the white arrow to change the timing display.
Video folks tend to think in timecode. Animators tend to think in frames. Motion supports both. Internally, Motion tracks everything in frames, but can easily display timecode.
To switch, click the small down-pointing white arrow to the right of the timecode / frame display at the bottom of the Canvas (see screen shot).
Using this popup menu, you can choose to display either frames or timecode, as well as current project time or total project duration.
You can change this setting whenever you want, it is display-only.
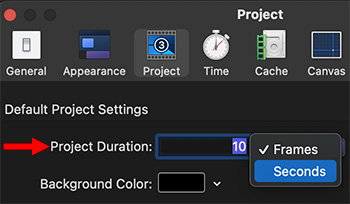
Preset preferences control everything except project durations.
Project durations, which can be in frames or seconds, are set from Preferences > Project.
Here’s another Motion preference setting that can simplify your life.
When you create a new preset (Motion > Preferences > Presets), you can specify all sorts of different technical settings for your projects. This allows Motion to auto-configure projects quickly when you create new ones.
The only thing you CAN’T do from the Preset menu is set a default duration. That option is located in Motion > Preferences > Project. (See screen shot.)
Simply change the Project Duration in the Project pane to whatever you prefer for a default.
NOTE: Remember, you can always change this value when creating a new project using the Project Browser.
EXTRA CREDIT
You can specify durations using either frames or seconds.
This one preference setting can decrease your frustration.
An edited screen shot of the Motion > Preferences > Project pane.
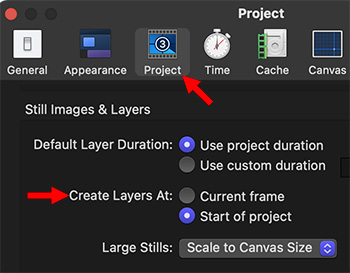
If, like me, you add new elements to a Motion project only to discover that they seem to land anywhere EXCEPT where you want them, here’s a very simple fix.
By default, whenever you add a new element to a project – either by dragging into the Canvas or the Layers panel – that element starts at the position of the playhead in the mini-Timeline.
Which is great – except, I NEVER remember to move the playhead to the right spot until AFTER I add the element.
Grrr… I spend most of my time repositioning the In or the Out of an element.
So, here’s a FAST way to fix this:
Open Motion > Preferences.
Click the Project icon (see screen shot).
Change Create Layers at to Start of Project.
NOTE: The default setting Current frame, always places the In of a new element at the position of the playhead in the mini-Timeline.
Now, whenever you add something new, it will always start at the beginning of a project. This may not be where you want it, but it will always be where you expect it.
EXTRA CREDIT
In addition to dragging elements into position in the Timeline, you can also place the playhead where you want them to start and type I (in) or O (out).
Please rate the helpfulness of this tip.
Click on a star to rate it!
https://www.theinsidetips.com/wp-content/uploads/2019/09/Tips-Logo-700x150.jpg00Larry Jordanhttps://www.theinsidetips.com/wp-content/uploads/2019/09/Tips-Logo-700x150.jpgLarry Jordan2021-05-20 01:30:002021-05-20 01:30:00Tip #1637: An Invaluable Preference Setting
Toolfarm has added or updated 8 demos to their ever growing collection of free trials. The demos give you chance to take a plug-in for a spin and kick the tires, so you can get a feel for how it works, and if it works with your system.
https://www.theinsidetips.com/wp-content/uploads/2019/09/Tips-Logo-700x150.jpg00Larry Jordanhttps://www.theinsidetips.com/wp-content/uploads/2019/09/Tips-Logo-700x150.jpgLarry Jordan2021-05-19 01:30:002021-05-14 17:02:40Tip #1636: New Demos at Toolfarm
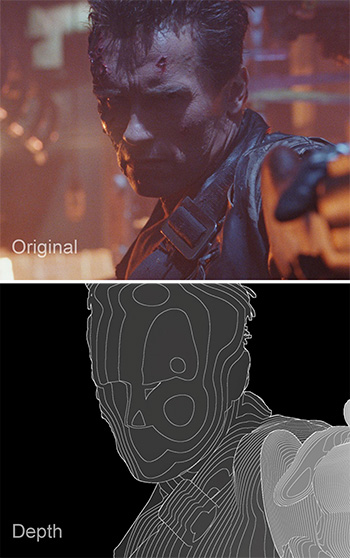
1,800 artists, 8 months, tens of thousands of rotoscopes.
Detail from converting “Terminator 2” to 3D. (Courtesy of VFXVoice.com)
This article, written by Ian Failes, first appeared in VFXVoice.com. This is a summary.
James Cameron loves stereo. After also championing the stereo conversion of Titanic a few years ago, Cameron’s latest 3D re-release is Terminator 2: Judgment Day. The 1991 film was first re-mastered in 4K, before receiving the stereo treatment from Stereo D (part of Deluxe).
Before the stereo conversion could take place, Deluxe’s Post and Restoration Services Group, housed out of EFILM, scanned the film at 4K on a custom wet gate scanner. “The wet gate liquid conceals and reduces most base and emulsion scratches,” explains Deluxe’s Allan Tudzin. “The technology submerses the film frame into liquid, making the scratch invisible to the camera.”
The Post and Restoration Services Group also removed dirt and repaired scratches. The manual ‘dust busting’ procedure took hundreds of hours to clean the 4K scans back to their original pristine condition, but it was a necessary step since the 3D conversion process essentially involves rotoscoping thousands of images in every frame.
The mandate from Cameron, notes stereographer Yoichiro Aoki, was simply to “make a great 3D experience,” while also keeping things as realistic as possible. That, adds stereo supervisor Russell McCoy, meant maintaining good internal shaping for all the characters, particularly Arnold Schwarzenegger as the now-good T-800 Terminator.
Incredibly, that effort took around 1,800 artists about eight months to pull off. “It sounds like an exaggeration but it’s not,” says McCoy. “With a project that spans eight months, everyone gets a shot. And since there has to be so much detail and so much work put onto these shots, breaking it up into small teams just doesn’t work.”
The article continues with more details on the process, along with trailer and featurette videos.
Please rate the helpfulness of this tip.
Click on a star to rate it!
https://www.theinsidetips.com/wp-content/uploads/2019/09/Tips-Logo-700x150.jpg00Larry Jordanhttps://www.theinsidetips.com/wp-content/uploads/2019/09/Tips-Logo-700x150.jpgLarry Jordan2021-05-19 01:30:002021-05-19 01:30:00Tip #1635: Converting “Terminator 2” to 3D
Image courtesy of Columbia Pictures: “Passengers.”
GridMarkets hosted Fabian Nowak, VES award winning Houdini artist, in a webinar last week during which he discussed how he created the gravity scene in “Passengers.”
In the webinar, Fabian talks about the research that he invested into the shot and how the CG and live action elements came together. As is often the case, there were many unexpected challenges to overcome in order to produce this iconic shot. Fabian describes the approaches that he took to “keep making forward progress” in the face of adversity . . . something we can all learn from.
We may request cookies to be set on your device. We use cookies to let us know when you visit our websites, how you interact with us, to enrich your user experience, and to customize your relationship with our website.
Click on the different category headings to find out more. You can also change some of your preferences. Note that blocking some types of cookies may impact your experience on our websites and the services we are able to offer.
Essential Website Cookies
These cookies are strictly necessary to provide you with services available through our website and to use some of its features.
Because these cookies are strictly necessary to deliver the website, refuseing them will have impact how our site functions. You always can block or delete cookies by changing your browser settings and force blocking all cookies on this website. But this will always prompt you to accept/refuse cookies when revisiting our site.
We fully respect if you want to refuse cookies but to avoid asking you again and again kindly allow us to store a cookie for that. You are free to opt out any time or opt in for other cookies to get a better experience. If you refuse cookies we will remove all set cookies in our domain.
We provide you with a list of stored cookies on your computer in our domain so you can check what we stored. Due to security reasons we are not able to show or modify cookies from other domains. You can check these in your browser security settings.
Google Analytics Cookies
These cookies collect information that is used either in aggregate form to help us understand how our website is being used or how effective our marketing campaigns are, or to help us customize our website and application for you in order to enhance your experience.
If you do not want that we track your visit to our site you can disable tracking in your browser here:
Other external services
We also use different external services like Google Webfonts, Google Maps, and external Video providers. Since these providers may collect personal data like your IP address we allow you to block them here. Please be aware that this might heavily reduce the functionality and appearance of our site. Changes will take effect once you reload the page.
Google Webfont Settings:
Google Map Settings:
Google reCaptcha Settings:
Vimeo and Youtube video embeds:
Other cookies
The following cookies are also needed - You can choose if you want to allow them:
Privacy Policy
You can read about our cookies and privacy settings in detail on our Privacy Policy Page.