… for Adobe Premiere Pro CC

Tip #1634: New! Loudness Meter in Premiere

Larry Jordan – LarryJordan.com

The new Loudness Meter provides very granular details on audio levels.

The new Loudness Meter in Premiere & Audition, using the YouTube setting.

Topic $TipTopic New with the May, 2021, update to both Audition and Premiere Pro is the Loudness Meter; separate from the long-standing Loudness Radar. Here’s how the Meter works.

  • Apply the Loudness Meter (Effects > Audio Effects > Special > Loudness Meter) the same as any other effect.
  • In Effect Controls, scroll down until you see Loudness Meter, then click the Edit button.

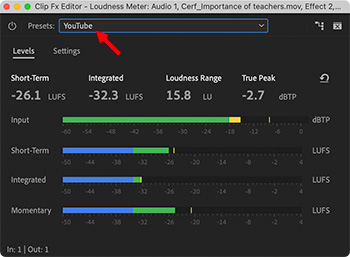
The Loudness Meter is displayed (see screen shot).

NOTE: This measures audio levels, it does not adjust them.

  • From the Presets menu, choose the monitoring settings you want to use for your audio.

NOTE: You can adjust these settings using the Settings tab in this panel.

For example, the YouTube setting has a target of -14 LUFS, with a maximum true peak of -1 dBTP.

NOTE: There are four different options for measurement scale: LUFS, LKFS, LU/LUFS and LU/LKFS. My general preference is LKFS.

I like the Radar because it shows audio levels over time. I like the new Loudness Meter because it shows more granular detail about my audio on an instant-by-instant basis.


Please rate the helpfulness of this tip.

Click on a star to rate it!

… for Adobe Premiere Pro CC

Tip #1633: New! Text Color Gradients in Premiere

Larry Jordan – LarryJordan.com

Text gradients now can be created directly in Premiere.

Text with gradient (top), and the top portion of the Color Picker showing gradient settings (bottom).

Topic $TipTopic

Text gradients have been a part of the legacy Titler in Premiere for a while. Now, however, you can create them directly in Premiere itself. Here’s how.

  • Select the text to which you want to apply the gradient.
  • Switch to the Essential Graphics workspace.
  • In the Appearance section click the Fill color chip.
  • In the Color Picker dialog that opens, select one of the gradient options from the drop-down list at the top left. There are three choices: Solid, Linear Gradient, and Radial Gradient. (Red arrow in the screen shot.)

To adjust the colors in the gradient:

  • Click any of the color stops below the gradient slider to show different color options and change the color.
  • To remove a color stop, click one and either drag it away from the gradient slider and release, or click Delete at the bottom right of the gradient slider.

To adjust the opacity of the gradient:

  • Move the Opacity Stop at the top of the gradient slider.
  • Then change the opacity in the Opacity % field

To adjust the angle and location of the gradient:

  • Angle: Type in a value in the Angle field or drag on the blue hot text to change a linear gradient’s angle.
  • Location: Type in a value in the Location field or drag on the blue hot text for an interactive experience to change the location of a selected stop or midpoint.

As you adjust all the controls in the gradient, you can see your changes to the text live in the Program Monitor.

Click OK to apply the gradient to the text.


Please rate the helpfulness of this tip.

Click on a star to rate it!

… for Codecs & Media

Tip #1629: What is the VVC Codec

Larry Jordan – LarryJordan.com

Versatile Video Coding was finalized July 6, 2020, rolling out early 2021.

Image courtesy of Pexels.com.

Topic $TipTopic

The VVC codec is promoted as the successor to HEVC. (And HEVC is currently not predicted to achieve the success of H.264 – see Tip #1623). But what is it?

Versatile Video Coding (VVC), also called H.266, is a brand-new video compression technology that is under current development to help reduce video size while not sacrificing image quality…. The VVC codec is especially designed to aid in the smoothness of higher-quality video services such as 360° omnidirectional immersive multimedia, high-dynamic-range (HDR) video and conventional dynamic range video. (5KPlayer.com )

NOTE: How large are HD video files without compression? A 1080p 30fps video, would require bandwidth of 1423.82 Mbps! To stream a second of 4K video, bandwidth aproaches 6 Gbps!!

Compared with royalty-free video coding formats like AVI and VP9, the H.26x series, including H.266, H.265, H.264, etc., are proprietary with numbers of patent pool administrators.

Normally, one of the reasons that a new video coding standard is worth spreading is due to improvement of the video compression algorithm. The higher the compression ratio, the less the bit rate for data transmission, the smaller the file size would be. Given that, what are the benefits of H.266?

  • H.266 comes with new algorithm, 30% to 50% higher compression rate for the same video quality than HEVC. A video file encoded in VVC therefore would be much smaller than in HEVC, let alone one compressed using H.264 (AVC).
  • In terms of quality, H.266 so good that barely any cother odec can match it at the same data rate.
  • VVC is better for streaming UHD content in 4K, 8K and even 16K on TV.
  • Better support for High Dynamic Range (HDR) and 360° video.

Here’s a link with more details , written for non-engineers.


Please rate the helpfulness of this tip.

Click on a star to rate it!

… for Adobe Premiere Pro CC

Tip #1627: Adobe Updates Premiere & Audition

Larry Jordan – LarryJordan.com

Monthly update cycle continues for Adobe.

Adobe Premiere Pro logo.

Topic $TipTopic

Last week, Adobe updated both Premiere Pro and Audition. Here’s what’s new.

Adobe Audition

  • Audition now runs natively on Apple M1 systems providing improved performance for recording and mixing high-quality audio content, such as podcasts, broadcast, sound design, audio restoration, and more. Notable gains include faster mixdowns, audio effects rendering, and near-real time updates in the Spectral Display Editor.
  • The new Loudness Meter in both Audition and Premiere Pro provides industry standard ITU-based loudness monitoring for broadcast, podcast, and streaming media content. The new Loudness Meter, which will replace the previous Loudness Radar, transparently measures program loudness for full mixes, single tracks, or buses and submixes.
  • Strip Silence is a much-requested new feature which allows users to identify and remove silent or inactive regions in recorded clips, without losing synchronization in multitrack audio. Use this feature for cleaning up voice recording, interviews, and preparing multi-track edits, such as podcasts or audio documentary content.

In Premiere Pro

  • Text gradients are now part of the modern titling tools in the Essential Graphics panel. Users can apply gradients to add sheen to letters or colorful effects for text and titles.
  • Caption items in the Captions track now have the same label color options as other items on the timeline. Select Label Color Group to assign labels and colors for captions – and use the same keyboard shortcuts.
  • Simple edits with Caption items on the Caption track behave the same as traditional linked video and audio pairs. Selecting, moving, trimming, and blade edits will be applied to video audio and captions items simultaneously.
  • Canon XF HEVC performance improvements
  • Support for DirectX display technology on Windows

Please rate the helpfulness of this tip.

Click on a star to rate it!

… for Codecs & Media

Tip #1625: IP is the Future of Broadcast

Larry Jordan – LarryJordan.com

“Television becomes just one service inside of an IP broadcast.”

Image courtesy of HPAonline.com.

Topic $TipTopic

This article, written by Michael Balderson, first appeared in TVTechnology.com. This is a summary.

Broadcast television is no longer unique, and that will open up new and exciting doors over the next few years. More specifically, the broadcast industry’s transition to IP technology allows them to operate and compete in streaming markets, which will be a boost as the industry looks to transition to ATSC 3.0, embrace remote production and explore new opportunities to engage with viewers.

This was the focus of last week’s two-part Broadcasters Panel during HPA Tech Retreat 2021. The panel was moderated by industry pundit Matthew Goldman and featured Del Parks of Sinclair Broadcast Group, Dave Folsom of Pearl TV, Ken Fuller of CBS and Richard Friedel of Fox as panelists.

With IP a critical feature of the ATSC 3.0 standard, traditional video media systems can now move into new areas, according to Parks.

“Having an IP backbone does a couple of things: It gets us into a different operating environment globally, but it also gives us to a large degree some interoperability with 5G, with LT, with existing telecommunications,” Parks said. “We have in our labs at CES and NAB demonstrated switching back and forth between 5G and ATSC 3.0 seamlessly.”

The full Broadcaster Panels are available to view on-demand via the
HPA Tech Retreat Website.
.


Please rate the helpfulness of this tip.

Click on a star to rate it!

… for Codecs & Media

Tip #1623: H.264 is Going Away. Chaos is Coming.

Larry Jordan – LarryJordan.com

“Feudal” and “obtuse” MPEG bureaucrats blamed.

Image courtesy: ReThink TV

Topic $TipTopic

This article, written by Adrian Penington, first appeared in NAB Amplify. This is a summary.

MPEG has been the dominant force in driving standardization of video compression format over three decades successfully delivering successive generations which drive bitrates down while keeping quality up.

In recent times its codec HEVC/H.265, the successor to the world’s current dominant code AVC H.264, has become mired in opaque patent pools which has hindered adoption and caused web giants and OEMs to seek alternatives. The mistakes in implementing HEVC and in not correcting them in time have come home to roost.

MPEG’s once dominant position seems to have come to an end — “and the blame seems to be entirely on the mess that arose from intellectual property claims and royalties,” concludes Rethink Research in a comprehensive analysis of the codec sector.

This matters because codecs are essential components of any video business, particularly when streaming content OTT to devices everywhere. Decisions on which horse to back need taking some time out and investments don’t run cheap. In fact, they could be about to get steeper for all concerned.

Instead of one codec to rule them all, as was the state of play for the last 30 years, what all this means for the next few decades is a fractured market with no single codec reach the same dominant position of MPEG 2 or AVC.

EXTRA CREDIT

Turning to the ReThink TV website, they summarize the report as:

  • AVC (H.264) will finally decline, but its direct successor (H.265) will not replace it entirely.
  • As HEVC grows, its own successor VVC (H.266) becomes a direct competitor. This, and its high royalty fees, will stall growth, as well as the memory of the infamous HEVC royalty wars.
  • AV1 will emerge as an OTT option, but is still dogged by Sisvel’s recent appearance and royalty claims.
  • LCEVC will take root, initially in the AOMedia ecosystem, but expanding comfortably into the MPEG family by 2030.

Here’s a link to the Executive Summary of the ReThink TV Report.


Please rate the helpfulness of this tip.

Click on a star to rate it!

… for Apple Final Cut Pro X

Tip #1632: Change Default Color Grading Options

Larry Jordan – LarryJordan.com

My personal preference is for Color Wheels.

Set the default Color Correction option using the General preferences tab.

Topic $TipTopic

The Color Board is the default color grading setting for Final Cut Pro. Some people like the Color Board, other folks prefer other color grading options. Here’s how to change the default setting.

  • Open Final Cut.
  • Go to Final Cut Pro > Preferences.
  • Go to the General tab and change Color Correction to the default color tool you want to use.

This choice remains in effect until you either change it, or trash preferences.

NOTE: This sets the default setting. You can always change to something different using the Color Inspector.


Please rate the helpfulness of this tip.

Click on a star to rate it!

… for Apple Final Cut Pro X

Tip #1631: Learn Where Your Library Media Is Stored

Larry Jordan – LarryJordan.com

This lists media by type, storage space used and drive.

Media storage data displayed in the Info Inspector in Final Cut Pro.

Topic $TipTopic

Here’s a fast way to learn how much space the media for a Final Cut Library takes, what type of files are using that space, and where it’s stored.

Select a Library in the Library List, then go to the Info Inspector.

At the bottom (see screen shot) is a list of where your media is stored by drive and category.


Please rate the helpfulness of this tip.

Click on a star to rate it!

… for Apple Final Cut Pro X

Tip #1630: Simplify Transferring a Final Cut Library

Larry Jordan – LarryJordan.com

Store custom Motion templates in the Library to simplify transfers.

Library Storage Locations dialog.

Topic $TipTopic

Here’s a quick tip that makes sharing Final Cut Libraries between editors less stressful by consolidating custom Motion templates into the Library.

Normally, Motion stores – and Final Cut accesses – Motion templates in [ Home Directory ] > Movies > Motion Templates. However, when you send a Library to another editor, none of those templates transfer with it.

Here’s how to fix it:

  • Open a Final Cut Library.
  • Select the Library in the Library List (to the left of the Browser).
  • Open the Inspector and click Storage Locations > Modify Settings
  • Change Motion Content to In Library.
  • Then, click Motion Content > Consolidate. This copies all custom Motion templates used by that Library from the Motion Templates folder into the Library.

Now, wherever you transfer that Library, all custom templates will travel with it.


Please rate the helpfulness of this tip.

Click on a star to rate it!

… for Random Weirdness

Tip #1616: Top 50 Perfect Shots from Star Wars Films

Larry Jordan – LarryJordan.com

Nothing like a list of perfection to get a debate started!

A Hew Hope – dir: George Lucas, dp: Gilbert Taylor

Topic $TipTopic

This article first appeared in FilmSchoolRejects.com. This is an excerpt.

Clearly, someone had too much time on their hands. From A New Hope to The Mandalorian, they selected the 50 live-action Star Wars cinematic universe’s most perfect frames.

The Perfect Shot is as much about a beautifully composed frame as it is about how an individual shot makes us feel. The most perfect shots accomplish both, holding up in a vacuum while also transporting us back to our most honored experiences. Freshly updated for “MayTheFourth,” take a look at this link and see whether you agree or whether you can do better.

Link


Please rate the helpfulness of this tip.

Click on a star to rate it!