… for Visual Effects

Tip #1725: Rocket Lasso Releases Ricochet

Larry Jordan – LarryJordan.com

Ricochet: When you’re tired of splines NOT bouncing off objects.

Image courtesy of Rocket Lasso.

Topic $TipTopic

This article first appeared in PostPerspective.com. This is a summary.

Rocket Lasso has released another plugin for Cinema 4D. Ricochet behaves like a particle system for splines by automatically animating splines to “ricochet” around your Cinema 4D scene or even within models. Ricochet pre-calculates the entire path of the splines, so there is no need to guess where it will end up or wait for the timeline to play every frame.

Ricochet automatically animates splines ricocheting around your models and scene. You can have them bouncing around forever by setting the Rate, Surface Alignment to wrap splines around objects, or you can dynamically fill volumes of any model or space over time with Growth.

Spline segments can be colorized with built-in random color, greyscale or driven by MoGraph Effectors. Use Cinema 4D’s Matrix object as the basis to create as many Ricochet origins as you want and Fields to drive the advanced interactions with Ricochet’s parameters.

Ricochet is compatible with Cinema R20 and greater on Windows and macOS.

EXTRA CREDIT

Here’s the link to Ricochet, itself.


Please rate the helpfulness of this tip.

Click on a star to rate it!

… for Adobe Premiere Pro CC

Tip #1724: What Do These Icons Do?

Larry Jordan – LarryJordan.com

These six icons control how media files are displayed in the Project panel or bins.

These icons are located in the lower-left corner of the Premiere interface.

Topic $TipTopic

These six icons, tucked into the lower-left corner of the Premiere Pro interface, can help you better find and organize the media in your project. Here’s what they do, from left to right.

  • Green pen. This marks a project as writable. For solo editors, this will always be green. But, for team projects, a red pen indicates a project you can view, but not change.
  • Two stacked lines. This displays the contents of the Project panel or a bin as lines of text.
  • Blue square. This displays the contents of the Project panel or a bin as thumbnails.
  • Stacked rectangles. This displays the contents of the Project panel or a bin as “freeform thumbnails” you can resize and move around – like images on a light table. The purpose of this is to help you organize your media visually.
  • Open circle. This slider determines how large to display thumbnails. (Not available when media is displayed as a list.)
  • Three stacked lines. This determines the sort order for thumbnails. (This option is only available when thumbnails, not freeform images, are displayed.

NOTE: Sort order when a line list is displayed is determined by most recent column header you clicked.


Please rate the helpfulness of this tip.

Click on a star to rate it!

… for Adobe Premiere Pro CC

Tip #1723: How Much Faster?

Larry Jordan – LarryJordan.com

Adobe continues its focus on stability and performance with Premiere Pro.

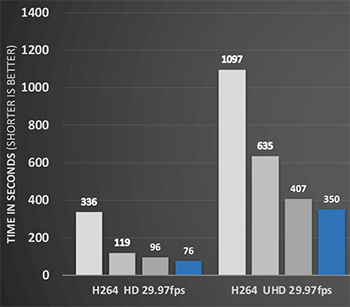
H.264 encoding using Intel Quick Snyc (Windows). (L-R) Software-only, Premiere 14.0, 14.8 and 15.1.

Topic $TipTopic

Adobe recently improved the performance of H.264 encoding on Windows using Intel Quick Sync hardware acceleration.

The latest numbers show Premiere Pro 15.1 to be:

  • 77% faster than software encoding using H.264 with HD media.
  • 68% faster than software encoding using H.264 with UHD media.
  • 36% faster than Premiere 14.0 using H.264 with HD media.
  • 45% faster than Premiere 14.0 using H.264 with UHD media.

HEVC encoding showed similar speed gains.

EXTRA CREDIT

Premiere Pro 15.1 was released in April, 2021. The chart illustrates the specific results by version.


Please rate the helpfulness of this tip.

Click on a star to rate it!

… for Adobe Premiere Pro CC

Tip #1722: The New Quick Export Menu

Larry Jordan – LarryJordan.com

Quick Export is designed to create H.264 files for the web.

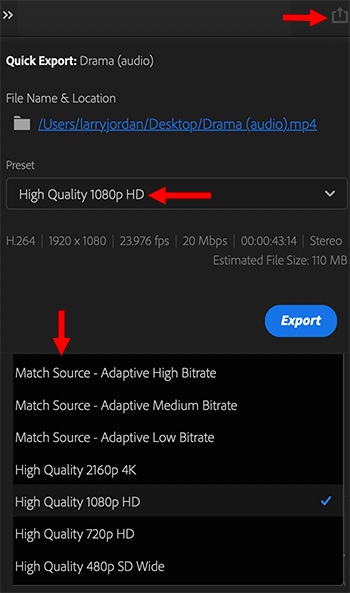
The Quick Export panel (top) and the contents of the Preset menu (bottom).

Topic $TipTopic

One of the newer features in Adobe Premiere Pro is Quick Export. This is a one-click icon to quickly export a project for review or distribution via the web or social media.

  • In the top right corner of the Premiere interface is a “Send” icon (top red arrow).
  • Click it and the Quick Export panel pops up.
  • Click the menu (middle arrow) to reveal a variety of compression choices (bottom arrow). Select the option you want based upon the frame size of the exported file.

These options all create H.264 movies, suitable for posting to social media or websites.

You can see the specific compression settings at the bottom of this menu.

EXTRA CREDIT

This menu was designed to simplify exports for social media. As always, you can create custom settings and choose from a much wider variety of codecs using File > Export > Media.


Please rate the helpfulness of this tip.

Click on a star to rate it!

… for Codecs & Media

Tip #1721: New! Change Starting Timecode in Compressor

Larry Jordan – LarryJordan.com

New! Modify source clip timecode for compressed files.

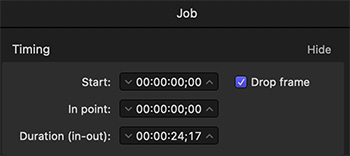
The new “Change Timecode” options in Apple Compressor.

Topic $TipTopic

New with the 4.5.3 update to Compressor is a setting to modify a job’s starting timecode in the timing area of the Job Inspector. Here’s how.

NOTE: Modifying the starting timecode automatically adjusts the job’s In point to match the new start time.

  • Import a clip into Compressor.
  • Assign a compression setting.
  • Select the job (file name) in the Compressor batch area.
  • Go to Inspector > Job.
  • Look about 1/4 the way down to see the new timecode entries (see screen shot).
  • Enter the new starting timecode and, if necessary, click Drop Frame to enable drop frame timecode.

The new timecode will be used when compressing this file.

EXTRA CREDIT

You can enter numbers or click the Up/Down arrows in the timecode pane.


Please rate the helpfulness of this tip.

Click on a star to rate it!

… for Codecs & Media

Tip #1720: New! Framing Options in Compressor

Larry Jordan – LarryJordan.com

New compression options support more social media platforms.

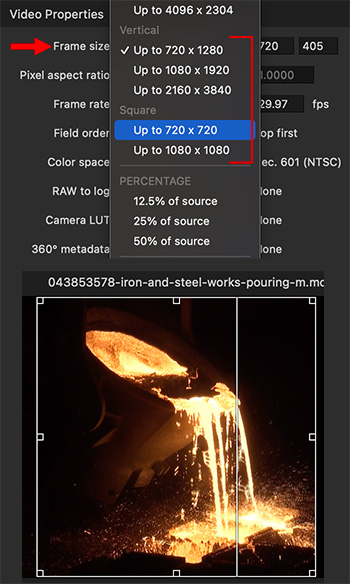
New frame size options support vertical and square sizes.

Topic $TipTopic

New with the 4.5.3 update to Compressor are new compression settings which simplify cropping and compressing square and vertical media. Here’s how.

  • Import a video clip for compression and apply a compression setting, for example, Apple Devices > Apple Devices HD (Best Quality).
  • Go to Video > Frame Size and choose one of the new vertical or square size options (red arrow and bracket).
  • In the Viewer, drag one of the small cropping squares along the edge and watch the frame size numbers in the Inspector until you get to the frame size you want.
  • By default, Compressor tries to preserve the entire frame. Dragging one of the cropping squares allows you to determine which part of the image to crop.
  • Click in the middle of the selection square in the Viewer and drag to reposition which part of the image will be cropped.

EXTRA CREDIT

You can use this technique with other codecs, for example, ProRes 422. Compression options will vary by codec and source clip.


Please rate the helpfulness of this tip.

Click on a star to rate it!

… for Codecs & Media

Tip #1715: Apple Updates Compressor

Larry Jordan – LarryJordan.com

Update adds a variety of new features.

The Apple compressor logo, displaying the latest version number.

Topic $TipTopic

Last week, as part of updates to all their media applications, Apple updated Compressor to version 4.5.3.

New features include:

  • Optimization for Apple silicon
  • Batch status notifications
  • Improved audio descriptions

Here’s the complete list of new features, according to Apple:

  • Adds the ability to modify the start timecode of a source clip or audio file.
  • Adds the ability to choose the color palette and dithering algorithm to minimize the file size of PNGs and GiFs.
  • Adds the ability to resize vertical video to other vertical frame sizes and square video to other square frame sizes with new Up To presets in the inspector.
  • Adds the ability to resize video to vertical and square aspect ratios using new presets for Cropping and Padding in the inspector.
  • Allows a user to disable passthrough of source metadata to output audio files and MOV, MP4, M4V, and MXF video formats.
  • Adds an alert when a group of shared computers contains a Mac with an incompatible Compressor version.
  • Adds support for MXF language tags.
  • Adds the ability to write an AVCHD disk image to the file system.
  • Adds keyboard shortcuts to create new batches for iTunes Store or IMF Packages types.
  • Fixes an issue where DPX or Cineon image sequences were imported with an incorrect frame rate.

I especially like the new resizing options.

Here’s the link to Apple Compressor’s Release Notes.


Please rate the helpfulness of this tip.

Click on a star to rate it!

… for Apple Final Cut Pro X

Tip #1730: Final Cut Pro Bug Workarounds

Larry Jordan – LarryJordan.com

Two workarounds for apparent bugs in Final Cut Pro.

Image detail courtesy of Pexels.com.

Topic $TipTopic

Scott Newell reports on two workarounds for Final Cut Pro.

BROKEN RENDERS

Just wanted to share two FCP X stories with you. I was trying to output (share) a fairly complex video with lots of various video sources and found it stopped at 94% each time. Online searches said it could be a corrupt file somewhere and many suggested trashing preferences. Nothing worked.

So I rendered out a section at a time to see where the problem was. Turned out to be a plugin from Pixel Film Studios near the end and it was in a very dense portion of the timeline.. I’ve used many of their plugins successfully before, but it must have been taxing my system beyond its capabilities. Removed the effect and it rendered without a hitch.

My takeaway (which I suspect is something you already do) is to look at 3rd party plugins first when there is a problem like that.

LARRY ADDS: The two biggest issues that cause renders to fail are corrupt stock media and broken plugins.

MISSING SHORTCUTS

One other question that doesn’t involve plugins. Sometimes when I start a new project and copy and paste from another project to start things going, the enlarge and shrink keyboard shortcuts (CMD+ and CMD-) don’t have any effect. I have to go to the appearance icon in the top right corner of the Timeline and move the timeline resize slider to enable the keystrokes again. Wonder why that is?

Just recently a friend called me to ask why his CMD+ and CMD- key combinations weren’t working and I knew exactly what he was talking about, so I must not be the only one this is happening with.

NOTE: Scott sent me this note before the latest FCP 10.5.3 update. I don’t know whether these were fixed in that version or not.


Please rate the helpfulness of this tip.

Click on a star to rate it!

… for Apple Final Cut Pro X

Tip #1717: New! Improved Search in Final Cut Pro

Larry Jordan – LarryJordan.com

Searches are lightning quick and more controllable than ever.

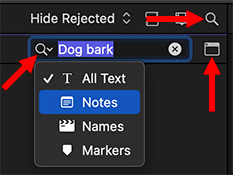
Search tool (upper arrow), Search limit (left arrow) & extended search (lower arrow).

Topic $TipTopic

New with the 10.5.3 update to Final Cut Pro is an enhanced search capability in the Browser.

To get started:

  • Select a library, event(s) or folders that you want to search. (You can’t search across multiple libraries.)
  • Click the Search button (top arrow, the magnifying glass) in the top-right corner of the Browser.
  • Enter the text you want to search for. By default, FCP will search in notes, clip names, project names and marker text.

NOTE: It won’t search for text stored in titles.

  • If you want to restrict your search, click the Search button (left red arrow), then choose where you want to limit the search.

EXTRA CREDIT

You can also search on multiple criteria by clicking the small “clapperboard” icon (lower red arrow) to the right of the search box.

This feature allows extensive searching on a variety of criteria, even the ability to save searches. But explaining how this feature works requires more than a tip.

Here’s an older article that explains more.


Please rate the helpfulness of this tip.

Click on a star to rate it!

… for Apple Final Cut Pro X

Tip #1716: New! Browser Column Views in FCP

Larry Jordan – LarryJordan.com

Column sets are a great way to organize the display of Browser data.

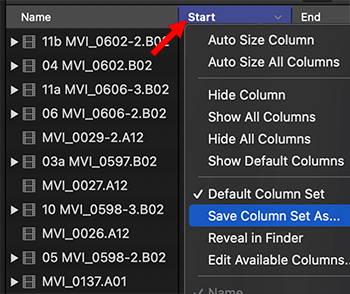
Control-click any column header in the Browser to access the new column set features.

Topic $TipTopic

The Browser in Final Cut Pro holds a wealth of technical information about clips and projects. While we’ve always been able to view this information, we’ve never been able to organize it.

Until now.

With the 10.5.3 update to Final Cut, Apple added the ability to create and share column sets. That is, we can select which columns we want to display in the Browser, save those changes and share them with others.

“The column settings include available columns, column order, column width, column visibility, and custom metadata fields. You can easily copy column sets to another computer, or share them with friends and colleagues so that the same column sets are available in their browser.” (Apple Help)

  • Control-click any column header in the Browser and choose Edit Available Columns. This determines which fields are displayed when you Control-click a column header.
  • Since the default column set can’t be changed, you’ll be asked to create a new column set.

NOTE: This is exactly the same concept as creating a new keyboard shortcut command set.

  • You are then presented with a list of HUNDREDS of metadata fields to add or remove from the Browser.
  • Check those you want, uncheck those you don’t.
  • Click OK when you are done.

What you’ve done is create a master list of fields that can be displayed in the Browser. However, just because you have access, doesn’t mean you need to display all of them.

EXTRA CREDIT

What works best for me is to use the Column Editor to make sure you have the fields you want, then Control-click a Browser column header and uncheck those items you don’t want to view at this time.

Then, save the Column set so that the next time you open the Browser, your new custom column organization will be retained.

You can create as many different column sets as you need, depending upon the tasks you need to accomplish at that time.


Please rate the helpfulness of this tip.

Click on a star to rate it!