NDI Tools announced support to enable NDI output from Apple Final Cut Pro, Adobe Premiere Pro and After Effects in their upcoming NDI Tools 5. The upcoming utility is free.
Shipping later in June, “NDI 5 makes it possible, for the first time in history, to connect to any device, in any location, anywhere in the world – allowing it to work with almost any video application in the world. Physical studios can connect to ones in the cloud and remote video production effectively becomes local. Tools is a free suite of applications designed to introduce you to the world of IP. NDI makes it possible to connect to any device, in any location, anywhere in the world – and transmit live video to wherever you are.” (NDI Tools website)
NDI 5 makes it possible, for the first time in history, to connect to any device, in any location, anywhere in the world – allowing it to work with almost any video application in the world. Physical studios can connect to ones in the cloud and remote video production effectively becomes local.
NDI Tools fully supports all M1 Macs, Adobe Premiere Pro, After Effects, and Final Cut Pro, as well as all macOS, iOS, tvOS and iPadOS devices.
https://www.theinsidetips.com/wp-content/uploads/2019/09/Tips-Logo-700x150.jpg00Larry Jordanhttps://www.theinsidetips.com/wp-content/uploads/2019/09/Tips-Logo-700x150.jpgLarry Jordan2021-06-15 01:30:002021-06-11 17:36:09Tip #1707: NDI Tools 5: NDI Output from FCP & Premiere
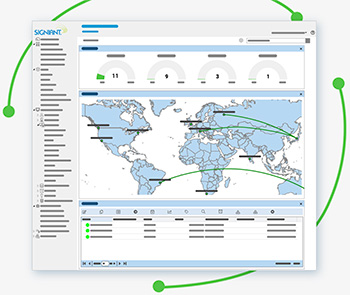
Signiant offers faster, more secure file transfers.
Image courtesy of Signiant.com.
TVTech reports that the NBC Olympics will use Signiant’s File Transfer software for the Tokyo Olympics to enable remote productions. (Here’s an excerpt.)
NBC Olympics is deploying Signiant intelligent file transfer software for its production of the Games of the XXXII Olympiad, reported Darryl Jefferson, vice president of post production and digital workflow, at NBC Sports and Olympics, and Margaret Craig, CEO of Signiant.
Signiant’s software will allow NBC Olympics to leverage their talent and equipment back home in Stamford with remote production techniques, enabling them to provide enhanced viewing experiences to their audience much more efficiently, the companies reported.
NBC will use Signiant’s software to move petabytes of footage from Tokyo back to its International Broadcast Center in Stamford immediately after it is captured.
In addition, the software will be used to transfer content, including advanced graphics work and pre-recorded footage, quickly and securely back to the broadcast center in Tokyo.
https://www.theinsidetips.com/wp-content/uploads/2019/09/Tips-Logo-700x150.jpg00Larry Jordanhttps://www.theinsidetips.com/wp-content/uploads/2019/09/Tips-Logo-700x150.jpgLarry Jordan2021-06-15 01:30:002021-06-11 17:37:07Tip #1706: Olympics To Use Signiant File Transfer Software
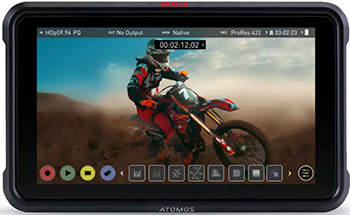
TVTech reports that Atmos and Panasonic have released Apple ProRes RAW recording from the Panasonic LUMIX GH5S camera when used with the Atmos Ninja V or Ninja V+, the companies said today.
Both products now can record up to 4K DCI p60 ProRes RAW and 3.7Kp60 anamorphic RAW from the GH5S with an update to AtomOS Firmware 10.66.
The small, compact size of the GH5S makes it well suited for gimbal and drone shooting, vlogging and cinema production. Its Micro Four Thirds image sensor provides flexible lens options, affordable anamorphic capture and dual native ISO, the companies said.
The ProRes RAW files captured when using the camera with the Ninja V or Ninja V+ will offer full metadata support in Final Cut Pro for White Balance and ISO slider adjustments, they said.
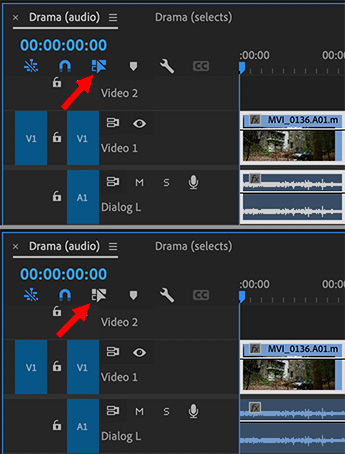
Most of the time, leaving Linked Selection on prevents surprises during editing.
Linked Selection on (blue): Top. Linked Selection off (white): Bottom
Normally, when you click a linked clip (where the audio and video are synced together), both are selected. But there’s a switch that can change that.
In the top left corner of the timeline (see screen shot) is the Linked Selection switch.
When this is blue (top image), clicking a synced audio/video clip selects the entire clip.
When this switch is white(bottom image), clicking a synced clip only selects that part of the clip you clicked on.
NOTE: This separation is useful when you want to delete the audio or video portion of a clip, or move the audio separately from the video.
EXTRA CREDIT
Toggling this switch does not change the selection state of any currently-selected clips.
You can temporarily achieve the same result by pressing the Option key when you click a clip. This performs the opposite of the current setting of this switch.
Please rate the helpfulness of this tip.
Click on a star to rate it!
https://www.theinsidetips.com/wp-content/uploads/2019/09/Tips-Logo-700x150.jpg00Larry Jordanhttps://www.theinsidetips.com/wp-content/uploads/2019/09/Tips-Logo-700x150.jpgLarry Jordan2021-06-15 01:30:002021-06-15 01:30:00Tip #1700: What the Linked Selection Button Does
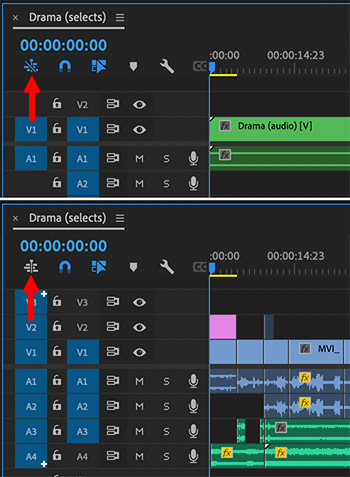
Edit sequences you don’t want to change as a single element.
This switch determines if a nest is added to the timeline as a single “clip,” or a group of clips.
Hidden in plain sight in the top left corner of the timeline is the “Nest Switch.”
A nest is a sequence contained in another sequence. There are a wide variety of uses:
Reusing an open between programs
Cleaning up a timeline
Preventing accidental changes to a completed section
And many others
An easy way to add one sequence into another is to drag it from the Project panel into the timeline.
NOTE: You can also use the traditional keyboard shortcuts of comma and period.
When the switch, indicated by the red arrow in the screen shot, is blue, the sequence edits into the timeline as a single element. This makes it harder to make changes to the contents of the sequence.
When the switch is white, the sequence is edited into the timeline as individual clips. This simplifies making changes.
EXTRA CREDIT
To see the contents of a nest, simply double-click it. That opens it into its own timeline for editing.
Please rate the helpfulness of this tip.
Click on a star to rate it!
https://www.theinsidetips.com/wp-content/uploads/2019/09/Tips-Logo-700x150.jpg00Larry Jordanhttps://www.theinsidetips.com/wp-content/uploads/2019/09/Tips-Logo-700x150.jpgLarry Jordan2021-06-15 01:30:002021-06-15 01:30:00Tip #1699: The Secret Nest Switch
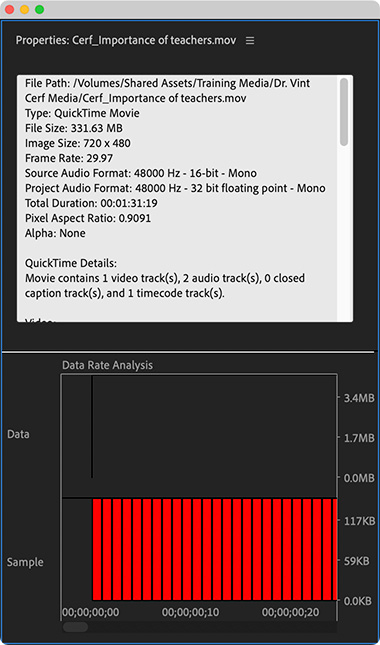
The Clip Properties displays tons of technical details about a clip.
The Clip Properties window in Premiere Pro.
Most of the time, you don’t need to know all the technical details of the clips you are editing. But, when you do, Premiere has a hidden menu that can tell you a LOT!
To display it:
Control-click a clip in the Timeline, Project or Bin panel.
From the popup menu that appears, select Properties.
The Clip Properties window appears (see screen shot).
NOTE: The contents of this window will change, depending upon what type of clip is selected.
I enjoy exploring this window from time to time simply to admire how much technical data Premiere needs to track and process for each clip.
EXTRA CREDIT
The Data Rate Analysis window shows the file size of each frame in a video clip. Codecs that use variable bit rate encoding will vary in size per frame.
Please rate the helpfulness of this tip.
Click on a star to rate it!
https://www.theinsidetips.com/wp-content/uploads/2019/09/Tips-Logo-700x150.jpg00Larry Jordanhttps://www.theinsidetips.com/wp-content/uploads/2019/09/Tips-Logo-700x150.jpgLarry Jordan2021-06-15 01:30:002021-06-11 17:43:02Tip #1697: The Secrets in Clip Properties
This makes keyframe timing changes faster than the Inspector.
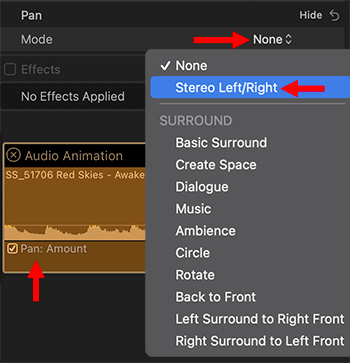
This composite image shows where to enable pan controls, the Pan Mode menu and the clip’s Audio Animation bar, with pan enabled.
Attached, but hidden, to each clip in the Final Cut timeline is the Audio Animation Editor. This “bar” provides another way to adjust effect parameters, create fade-ins or fade-outs, or change effects over time using keyframes.
The Audio Animation Editor appears above a timeline clip. To make it appear, select one or more clips in the timeline, then type Control + A or choose Clip > Show Audio Animation. (See screen shot.)
By default, when this bar first appears, no adjustable settings are displayed.
NOTE: Audio volume is already displayed as a horizontal line in the audio clip.
To enable an audio effect, either apply one from the Effects Browser, or go to the Audio Inspector and change the Pan Mode from None to Stereo Left/Right. (See screen shot)
This displays the Pan: Amount setting in the Audio Animation Editor. (See screen shot)
Click the check boxes on the left to turn an effect on or off (they are on by default).
Double-click the box on the right side (not shown) to expand the setting vertically to make adjustments easier to make.
The dotted line that appears is used to set, adjust or remove keyframes for that parameter.
To create a keyframe: Option-click the line
To move a keyframe for timing, drag horizontally.
To adjust a keyframe setting, drag vertically.
NOTE: Once you start dragging, Final Cut constrains movement. For example, once you start dragging horizontally, FCP will only allow horizontal movement until you let go of the mouse. This prevents unintended changes to settings when all you wanted to do was change the time, or vice-versa.
To convert a keyframe from a corner to a curve, Control-click it and select from the menu.
To delete a keyframe, Control-click it and select from the menu.
NOTE: As you add effects to a clip, they are also added to the Audio Animation Editor.
EXTRA CREDIT
You can also add keyframes using the Inspector and they will appear in the Audio Animation Editor. This bar is faster than the Inspector to change keyframe timing, but the Inspector is easier to change settings.
The Video Animation Editor bar, showing the Transform keyframe controls menu.
Attached, but hidden, to each clip in the Final Cut timeline is the Video Animation Editor. This “bar” provides anther way to adjust effect parameters, or change timing using keyframes.
The Video Animation Editor appears above the clip. To make it appear, select one or more clips in the timeline, then type Control + V or choose Clip > Show Video Animation. (See screen shot.)
Click the check boxes on the left to turn an effect on or off (they are on by default).
Click the small down-pointing arrow to select a specific parameter to adjust (red arrow).
Double-click the box on the right side (not shown) to expand the setting vertically to make adjustments easier to make.
NOTE: This expansion box appears for Opacity, but not most other effects.
The dotted line that appears is used to set, adjust or remove keyframes for that parameter.
To create a keyframe: Option-click the line
To move a keyframe for timing, drag horizontally.
To adjust a keyframe setting, drag vertically.
NOTE: Once you start dragging, Final Cut constrains movement. For example, once you start dragging horizontally, FCP will only allow horizontal movement until you let go of the mouse. This prevents unintended changes to settings when all you wanted to do was change the time, or vice-versa.
To convert a keyframe from a corner to a curve, Control-click it and select from the menu.
To delete a keyframe, Control-click it and select from the menu.
NOTE: As you add effects to a clip, they are also added to the Video Animation Editor.
EXTRA CREDIT
You can also add keyframes using the Inspector and they will appear in the Video Animation Editor. This bar is faster than the Inspector to change keyframe timing, but the Inspector is easier to change settings.
Please rate the helpfulness of this tip.
Click on a star to rate it!
https://www.theinsidetips.com/wp-content/uploads/2019/09/Tips-Logo-700x150.jpg00Larry Jordanhttps://www.theinsidetips.com/wp-content/uploads/2019/09/Tips-Logo-700x150.jpgLarry Jordan2021-06-14 01:30:002021-06-11 17:30:00Tip #1695: The Hidden Video Animation Editor
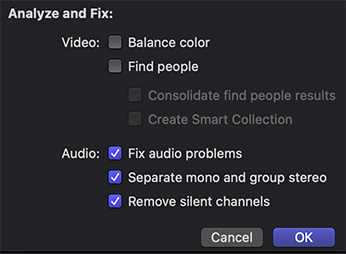
These automated features help find and fix problem clips.
The Final Cut Analyze and Fix dialog box, with audio fixes enabled.
Final Cut provides an option – Analyze and Fix – that will review clips either during or after import to find and, potentially fix, any problems with the clip.
This process runs in the background and can be monitored in the Background Tasks window (Shortcut: Cmd + 9)
If you want to check clips after they are imported, simply select the clips you want to check in the Browser and choose File > Analyze and Fix.
VIDEO OPTIONS
Here’s what the options mean (according to Apple’s Help files):
Balance Color: Analyzes video clips to detect color balance and contrast. Color is automatically balanced when you add the clip to the timeline. You can turn automatic color adjustments on and off at any time using the Video Inspector.
Find People: Analyzes video clips and still images for the number of people present and shot types. After analysis, any of the following keywords are added to the clips or clip ranges: One Person, Two Persons, Group, Close Up Shot, Medium Shot, and Wide Shot.
Consolidate find people results: Consolidates all of the “find people” analysis keywords into one shot type keyword and one people keyword for every 2-minute segment of video. The shot type keyword chosen is the one for the widest shot type, and the people keyword chosen is the one representing the most people. For example, if a video segment contains Medium Shot, Wide Shot, One Person, and Group keywords, the segment’s analysis keywords are reduced to Wide Shot and Group during consolidation.
Create Smart Collections after analysis: Creates a Smart Collection for each keyword applied when video clips and still images are analyzed for the presence of people. The Smart Collections are listed alphabetically in a People folder inside the event in the Libraries sidebar.
AUDIO OPTIONS
Analyze and fix audio problems: Analyzes the audio for hum, noise, and loudness. Final Cut Pro automatically fixes problems that are considered severe (marked in red) and flags problems that are considered moderate (marked in yellow). See Enhance audio in Final Cut Pro.
Separate mono and group stereo audio: Audio channels are analyzed and grouped as dual mono or stereo, depending on the results of the analysis. Automatically corrected audio channels are marked as Autoselected. For more information about audio channels, see Configure audio channels in Final Cut Pro.
Remove silent channels: Audio channels are analyzed, and silent channels are removed. Clips that have had channels removed are marked as Autoselected. For more information about audio channels, see Configure audio channels in Final Cut Pro.
EXTRA CREDIT
Personally, i don’t like the results of video analysis, so I always turn these off. However, I do like the results of audio analysis so I always turn these on.
Please rate the helpfulness of this tip.
Click on a star to rate it!
https://www.theinsidetips.com/wp-content/uploads/2019/09/Tips-Logo-700x150.jpg00Larry Jordanhttps://www.theinsidetips.com/wp-content/uploads/2019/09/Tips-Logo-700x150.jpgLarry Jordan2021-06-14 01:30:002021-06-14 01:30:00Tip #1694: What Does “Analyze & Fix” Do?
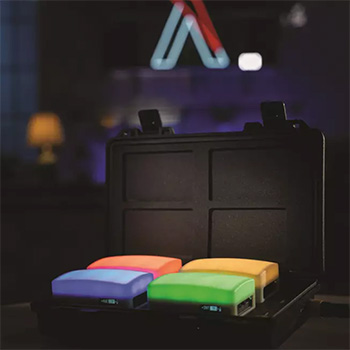
Advances in technology offer new options and expanded usage.
Aputure MC-4 Kit (Image credit: Julia Swain)
This article, written by Julia Swain, first appeared in TVTech.com. This is a summary.
There are so many reasons why the use of larger lighting sources is preferred a lot of the time on set. The ability to cut, soften and shape a larger source tends to be much easier than a smaller one. Output is not lost as quickly as from a smaller source and these bigger lights can be used to cover a large surface area and create ambience. I have written on the versatility of smaller sources before, but technology is advancing so quickly that new options have since become available and the ways to use them have expanded.
Popular small lights that have held up include ARRI’s AX5 smaller fresnels and the Dedolight. Small tungsten units such as these for uplights or as extensions of practicals that already exist in the frame are so useful.
Other small units are panels such as Aputure’s MC-4, which can act as a replacement for a bulb in some instances. Like the AX5, the battery-powered MC-4 can be controlled via an app.
Using a large source is great but it becomes a bit of a “grip jungle”—so many stands and flags and diffusion have to surround a large source in order to focus it on a subject. Sometimes it is appropriate to downsize your key, and in my experience it’s usually when you don’t have much space.
If you have your subject close to walls or other elements in space that light would spill onto, key with something smaller.
A popular lighting approach right now is one that is minimal. Smaller units play into more specificity. When we think minimal, it’s just a couple large sources doing all the work for a space. The use of smaller lights lends itself to adding interest in the frame and creating separation.
EXTRA CREDIT
The author provides practical examples from her lighting experience, which makes the entire article worth reading.
We may request cookies to be set on your device. We use cookies to let us know when you visit our websites, how you interact with us, to enrich your user experience, and to customize your relationship with our website.
Click on the different category headings to find out more. You can also change some of your preferences. Note that blocking some types of cookies may impact your experience on our websites and the services we are able to offer.
Essential Website Cookies
These cookies are strictly necessary to provide you with services available through our website and to use some of its features.
Because these cookies are strictly necessary to deliver the website, refuseing them will have impact how our site functions. You always can block or delete cookies by changing your browser settings and force blocking all cookies on this website. But this will always prompt you to accept/refuse cookies when revisiting our site.
We fully respect if you want to refuse cookies but to avoid asking you again and again kindly allow us to store a cookie for that. You are free to opt out any time or opt in for other cookies to get a better experience. If you refuse cookies we will remove all set cookies in our domain.
We provide you with a list of stored cookies on your computer in our domain so you can check what we stored. Due to security reasons we are not able to show or modify cookies from other domains. You can check these in your browser security settings.
Google Analytics Cookies
These cookies collect information that is used either in aggregate form to help us understand how our website is being used or how effective our marketing campaigns are, or to help us customize our website and application for you in order to enhance your experience.
If you do not want that we track your visit to our site you can disable tracking in your browser here:
Other external services
We also use different external services like Google Webfonts, Google Maps, and external Video providers. Since these providers may collect personal data like your IP address we allow you to block them here. Please be aware that this might heavily reduce the functionality and appearance of our site. Changes will take effect once you reload the page.
Google Webfont Settings:
Google Map Settings:
Google reCaptcha Settings:
Vimeo and Youtube video embeds:
Other cookies
The following cookies are also needed - You can choose if you want to allow them:
Privacy Policy
You can read about our cookies and privacy settings in detail on our Privacy Policy Page.