… for Apple Motion

Tip #1675: View Control Icons in Motion

Larry Jordan – LarryJordan.com

These icons control the view, not the image you are creating.

These four icons move your view, without affecting your project.

Topic $TipTopic

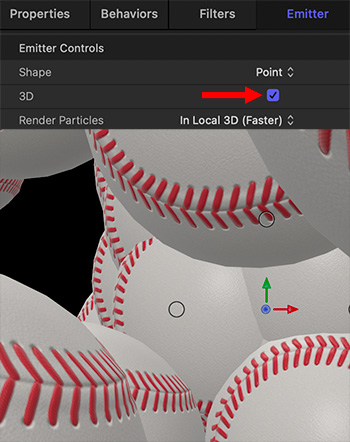
When you add a camera or light to create a 3D group, three or four icons appear in the top right corner of the Viewer. Here’s what they mean.

Looking at the screen shot, the camera icon only appears when you add a camera into a project. This icon appears when you are looking at the camera view. If you view the scene from the top or side, this icon disappears. This icon reminds you when you are seeing the view the audience will see, or, more importantly, when you are NOT seeing it.

Dragging the four-arrow icon moves the view in the Viewer – NOT the image you are creating – left / right or up / down. The actual direction you move is dependent upon your view. Looking at the scene from the front, left/right is actually left and right. Looking at the scene from the side, left / right actually means front and back.

The rotating arrow rotates the view on whatever axis is perpendicular to your monitor – which, again, depends upon your view.

The far right arrow moves you forward or back in depth.

EXTRA CREDIT

Some of these options will be grayed out when you add a light without adding a camera. And, to stress, this changes your view, but not your project.


Please rate the helpfulness of this tip.

Click on a star to rate it!

… for Apple Motion

Tip #1674: Make a Particle System 3D

Larry Jordan – LarryJordan.com

Switching a particle system to 3D takes just one mouse click.

The 3D checkbox – Inspector > Emitter (top) – and a field of flying baseballs.

Topic $TipTopic

Particles, like cameras, lights, replicators and 3D Objects, can expand into 3D space. (All other Motion elements are 2D.) However, by default, all particle systems are set to 2D. Here’s how to make the switch.

  • Add the particle system you want to use into the Viewer. (Library > Particle Emitters).

NOTE: This setting also works for particle systems you create – again, the default is 2D.

  • Select the name of the particle emitter in the Layers panel, not the group you moved it into.
  • Open Inspector > Emitter and check the 3D check box (top of screen shot).
  • A warning message appears reminding you to switch the group containing the particle system to 3D. Click the blue button to make the switch.

Done. Now, the particle system occupies volume as well as a position in space.

NOTE: Depending upon what particles are used to create the system, you can dolly through a particle cloud and see individual particles! It will take experimenting to find what works best for you – and you’ll need to render to see movement at full speed.

EXTRA CREDIT

In the lower screen shot, we see a camera dollying through a field of flying baseballs. The baseballs are the 3D baseball object that was turned into a particle system.


Please rate the helpfulness of this tip.

Click on a star to rate it!

… for Apple Motion

Tip #1673: Replicator Effect: Chop Sticks

Larry Jordan – LarryJordan.com

Replicators are designed to generate repeating patterns.

The Chop Sticks replicator with a variable blur applied.

Topic $TipTopic

Apple Motion gives us a lot of visual toys to play with as we create motion graphics. Here’s one you may not have looked at very carefully: Replicators.

Replicators take an object and create a pattern from it. For example, creating a repeating pattern from a company logo.

While not as dynamic as a particle system, there are things we can do with replicators that particles can’t.

NOTE: A good place to look is in the Replicators category in the Motion Library. Remember, you can ALWAYS add filters to change the look of any replicator.

The screen shot is an example: Chop Sticks. These green and blue floating rectangles can serve as an eye-catching intro to an ad or open.

What I did here was add a variable blur (Filters > Blur > Variable Blur) to the replicator. This instantly provides a sense of depth (and depth of field) to the image.

EXTRA CREDIT

Like particle systems, replicators can move in 3D space. Or, when we apply a variable blur, they can just LOOK like they are moving in 3D.


Please rate the helpfulness of this tip.

Click on a star to rate it!

… for Visual Effects

Tip #1663: VFX in “The Falcon and the Winter Soldier.”

Larry Jordan – LarryJordan.com

“The Falcon…” made extensive use of digital doubles.

To create the impression that the stationary trucks were going 120kms, Rodeo FX moved the road at the required speed while adding bits of rocks, dirt and dust being kicked up.

Topic $TipTopic

This article, written by Trevor Hogg, first appeared in VFXVoice.com. This is a summary.

Initially meant to be the first small-screen venture for Marvel Studios on Disney+, the coronavirus pandemic and subsequent production lockdown caused The Falcon and the Winter Soldier to follow after WandaVision.

In this interview with showrunner Malcolm Spellman, director Kari Skogland and VFX Supervisor Eric Leven, VFXVoice explores how the effects for this multimillion dollar series were created.

Eric Leven: “It wasn’t like we had to figure out a new look for an energy beam or something like that. It was to make this photographically real. … Just trying to figure out if you were shooting something for real, how would you photograph it? Where would the camera be? How fast would the camera be moving? We orchestrated two aerial units. We had a helicopter plate shoot in New York to capture plates for Episode 106 and then we had the skydiving unit for Episode 101. Stunt guys actually had a day when they went out on real trucks, drove down and pretended to fight just to see what that would look like.”

Key collaborators were Special Effects Supervisor Daniel Sudick and Supervising Stunt Coordinator Hank Amos. “The special effects department has done every Marvel movie, so they know how to do everything,” states Leven. “I remember talking to Hank Amos, the stunt coordinator, about a scene in the Hot Potato where it is scripted that there is a guy strapped to a skydiver and they’re going to jump out of the plane together. I asked him, ‘Do we need to put in a digital double on another guy’s back?’ He was like, ‘We can do that for real.’ The wingsuit pilots were phenomenal to watch. Not only are they making these incredible maneuvers in the air but also photographing themselves doing it with just the right camera angles and action, and doing multiple takes during the freefall.” Falcon (Anthony Mackie) flies through a helicopter to grab his intended target. “There are two parts to that,” Leven explains. “There is a wide shot where it is all digital. Then there is a closeup. We had the stuntman playing Captain Vassant sitting on a chair with a wire pull. He was pulled out and then we added a digital Falcon on top of that. Somewhere when he gets pulled out, we transition to a digital Captain Vassant. So easy!”

EXTRA CREDIT

The interview – linked above – contains extensive production stills, plus lots more detail on the VFX process for the film.


Please rate the helpfulness of this tip.

Click on a star to rate it!

… for Visual Effects

Tip #1662: Dissecting “Jisei” – An Animated Short

Larry Jordan – LarryJordan.com

Animation requires tools, techniques, creativity and imagination. And lots of time.

Image courtesy of Motionographer.com.

Topic $TipTopic

Jisei is an animated short that turns reality on its head in fascinating ways, based on the poem: “Do Not Stand at My Grave and Weep.” Directed by Tom Teller and Julian Conner, it is currently featured on Motionographer.com.

In this article – link – they interview the two directors about the creative process for the work.

Tom describes Jisei is “an experimental short film that follows the recollection of one’s memories as they experience death. It was something we had wanted to make for a while. For better or for worse, we’re both fascinated with death; I’ve had a few close brushes with it between a pretty bad motorcycle crash and a plane landing gear failure. For me, this film was an effort to express some thoughts and feelings that crossed my mind in those moments.”

Julian continues: “After countless hours discussing the topic, we finally landed on the premise that the choices we make every single day of our lives compound on themselves, resulting in our impact on the world after we’re gone. It’s all connected, the places you’ve lived, the people you’ve met, the ideas you’ve had – and in Jisei, we chose to connect them quite literally with an astronaut’s tether.”

Tom: We started with Miro, an online whiteboard application, where we wrote down all of our initial concepts and ideas, pulled references from other pieces and drew mock-up scenes. We spent quite a bit of time iterating on the core concept and the message we were trying to send. After the narrative structure, we moved on to look-dev and animation. All of the CG was done in 3DS Max and rendered with V-Ray on GPU. For compositing, we used After Effects and Nuke.”

Julian: “We both have backgrounds in Photoshop and relied heavily on it during the initial concept stages. I would mock-up a frame and express my motivation behind the composition, and he would do the same. Before we began previs, I would be working with these boards in Adobe Premiere and automating some test animation that Tom would take much further in 3DS Max.”

The entire interview, along with production stills and the short film itself is covered here.


Please rate the helpfulness of this tip.

Click on a star to rate it!

… for Visual Effects

Tip #1659: 12 Principles of Animation – From Disney

Larry Jordan – LarryJordan.com

These twelve principles underlie all animation.

Image courtesy of DesignBuckle.com.

Topic $TipTopic

This article, written by Anne Mirrop, first appeared in DesignBuckle.com. This is a summary.

Recently, Disney animators Ollie Johnston and Frank Thomas wrote a book: “The Illusion of Life: Disney Animation.” DesignBuckle reported on the twelve principles of animation that the two authors spent the book discussing.

NOTE: The first animated film with sound was “Steamboat Willie” by Walt Disney, produced by Walt Disney Studios in 1928.

If you’re an aspiring animator, you’ve probably heard the spiel about going back to the animation basics, starting with the twelve rules of animation. Why are these rules highlighted again and again? These principles established by Ollie Johnston and Frank Thomas help new animators create realistic, relatable work that mimics real-life movements while making room for creativity. By mastering these principles, you will create a foundation that will make your work visually appealing and work in the eye of the beholder.

  • Rule 1: Squash and Stretch
  • Rule 2: Anticipation
  • Rule 3: Staging
  • Rule 4: Straight-Ahead Action and Pose-to-Pose
  • Rule 5: Follow Through and Overlapping Action
  • Rule 6: Exaggeration
  • Rule 7: Solid Drawing
  • Rule 8: Slow In and Slow Out
  • Rule 9: Arc
  • Rule 10: Secondary Action
  • Rule 11: Timing
  • Rule 12: Appeal
  • Bonus Rule: Frame Rate

Those are the twelve rules of animation. These rules are foundational, bringing an animator back to the basics of animation and teaching the importance of believable movement while also emphasizing creative play. With the basics and creativity at your side, you can create characters with personality, movement, and style.

EXTRA CREDIT

The article includes descriptions and illustrations of each rule, along with a history of animation and in-depth discussion of animation styles and list of top animated films.


Please rate the helpfulness of this tip.

Click on a star to rate it!

… for Codecs & Media

Tip #1669: StreamingMedia Codec Survey

Larry Jordan – LarryJordan.com

The survey is 15 questions – and takes about five minutes.

The StreamingMedia.com logo.

Topic $TipTopic

StreamingMedia.com is conducting a survey on encoding and transcoding media. Here’s their description:

Encoding and transcoding are at the core of everything we cover here at Streaming Media, and we thought it was time to take the pulse of the industry and find out, as Wayne Gretzky famously said, “where the puck is going” regarding video compression and related technologies and workflows.

Is H.264 still the leading codec? How many publishers are using content/context-aware encoding? Are enhancements like HDR and premium audio part of most encoding workflows? What sorts of DRM are publishers implementing? Those are the kinds of questions we’re looking to answer.

And who better to help us understand the market than you? So we’ve put together a short 15-question survey looking at the codec usage (both now and in the future), encoding optimization, content protection, premium video/audio features, and more. The survey should take only 5 minutes to complete, and if you share your email, we’ll enter you in a drawing to win a $500 Amazon gift card. We won’t share your contact information, and the only other thing we’ll use your email for is to send you a copy of the results as soon as they’re available.

The survey closes on June 18.

Here’s the survey link.


Please rate the helpfulness of this tip.

Click on a star to rate it!

… for Codecs & Media

Tip #1668: Planning for Future File Sizes

Larry Jordan – LarryJordan.com

Storage requirements double with every 2K increase in frame size.

File storage requirements (in MB / hour) as frame size increases.

Topic $TipTopic

Camera makers are rushing to support ever larger frame sizes. But, I wondered, what impact does increasing frame size have on storage requirements? The answer is: a LOT!

Apple has done an excellent job documenting the storage and bandwidth requirements for different frame sizes and frame rates of ProRes. For this chart, I took the numbers for ProRes 422 at 30 frames per second. Though this uses ProRes, the ratio between frame sizes will be the pretty much the same, even as you change codecs or frame rates; though the specific numbers will be different.

This screen shot illustrates the storage challenge editors face as frame size increases. Files which are manageable in smaller frame sizes become overwhelming as frame sizes grow.

  • 1080p HD = 66 GB / hour
  • 8K = 1,131 GB / hour
  • 10K = 2012 GB / hour (estimated)

NOTE: That is not a typo. When frame sizes hit 8K, storage is measured in TERABYTES per hour!

Bandwidth, the speed storage needs to transfer data to your computer, is equally challenging.

  • 1080p HD = 18 MB/sec
  • 8K = 314 MB/sec
  • 10K = 558 MB/sec (estimated)

Clearly, as we move into larger frame sizes, our storage needs to shift into RAIDs filled with SSDs or NVMe SSDs.


Please rate the helpfulness of this tip.

Click on a star to rate it!

… for Codecs & Media

Tip #1667: Behind the Scenes: Codec Central

Larry Jordan – LarryJordan.com

These codecs work on Mac & Windows, including the M1 Mac.

The illustrate logo.

Topic $TipTopic

illustrate makes products focused on audio codecs, audio conversion and metadata. Providing products for both consumers and professionals, their key conversion utility is dBPowerAmp.

What caught my eye was their “Codec Central” – a list
of the audio codecs they support.

For those interested in converting media from one format to another, their products might also be of interest.


Please rate the helpfulness of this tip.

Click on a star to rate it!

… for Adobe Premiere Pro CC

Tip #1666: Customize the Audio Mixer Meters

Larry Jordan – LarryJordan.com

Customizing audio meters makes sure they show you want to need to see.

Audio meter options: Clip Mixer (left) Track Mixer (right)

Topic $TipTopic

Premiere Pro supports customizing the audio meter display in the timeline, as well as the Audio Clip and Track Mixers. Here’s what’s possible.

Open the Audio Clip Mixer (you can find it in the Windows menu, if it isn’t part of your current workspace). Control-click inside the area where the audio levels are displayed (i.e. the black stripe, not the numbers).

  • Show Valleys. This displays the lowest level of your audio during the last two seconds.
  • Show Color Gradient. This displays a smoother color ramp from green to yellow to red.
  • Dynamic Peaks. This displays the loudest level of your audio during the last two seconds.
  • Static Peaks. This displays the loudest level of your audio until something louder comes along. This is a good way to determine if any part of your mix exceeds 0 dB.
  • Show Peaks. This enables either Dynamic or Static peak display.
  • Show Channel Volume. This displays the current level of the audio clip in numbers.

Open the Track Mixer, control click in the same area and the options change. (These options are the same as Control-clicking in the timeline audio meters.) The one new choice is:

  • dB Range. This only displays audio levels that exceed the level selected here. This is a good way to focus on the louder portions of your mix.

Please rate the helpfulness of this tip.

Click on a star to rate it!