… for Apple Motion

Tip #1783: Animate the Background of a Title

Larry Jordan – LarryJordan.com

An animated background calls even more attention to the foreground title.
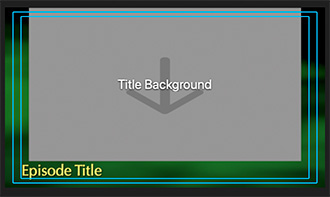
The Title Background animates over a particle system and animated title.

Topic $TipTopic

Normally, when we add a title to a video, we want the background video to remain stationary. But, there’s no rule that says it must.

When you create a title using Motion, Apple displays a special kind of drop zone (or placeholder) called “Title Background.”

This placeholder is automatically filled with whatever video is located under the title. (All other drop zones require you to specify the video you want inside it using the Inspector.)

Well, though this placeholder automatically fills with the background video, you can still animate it. For example, in the screen shot, it starts full screen, then, using keyframes, I scale it to 85% and raise it up so that the title slides in underneath, floating over the Simple Background particle system.

Once you realize that you can animate the background as well as the foreground of a title, there’s no end to the creative opportunities.


Please rate the helpfulness of this tip.

Click on a star to rate it!

… for Apple Motion

Tip #1782: Apple Updates Motion to v5.5.3

Larry Jordan – LarryJordan.com

This update provides bug fixes but no new features.

The new version screen for Apple Motion.

Topic $TipTopic

Last week, Apple updated Motion to version 5.5.3. This update provides bug fixes but no new features.

Here’s Apple’s list of changes for Motion 5.5.3, released July 8, 2021:

  • Improves stability when exporting with certain macOS Language & Region preferences.
  • Improves stability when playing H.264 or HEVC media.

Here’s the complete list of Motion release notes for this and previous versions.


Please rate the helpfulness of this tip.

Click on a star to rate it!

… for Visual Effects

Tip #1778: Render After Effects Comps 70X Faster

Larry Jordan – LarryJordan.com

Even simple changes vastly affect render speeds.

Still from Chris Zwar’s video.

Topic $TipTopic

This article, written by Chris Zwar, first appeared in ProVideoCoalition.com. This is a summary.

Render times in After Effects can vary a lot. If you’ve been using After Effects for a while, you’ve probably had some projects that render quickly, and others very slowly. Sometimes it can be hard to pinpoint exactly why some projects render faster than others.

At a very basic level, there are four things which determine how fast After Effects will render a single frame. Firstly, there’s the resolution of the composition. Secondly, there’s the resolution of each individual layer in the composition. Thirdly, there’s the number of layers in the composition. Finally, there’s the bit-depth of the composition – which determines how much data is required to process each individual pixel.

More recently, Adobe has added a fifth new variable – Multi-Frame Rendering. This is a new feature, still in Beta development, that utilizes more than one CPU core to render multiple frames of a composition at the same time. Depending on your hardware, rendering can be more than twice as fast.

The video [in this article] covers all of the details, but it’s probably worth emphasizing that this is a relatively niche demonstration. I didn’t try changing the overall composition resolution, and having 920 layers in a composition isn’t something you see every day. The project only uses one effect, and yet it’s a great example of how simple changes to bit-depth and resolution can dramatically affect the amount of data that After Effects has to process in order to produce a rendered image.

Here’s the link to the video and more details.


Please rate the helpfulness of this tip.

Click on a star to rate it!

… for Visual Effects

Tip #1777: VFX Pros Tell All – Free Webinars

Larry Jordan – LarryJordan.com

Cinzia Angelini, Director and Head of Story, Cinesite Studio

Topic $TipTopic

VFXVoice and Autodesk are co-sponsoring a series of webinars titled: “Ask Me Anything: VFX Pros Tell All.”

The next live event is July 15, 2021, at 12 PM PDT. This event features Cinzia Angelini, Director and Head of Story, Cinesite Studios. Her experience spans from Cinesite to Warner Brothers, DreamWorks, Sony Imageworks, Disney Animation Studios, Duncan Studio and Illumination Entertainment.

Past speakers include:

  • Chris White, Visual Effects Supervisor, WETA Digital
  • Nonny de la Peña, Founder, Emblematic Group
  • Ellen Poon, Visual Effects Supervisor, Visual Effects Producer
  • Aruna Inversin, Creative Director & Visual Effects Supervisor
  • Karen Dufilho, Producer, Google Spotlight Stories
  • Greg Anderson, Head of Studio-NY, Sr. VFX Supervisor, FuseFX
  • and many others.

Here’s the link to access all of these. All events are free.


Please rate the helpfulness of this tip.

Click on a star to rate it!

… for Visual Effects

Tip #1773: Chaos Updates V-Ray 5

Larry Jordan – LarryJordan.com

Chaos updates V-Ray 5 to support USD.

Image credit: Goodbye Kansas & DDB Paris—Assassin’s Creed Valhalla © 2020 Ubisoft

Topic $TipTopic

Last week, Chaos introduced initial Universal Scene Description (USD) support for V-Ray 5 for Maya, Houdini and Cinema 4D tying powerhouse production renderers to one of the fastest growing file formats in visual effects. Artists now have a non-destructive way to collaborate and assemble their scenes, making it easier to store and move scene data between different applications.

Initially developed by Pixar, the USD format is designed to hold the most common types of scene data – geometry, shaders, lights, rigs, hair, etc. – so artists have an easy way to share and dynamically update assets without workarounds or compromises. As the pipelines have grown more complex, the need for a universal format has become even more pronounced. Today, Chaos will begin providing V-Ray support to USD, giving artists more flexibility as the technology continues to develop.

The initial Maya implementation will support several key asset exchanges, including static/animated meshes, V-Ray materials, subdivisions, displacement and more. V-Ray 5 for Houdini will also mark the beta launch of V-Ray for Solaris, which helps artists work natively in SideFX’s USD-based shot layout and look dev tool via a V-Ray Hydra delegate.

Learn more here.


Please rate the helpfulness of this tip.

Click on a star to rate it!

… for Adobe Premiere Pro CC

Tip #1781: What the Render Bar Colors Mean

Larry Jordan – LarryJordan.com

Premiere is fast, but sometimes not fast enough.

Different render bar colors in Adobe Premiere Pro CC.
Render bar colors indicate what needs to be rendered before playback.

Topic $TipTopic

Most of the time, Premiere can play back your sequence in real-time displaying high-quality, full frame-rate images by harnessing the power of the Mercury Playback Engine.

However, every so often, you’ll create an effect that is so complex, it needs to render for optimum playback.

DEFINITION: Render means to calculate. But “calculate” is a very boring word. “Render” is much sexier. To render an effect means we are calculating the effect and turning it into video.

How can you tell if rendering is necessary? By the color of the render bar at the top of the Timeline.

  • No bar. Everything is playing perfectly. No rendering is necessary.
  • Yellow. An unrendered section that is complex, but may not need to be rendered in order to play back the sequence in real-time and at the full frame-rate.
  • Red. An unrendered section that needs to be rendered in order to play back the sequence in real-time and at the full frame-rate.
  • Green. A fully-rendered section of the sequence.

EXTRA CREDIT

To render some or all of a sequence, select the clips you want to render, then choose Sequence > Render Selection. A dialog appears showing the render status.


Please rate the helpfulness of this tip.

Click on a star to rate it!

… for Adobe Premiere Pro CC

Tip #1780: How & Why to Change Label Colors

Larry Jordan – LarryJordan.com

Menu colors can also be sorted, helping to group similar clips.

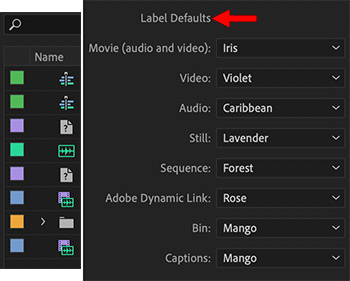
Labels displayed in the Project panel (left) and Preference > Labels panel.

Topic $TipTopic

A menu preference that I skip over ALL the time is “Labels.” However, these can be really useful – especially to help organize larger projects.

Label colors are assigned to different media types by default. These default colors are set using Preferences > Labels. (See screen shot.)

However, you can change these colors to something that works better for you.

NOTE: One reason where changing label colors might help is color blindness. Or, you may have preferred colors that help you organize media.

An added benefit to using colors is that you can sort on them in both Project and Bin panels. To sort on color, click the empty column header just above the colors. Click a second time to reverse the sort order.

NOTE: The sort order is actually based on the color order of a spectrum – from red to violet.


Please rate the helpfulness of this tip.

Click on a star to rate it!

… for Adobe Premiere Pro CC

Tip #1779: Export Caution: Match Source Settings

Larry Jordan – LarryJordan.com

The default Match Source export settings always uses H.264.

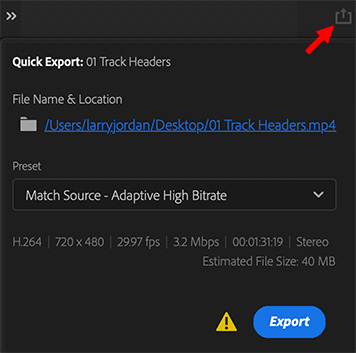
A Match Source Quick Export setting. Note that it uses H.264.

Topic $TipTopic

There’s a potential “gotcha” when using the default Match Source export settings that can trip you up. The screen shot illustrates the Quick Export menu in the top right corner of the Premiere interface and the Match Source settings.

Normally, I export sequences from Premiere using my own export settings. However, while I was exploring the Premiere beta, which revises the entire export process, I discovered a problem with the Match Source setting that affects both the beta and the current shipping version.

Specifically, even though it is supposed to “match the source,” it actually uses the H.264 codec. This is fine for distribution, but NOT fine for any sequences you expect to work with again.

NOTE: In fact, H.264 is the default codec for all export presets.

Instead, when exporting any file you expect to reuse, reedit or recompress, avoid ALL the preset export settings – which all use H.264 – and select an editable codec like ProRes, DNx or GoPro Cineform. The files are bigger, but you’ll avoid image degradation and artifacting.


Please rate the helpfulness of this tip.

Click on a star to rate it!

… for Codecs & Media

Tip #1776: Import VHS Media Using USB

Larry Jordan – LarryJordan.com

Roxio Easy VHS or QuickTime Player seem the best options.

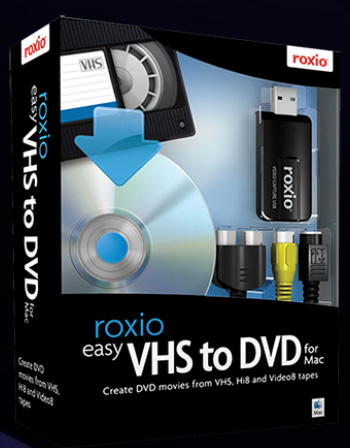
The Roxio Easy VHS to DVD software package.

Topic $TipTopic

A recent forum thread on MacRumors discussed low-cost options for batch importing VHS tapes of home movies into an iMac using HDMI or S-Video connected via USB.

While Photo Booth works, it is inflexible and hard to use. FaceTime sees the video, but doesn’t record.

The reader reported that iMovie and FCP don’t recognize video coming in via a USB port. What did readers recommend?

One suggested QuickTime Player. However, “the only quality control is “High” and “Maximum”, which are still much higher resolution than VHS in wide format. No option to save to external drive when digitizing, or auto stop after 1 hour or 2 hours.”

NOTE: However, you can work around some of this by capturing internally, then manually moving the file after capture to another drive. You could also compress it manually, as well.

Another reader reported using Roxio, but importing tapes “takes forever.” [Editor: By this, they mean that all video imports in real-time, unlike the high-speed transfer from an SD card.]

General consensus was Roxio Easy VHS to DVD for Mac. “When I used the Roxio software, I had to set it on “medium” quality. If I set it higher, the audio would begin to drift, and be really out of sync the longer the video went.”

Just thought I’d pass along the conversation.

EXTRA CREDIT

First, a caution. I was not able to verify that Roxio supports Big Sur. You may need to run it on earlier versions of the macOS. Or, use QuickTime Player.

Roxio says: “Easily convert VHS, Hi8, and Video8 tapes to popular digital formats.” This requires USB 2.0 (which every computer today supports).

Video quality is selectable between:

  • High. Apple intermediate codec at 640 x 480 (square pixel) resolution
  • Medium. H.264 at 640 x 480 (square pixel) resolution
  • Low. H.264 at 320 x 240 (square pixel) resolution.

Here’s the link.


Please rate the helpfulness of this tip.

Click on a star to rate it!

… for Codecs & Media

Tip #1775: NBC Chooses Signiant for Olympics

Larry Jordan – LarryJordan.com

Signiant to streamline remote production for 2021 Olympics

The NBC Sports logo.

Topic $TipTopic

NBC Olympics, a division of the NBC Sports Group, has selected Signiant to provide intelligent file transfer software for its production of the Games of the XXXII Olympiad, which take place in Tokyo, Japan, from July 23 – August 8.

With Signiant’s software, NBC Olympics will be able to move petabytes of footage from Tokyo back to its International Broadcast Center in Stamford, Conn., immediately upon capture. Signiant’s patented network optimization technology enables seamless transfer of the footage over standard IP networks, eliminating latency and packet loss, so that editors in Stamford can begin creating highlights almost immediately as the action is happening thousands of miles away. The software also allows for content, including advanced graphics work and pre-recorded footage, to be transferred quickly, easily and securely back to the broadcast center in Tokyo. Signiant’s software enables NBC Olympics to leverage their talent and equipment back home in Stamford, enabling them to provide enhanced viewing experiences to their audience much more efficiently.

Read the full press release here.


Please rate the helpfulness of this tip.

Click on a star to rate it!