… for Codecs & Media

Tip #1774: Media Production Shifts to the Cloud

Larry Jordan – LarryJordan.com

The cloud is more than storage, it’s now media apps.

Image credit: Karl Paulsen

Topic $TipTopic

TV Technology reports that “A paradigm shift in media-production technologies is changing how the cloud is perceived, used, presented and applied to media production. The lines between ground-based and cloud-based media production are becoming blurred.” (This is a synopsis.)

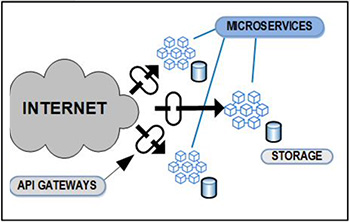
This in-depth article, written by Karl Paulsen, starts by looking at cloud computing, an application-based solution known also as an “infrastructure in the cloud.” Cloud computing is divided into a front-end part and a back-end part. To the user, these details don’t need to be thoroughly understood—but it is helpful to know that the end-to-end ecosystem is changing so that acceptability of these differences can be evaluated and adopted.

Today, cloud providers offer hundreds of specific services ranging from compute and storage to cloud consulting (through partners) and management. Each provider aims to enable users to deploy their compute and storage requirements in the cloud offering various competitive platforms, all eager for users to experiment in any way conceivable.

The article covers media-specific and cloud forward applications and Cloud-based automation.

It concludes by saying: “Reliable, secure, scalable, protected and cost-effective media production—without the annoyances of managing a complex local infrastructure—is changing the face of media from one end to the other. Whether the production services are hosted in a public cloud, regional co-lo site or even in your own private data center, the concepts developed (and being perfected all the time) are real, available and are here today.”

EXTRA CREDIT

The article goes into more detail with interviews and illustrations.


Please rate the helpfulness of this tip.

Click on a star to rate it!

… for Apple Final Cut Pro X

Tip #1772: The “Invisible” Quick Export Button

Larry Jordan – LarryJordan.com

One click speeds your project on it’s way.

The Quick Export menu (yours may look different) in the top right corner.

Topic $TipTopic

Hidden in a corner of the Final Cut Pro interface is the Quick Export button. This is a fast way to get your projects out of Final Cut using just the mouse.

As the screen shot illustrates, in the top right corner of the Final Cut interface is the Send icon.

Click it to display the list of all current export destinations.

Using this menu, you can export the current project in the timeline using a single mouse click.

EXTRA CREDIT

To change the options displayed in this menu, either choose Add Destination from the bottom of this menu or go to: Final Cut Pro > Preferences > Destinations.


Please rate the helpfulness of this tip.

Click on a star to rate it!

… for Apple Final Cut Pro X

Tip #1771: Tips to Help Find Clips Faster

Larry Jordan – LarryJordan.com

Final Cut provides very powerful and flexible search across all media.

The Keyword Editor (shortcut: Cmd+K) in Final Cut Pro.

Topic $TipTopic

Looking for better ways to organize and find media in Final Cut Pro? The secret is keywords. These three articles illustrate how keywords can help you get organized.


Please rate the helpfulness of this tip.

Click on a star to rate it!

… for Apple Final Cut Pro X

Tip #1769: Fix for FCP Crashes in Big Sur

Larry Jordan – LarryJordan.com

Most often, frequent crashes means something is out of date.

Topic $TipTopic

David M. reports:

FYI, I updated to Big Sur & FCP 10.5.2. I got continuous crashes on opening FCP until I uninstalled all Core Melt apps.

Everything is now fine. Didn’t lose any work.

Larry adds: Thanks, David, for the heads up.


Please rate the helpfulness of this tip.

Click on a star to rate it!

… for Random Weirdness

Tip #1759: Why Are All Video Graphics Yellow?

Larry Jordan – LarryJordan.com

Yellow text is everywhere – because it works.

Image courtesy of John P. Hess.

Topic $TipTopic

This video, narrated by John P. Hess, first appeared in FilmmakerIQ.com. This is a summary.

Yellow! It’s everywhere, especially in television graphics. But why? Well let’s seriously over-think this and explore some color theory concepts on why this color is the king of graphics color.

This video goes in-depth on the science and readability of color.


Please rate the helpfulness of this tip.

Click on a star to rate it!

… for Random Weirdness

Tip #1758: Night Shoots & the BMD Cinema Camera 6K

Larry Jordan – LarryJordan.com

Shooting at night requires a good camera and great lighting.

Image detail courtesy of NoFilmSchool.com & Charles Haine.

Topic $TipTopic

This article first appeared in NoFilmSchool.com. This is a summary.

If you’re a filmmaker wanting to shoot characters at night who also are in motion, you’re going to run into changing light temperatures and light sources, and you need a camera that’s just as flexible and shoots RAW. You also need something small, that can be affordably stabilized, and will shoot great footage in low light.

In this collaboration between Blackmagic Design and No Film School, Charles Haine worked with the Blackmagic Pocket Cinema Camera 6K Pro on a night shoot. Charles was especially interested in working with the new higher ISO setting. That’s because 3200 ISO is useful for night shoots along with night walk and talks.

This article provides sample footage, technical setups, and more.


Please rate the helpfulness of this tip.

Click on a star to rate it!

… for Random Weirdness

Tip #1756: Tips for Keeping a Camera Cool

Larry Jordan – LarryJordan.com

Hot cameras are noisy. Here’s how to keep yours cool.

Image detail courtesy of Pexels.com.

Topic $TipTopic

This article, written by Lewis McGregor, first appeared in PremiumBeat.com. This is a summary.

Since the introduction of the RED ONE MX, camera cooling has continued to improve. However, because camera cooling has improved doesn’t mean modern cameras aren’t prone to overheating. Additionally, even when cameras can keep themselves cool, it’s usually at the cost of fans being ramped up to an audible level.

Here are a few methods to keep your camera cool on a hot summer’s day.

  • Gel Packs. Running straight from what I used with my RED ONE, gel packs are still handy to lower the temperature of a camera. You can pick up gel packs (usually a set of two) for around $10. While a gel pack will stay cold for at least one to two hours when pressed against the skin, you can expect this to be considerably less when used against a hot camera.
  • Ice Packs. Due to their size and weight, they aren’t ideal for placing on top of a camera. And, given they’re filled with tap water then frozen, it’s not something that you want near your camera to begin with.
  • Courtesy Flags and Other Shade Tools. While it sounds majestic, a courtesy flag is nothing more than a regular grip flag. However, this isn’t intended to be used to shape light or negative fill. Instead, it’s used to create shade for the crew who cannot move into the shade while working. You can also get a flag setup to keep the camera out of line for direct sunlight.
  • White Shoulder Case. Larger and heavier lenses are commonly painted white by the manufacturer to reflect sunlight to keep the lens cool. Using that methodology, some case and bag manufacturers—such as Porta Brace—have created white shoulder cases.
  • Pop-up Canopy Tent. These are portable tents that can be set up within minutes. And, while they may initially look costly, you can pick up the smaller models, as seen in the image below, for less than $50.

EXTRA CREDIT

This article has more details, illustrations and links to more tips to keeping your gear cool and in working order.


Please rate the helpfulness of this tip.

Click on a star to rate it!

… for Apple Motion

Tip #1768: Color Burn Makes Colors More Intense

Larry Jordan – LarryJordan.com

Use Color Burn to intensify darker colors.

The Color Burn blend mode makes darker colors more intense.

Topic $TipTopic

Color Burn is a blend mode that intensifies the dark areas in two superimposed images.

Before you read the description below, taken from Apple’s Help, look at the screen shot.

Whites in the background image replace the foreground image, while whites in the foreground image become transparent. Midrange color values in the background image allow midrange color values in the foreground image to show through. Lighter midrange color values in the background image allow more of the foreground image to show through. Darker midrange values in all visible overlapping areas are then mixed together, resulting in intensified color effects.

To apply this effect:

  • Select the foreground element in the Layers pane.
  • Go to Inspector > Properties and apply the Color Burn option in the Blend Mode menu.

The order of two layers affected by the Color Burn blend mode is important. In the screen shot, the yellow sun is foreground.


Please rate the helpfulness of this tip.

Click on a star to rate it!

… for Apple Motion

Tip #1767: Multiply Makes Luma Keys Easy

Larry Jordan – LarryJordan.com

Multiply superimposes dark areas while removing lighter areas – automatically.

Foreground (top), background (middle), combining the two using Multiply. (Image courtesy Wewe Yang, Pexels.com.)

Topic $TipTopic

Multiply is a blend mode that drops out a white background while superimposing the darker portions of the image on a background.

It’s like a very fast luma key without having to make any adjustments. Here’s how it works.

In the Layers pane, stack the element with a white background on top of the background image.

Select the foreground image and go to Inspector > Properties and set Blend Mode to Multiply.

There’s nothing to adjust. Light areas are removed and darker areas are superimposed – instantly. The screen shot illustrates the process.

NOTE: The black edges in the top screen shot are from the Motion background, they are not part of the signature image itself. (The signature is Benjamin Franklin.)


Please rate the helpfulness of this tip.

Click on a star to rate it!

… for Apple Motion

Tip #1766: Quickly Create False Colors

Larry Jordan – LarryJordan.com

Difference creates a surreal, intense color effect

Blend modes are set using Inspector > Properties. The lower arrow indicates where.

Topic $TipTopic

Motion, like many graphics applications, includes a variety of blend modes to provide more dynamic blending between objects; especially moving objects. Difference is a rarely-used blend mode that creates eye-catching effects.

Difference displays the arithmetic difference between overlapping color objects. In general, I’ve found it creates a surreal, intense color effect.

The cool thing about Difference is that the colors change depending upon both foreground and background colors. As well, colors animate as objects move around the frame.

To apply the effect, select the foreground object in the Layers panel. Then go to Inspector > Properties and change Blend Mode to Difference.

If you haven’t played with this recently, it’s worth taking the time to experiment.


Please rate the helpfulness of this tip.

Click on a star to rate it!