… for Apple Final Cut Pro X

Tip #1751: Create Selects with Keywords

Larry Jordan – LarryJordan.com

Keywords are a fast, highly-flexible way to organize clips.

The Keyword Editor in Final Cut Pro.

Topic $TipTopic

In the old days, we would create a timeline, then add clips to it based upon the shots we liked. This worked, but it wasn’t very efficient.

The reason it wasn’t efficient was that these timelines containing “selects” didn’t tell us anything about the contents of the clips. Suddenly, our selects morphed into multiple timelines, renaming clip segments… like Topsy, it could quickly get out of control.

Instead, FCP offers keywords.

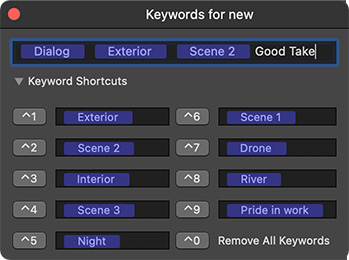
In the Browser, set an In and an Out marking a clip range that you like, then assign one or more keywords describing that section. For example: Scene, actor, interior/exterior, angle, content… whatever is important to you.

NOTE: To open the Keyword Editor either click the key icon in the top left corner of Final Cut, or type Cmd + K.

Enter as many keywords as you like, separated by commas. (See screen shot).

To view all the clips containing a specific keyword, twirl down the Event containing the media you want to search and click the name of the keyword. Only those segments containing that keyword are displayed in the Browser.

EXTRA CREDIT

To reveal all clips, again, click the name of the Event.

For more powerful searches, use the Search Filter. Here’s a tutorial from my website that illustrates this in more detail.


Please rate the helpfulness of this tip.

Click on a star to rate it!

… for Apple Final Cut Pro X

Tip #1750: Render Neat Video Effects Faster

Larry Jordan – LarryJordan.com

Neat Video renders very slowly. Here’s how to speed it up.

Topic $TipTopic

Neat Video makes an effect that removes video noise, which occurs when shooting in low-light situations. The filter creates amazing results, but takes forever to render.

This workaround was suggested by Brian Galford.

The Neat Video filter will render the entire duration of any clip it is applied to. So the key to faster rendering is to only apply the effect to those portions of a clip that need it.

For example, if you apply the filter to a ten second clip, but five seconds are covered by B-roll, cut the underlying clip containing the effect at the start and end of the shot above it. That way, only the visible part of the clip will render.

As well, if you’ve applied the filter to the entire underlying clip, be sure to remove or disable it from those portions that are covered by another clip.


Please rate the helpfulness of this tip.

Click on a star to rate it!

… for Random Weirdness

Tip #1745: How to Make Script Subplots Shine

Larry Jordan – LarryJordan.com

We focus on the main plot, but subplots give a film life.

An example of a film script, from Tootsie.

Topic $TipTopic

This article, written by Jason Hellerman, first appeared in NoFilmSchool.com. This is a summary.

So much of the time we spend writing is focusing on what happens in the main plot. As a result, we often forget other things have to happen as well. Writing movies and TV shows is not an easy thing to do. You have to juggle characters, their motivations, and make sure the audience cares about all of them.

In this article, Jason Hellerman goes over the stuff that happens outside of the main plot, the subplots, and the B-stories that make your movie or TV show feel whole.

In screenwriting for film and television, a subplot is one of the threads of the plot that is supporting the main plot.

There can be more than one subplot, and they can have crossover scenes with the main plot. Subplots usually have their own supporting characters besides the protagonist or antagonist. They have their own wants, desires, and arcs.

If you want to add a new dimension to your script to deepen your theme, a subplot can greatly help. Most scripts, whether film or television, have a few subplots. Now, you don’t want so many that they distract from the main story, but lots of time they can support what’s happening on the main pages.

The best subplots build out the world of the story. They help expand the universe, the themes, and the overall mission and intention of the story.


Please rate the helpfulness of this tip.

Click on a star to rate it!

… for Random Weirdness

Tip #1744: The Best Docs About Filmmaking

Larry Jordan – LarryJordan.com

Five key documentaries on filmmaking.

Alfred HIghcock (left) and François Truffaut (right)

Topic $TipTopic

This article, written by Jourdan Aldredge, first appeared in PremiumBeat.com. This is a summary.

These insightful documentaries about filmmaking can offer more inspiration and advice than most film classes.

If you really want to learn about how films are actually made, you should watch films about filmmaking. There are tons of incredible documentaries that cover the art of filmmaking, ranging from director retrospectives, famous “the making of” documentaries, as well as comprehensive studies about filmmaking itself.

Here’s a list of some the author’s favorites:

  • Lost in La Mancha. We’ll start with one of the best documentaries about the sheer insanity of filmmaking. Lost in La Mancha is a 2002 documentary that tells the story of Terry Gilliam‘s (first) attempt to make a film adaption of the famous Miguel de Cervantes novel Don Quixote de la Mancha. SPOILER: He ultimately fails at his endeavor.
  • Hitchcock/Truffaut. Premiered in 2015 at the Cannes Film Festival, Hitchcock/Truffaut is any cinephile’s documentary dream, providing an in-depth exploration into the work of two of the most famous, iconic filmmakers of all time.
  • Electric Boogaloo: The Wild, Untold Story of Cannon Films. For those who have ever wondered how Cannon Film favorites ever came to existence in the first place, this will give you the best primer on how one audacious company financed, produced, and distributed such a wide array of eclectic films, ranging from action to horror to sci-fi.
  • Room 237. The film is presented through voiceovers as various film theorists provide their interpretations into why Stanley Kubrick made The Shining and what he was trying to say with his many profound, yet confusing, filmmaking decisions.
  • My Life Directed by Nicolas Winding Refn. The acclaimed director granted unprecedented access into the filming of his 2013 action/crime drama Only God Forgives to one of the most intimate documentary filmmakers ever—his wife.

The article – linked above – provides more details, plus links to all these videos.


Please rate the helpfulness of this tip.

Click on a star to rate it!

… for Random Weirdness

Tip #1740: Streaming Media Reshapes Entertainment

Larry Jordan – LarryJordan.com

“It’s not either / or. There’s room for both.” (HBO)

“The Mandalorian” image courtesy of Disney.

Topic $TipTopic

This article, written by Chris McGowan, first appeared in VFXVoice.com. This is a summary.

At the start of 2020, Netflix, Amazon Prime Video and other streamers were already reshaping the movie and television-watching experience. Then came the pandemic. As home entertainment demand soared, movie theaters shut down and film and TV suffered a slump in production. Studios postponed premieres and tinkered with movie release strategies. Streaming services benefited from the increased demand and grew across the board. Due to all the disruptions that followed – either because of or accelerated by COVID-19 – the new decade seems set to become “the Streaming ’20s.”

Netflix continued its remarkable rise in 2020 and dominated Nielsen’s top 10 lists of most-streamed titles, with both old and new titles. The streamer continues to pump out original programming. It will launch 70-plus original movies this year, 10 of them in languages other than English. Netflix added 37 million paid subscribers in 2020, to stand at 203.7 million worldwide at the end of the year, according to the company.

The Walt Disney Company reported that Disney+ had nearly 95 million subscribers worldwide as of its first quarter of 2021, according to research firm Statista, which reports a growth in the service’s subscriber base of almost 70 million since the start of the fiscal year of 2020. The service launched November 12, 2019. Meanwhile, Hulu (controlled by Disney) reached 39.4 million subscribers by year’s end.

This year, some streamers are charging “premium” fees to access certain new films early, while others are offering tiered subscription pricing. Disney+ charged a $29.99 one-time “Premier Access” fee for Mulan last September and Raya and the Last Dragon in March of this year that offered exclusive access to the titles before they became free to regular subscribers.

Gregory K. Peters, Netflix COO and Chief Product Officer, has a different view about tiers. “We really believe that from a consumer orientation the simplicity of our ad-free, no additional payments, one subscription [is] really powerful and really satisfying to the consumers around the world. And so, we want to keep emphasizing that.”

EXTRA CREDIT

The article – linked above – has more interviews and thoughts on how the streaming wars are changing both theatrical and in-home entertainment.


Please rate the helpfulness of this tip.

Click on a star to rate it!

… for Apple Motion

Tip #1749: When to Use HDR Tools in Apple Motion

Larry Jordan – LarryJordan.com

HDR Tools is only necessary when your HDR media does not match your project.

HDR Tools applied to a clip, illustrating the Mode menu contents.

Topic $TipTopic

HDR Tools is a filter that exists for both Final Cut Pro and Motion that converts HDR media into different formats. For example (see screen shot), you will need to apply Filters > Color > HDR Tools when:

  • You import HDR media into a Rec. 709 project.
  • You import HDR HLG media into a HDR PQ project.
  • You import HDR PQ media into an HDR HLG project.

NOTE: By default, HDR Tools is set for HDR to Rec. 709. While that sounds benign, it is not a good option. You will always get better quality by selecting the specific format of your HDR media (HLG or PQ).

The screen shot illustrates the options in the Mode menu.

EXTRA CREDIT

If you don’t know the format of your HDR media, BE SURE!! to find out before you start editing. The differences between HLG and PQ are significant.


Please rate the helpfulness of this tip.

Click on a star to rate it!

… for Apple Motion

Tip #1748: Use HDR Media in an HD Motion Project

Larry Jordan – LarryJordan.com

The “secret sauce” is HDR Tools.

Using HDR HLG media in an HD project, the Levels filter (top), HDR Tools (middle) and the corrected image.

Topic $TipTopic

Apple Motion supports HDR media, both for HDR and HD projects. Here’s how to use HDR media in an HD (Rec. 709) project.

The secret is HDR Tools.

By default, all Motion projects are Rec. 709 (HD). To change this:

  • Add your video into a Motion project.
  • Select the video in the Layers pane and choose Filters > Color > HDR Tools.

NOTE: Your video will not look perfect after applying this filter, but it should look better.

  • In Inspector > Filters > HDR Tools, select the conversion that most closely resembles your footage using the Mode menu. In my example, I’m working with HLG footage and converting it to Rec. 709.
  • Again, with the video selected in the Layers pane, choose Filters > Color > Levels. Adjust the Levels so that your video looks good in the Viewer.

NOTE: These adjustments are why I wish Motion provided video scopes so we could set levels properly.

Notice that HDR Tools is applied first, then the Levels filter is added.

The lower image in the screen shot shows an HLG HDR image with HDR Tools applied, then Levels were adjusted to create the finished gray scale.

Here’s an Apple KnowledgeBase article on using HDR Tools.


Please rate the helpfulness of this tip.

Click on a star to rate it!

… for Apple Motion

Tip #1746: Create an HDR Project in Apple Motion

Larry Jordan – LarryJordan.com

Creating an HDR project requires changing three settings.

An edited version of the Inspector showing the location of the Color Processing menu and an HDR image.

Topic $TipTopic

Creating an HDR project in Motion requires changing three settings. However, those settings are pretty well hidden. Here’s how to do it.

SET COLOR PROCESSING

By default, all Motion projects are set to HD (Rec. 709) color space. We need to change this first.

  • Select the Project in the Layers pane.
  • Go to Inspector > Properties and change the Color Processing menu from Standard to Wide Gamut HDR.

SET RENDER PROCESSING

This setting determines the color of images you see in the canvas, as well as the color space and appearance of your exported project (the output media file) when “Use canvas setting” is selected in the Settings pane of the share window.

  • Go to the View menu in the menu bar, then select Render Color Space.
  • From this menu, select the video format of your project. In my example, I set this to HDR Rec. 2020 HLG, which matches my media.

NOTE: If your media does not match your project, you’ll need to convert it using HDR Tools.

SWITCH NON-HDR MONITORS TO TONE MAPPING

  • If you have a Pro Display XDR monitor, you are done.
  • If you are using your Mac display, which does not display HDR media, go to the View menu in the menu bar at the top and check Show HDR as tone mapped.

NOTE: This View menu option is only enabled when the Project is set to Wide Gamut HDR.

You have now created an HDR project and allowed HDR media to be displayed accurately on the Mac monitor. This is still HDR media, however, so exporting video from this project won’t look good on a non-HDR monitor.

EXTRA CREDIT

While this allows Motion to display and export HDR media, you will probably still need to apply Filters > Color > Levels to adjust the gray scale values to your liking. In other words, these steps get you close, but you’ll need to go through a color grade before you are ready for final output.


Please rate the helpfulness of this tip.

Click on a star to rate it!