The Inside Tips are taking a hiatus for the month of August. We’ll be back the first week of September with more Inside Tips.
Thanks for your readership and comments. Enjoy the rest of your summer.
Feel free to contribute some tips of your own here.
Please rate the helpfulness of this tip.
Click on a star to rate it!
https://www.theinsidetips.com/wp-content/uploads/2019/09/Tips-Logo-700x150.jpg00Larry Jordanhttps://www.theinsidetips.com/wp-content/uploads/2019/09/Tips-Logo-700x150.jpgLarry Jordan2021-08-03 01:30:002021-08-03 01:30:00Tip #1833: The Inside Tips Take a Hiatus
The Inside Tips are taking a hiatus for the month of August. We’ll be back the first week of September with more Inside Tips.
Thanks for your readership and comments. Enjoy the rest of your summer.
Feel free to contribute some tips of your own here.
Please rate the helpfulness of this tip.
Click on a star to rate it!
https://www.theinsidetips.com/wp-content/uploads/2019/09/Tips-Logo-700x150.jpg00Larry Jordanhttps://www.theinsidetips.com/wp-content/uploads/2019/09/Tips-Logo-700x150.jpgLarry Jordan2021-08-03 01:30:002021-08-03 01:30:00Tip #1832: The Inside Tips Take a Hiatus
Compressor limits almost all compressed files to 4K or smaller.
Vince asks:
“I’ve got a 360 project (filmed on GoPro Max) that is 5376×2688 and need the best quality compression setting to create a 5376×2688 .mp4 (or .m4v) for playback on a pair of Oculus Quest 2 goggles. I can’t find any setting in FCP or Compressor that allows me to custom set the resolution to match. Actually, I can’t get anything larger than 4k, which is killing me and the image quality when viewing on the goggles.”
The short answer is that Compressor limits compression frame sizes to 4K for both H.264 and HEVC codecs.
NOTE: HEVC was specifically designed to support frame sizes larger than 4K, but Compressor does not currently allow it.
Because Vince is interested in high-quality, the workaround is to use the ProRes 422 codec. This supports frame sizes up to 8K, along with non-standard aspect ratios.
NOTE: However, if you import a 4K 3D clip, Compressor won’t upscale it larger than 100%, even into ProRes.
Adobe Media Encoder supports frame sizes up to 8K.
Codecs such as HEVC and ProRes support video frame sizes up to 8K.
Not all codecs support large frame sizes, but for those that do – such as ProRes and HEVC – Adobe Media Encoder will compress them.
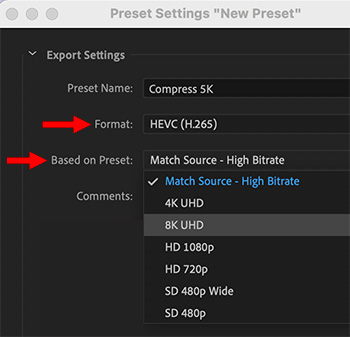
In Tip #1829, we learned that Apple Compressor limits compressed file sizes to 4K, except for ProRes.
But, Adobe Media Encoder will support up to 8K UHD (7680 x 4320 pixels) for some formats, such as HEVC and Apple ProRes.
NOTE: H.264 is limited to 4K due to the design of the codec.
To compress a file that large, you’ll need to create a custom preset (see screen shot) and select a codec that supports frame sizes that large. HEVC is a good choice for compressed files, while ProRes 422 is a good choice for higher-quality files.
NOTE: Keep in mind that HEVC will take significantly longer to compress than H.264, so be sure to allow extra time for compression.
The Inside Tips are taking a hiatus for the month of August. We’ll be back the first week of September with more Inside Tips.
Thanks for your readership and comments. Enjoy the rest of your summer.
Feel free to contribute some tips of your own here.
Please rate the helpfulness of this tip.
Click on a star to rate it!
https://www.theinsidetips.com/wp-content/uploads/2019/09/Tips-Logo-700x150.jpg00Larry Jordanhttps://www.theinsidetips.com/wp-content/uploads/2019/09/Tips-Logo-700x150.jpgLarry Jordan2021-08-02 01:30:002021-08-02 01:30:00Tip #1831: The Inside Tips Take a Hiatus
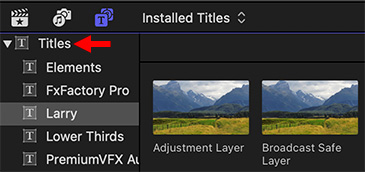
An adjustment layer is a custom title template which changes all clips below it in the timeline. For example, add an adjustment layer to change all clips below it to black-and-white, or apply the broadcast safe filter to your entire project, or apply the same color grade to multiple clips.
The benefit to an adjustment layer is that you can change the effect settings in the layer, without needing to adjust each individual clip. Or, remove an effect from multiple clips simply by removing the adjustment layer.
Premiere and Photoshop support adjustment layers natively. Final Cut does not. But… you can create one!
Here’s an article on my website that explains how to create an adjustment layer (you’ll need Motion). It’s a special form of a Title effect.
Another benefit – besides speed and flexibility – to creating an adjustment layer template is that you can “bake” in custom effects into the adjustment layer, as my article illustrates. This can save a significant amount of time during an edit.
Please rate the helpfulness of this tip.
Click on a star to rate it!
https://www.theinsidetips.com/wp-content/uploads/2019/09/Tips-Logo-700x150.jpg00Larry Jordanhttps://www.theinsidetips.com/wp-content/uploads/2019/09/Tips-Logo-700x150.jpgLarry Jordan2021-08-02 01:30:002021-08-02 01:30:00Tip #1828: Adjustment Layers Can Do Magic
The Broadcast Safe filter clamps excessive levels to keep your video in spec.
The Broadcast Safe filter is in Effects > Color (top). Pick the color space that matches your project (bottom).
Tip #1826 explained the value of Range Check. Range Check is a fast way to flag excessive video levels. But, how do you fix video levels that are out of range? Answer: The Broadcast Safe Filter.
Here’s how to fix errant video levels.
Go to Effects > Color and apply the Broadcast Safe filter to the clip with excessive levels (see top image in screen shot).
NOTE: You can create an adjustment layer, see Tip #1828 to apply this filter to a range of clips.
In the Video Inspector, select the color space of your project. (See the lower image in the screen shot.)
Excessive white or black levels are instantly clamped to 100 or 0 IRE. Clamping means you’ll lose detail in the brightest and darkest portions of the image. Most of the time, clamping will be fine.
However, for those times where that detail is important (the bright white lace of a wedding dress, for example) you’ll need to adjust video levels manually using the Color Board or Color Wheels.
Please rate the helpfulness of this tip.
Click on a star to rate it!
https://www.theinsidetips.com/wp-content/uploads/2019/09/Tips-Logo-700x150.jpg00Larry Jordanhttps://www.theinsidetips.com/wp-content/uploads/2019/09/Tips-Logo-700x150.jpgLarry Jordan2021-08-02 01:30:002021-08-02 01:30:00Tip #1827: Using the Broadcast Safe Filter
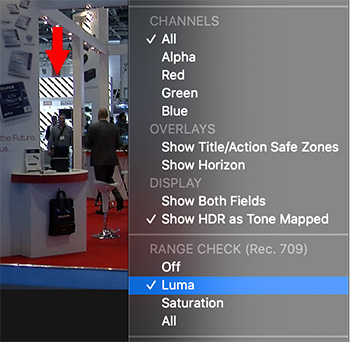
Range Check flags excessive white levels or chroma (color) saturation.
The View menu, top right corner of the Final Cut Viewer, showing Range Check options.
Have you ever wondered what “Range Check” does in the View menu? It’s actually really useful – it flags excessive white and chroma (color) saturation levels. Here’s what you need to know.
If you are posting media to the web, virtually any gray-scale or chroma value will be fine. The web is very forgiving.
But, not so broadcast, cable or digital cinema. Here, because of technical constraints, white levels can not exceed 100% and chroma levels can’t exceed certain amounts of saturation for SDR (Standard Dynamic Range) media.
What Range Check does is flag – using a moving series of red lines (red arrow in screen shot). These indicate areas in the frame that exceed white level limits (Luma), excessive saturation (Chroma) or both (All).
To fix this problem, either adjust your color grading or apply Effects > Color > Broadcast Safe.
EXTRA CREDIT
Tip #1827 explains how to use the Broadcast Safe filter.
Please rate the helpfulness of this tip.
Click on a star to rate it!
https://www.theinsidetips.com/wp-content/uploads/2019/09/Tips-Logo-700x150.jpg00Larry Jordanhttps://www.theinsidetips.com/wp-content/uploads/2019/09/Tips-Logo-700x150.jpgLarry Jordan2021-08-02 01:30:002021-08-02 01:30:00Tip #1826: What is Range Check?
We may request cookies to be set on your device. We use cookies to let us know when you visit our websites, how you interact with us, to enrich your user experience, and to customize your relationship with our website.
Click on the different category headings to find out more. You can also change some of your preferences. Note that blocking some types of cookies may impact your experience on our websites and the services we are able to offer.
Essential Website Cookies
These cookies are strictly necessary to provide you with services available through our website and to use some of its features.
Because these cookies are strictly necessary to deliver the website, refuseing them will have impact how our site functions. You always can block or delete cookies by changing your browser settings and force blocking all cookies on this website. But this will always prompt you to accept/refuse cookies when revisiting our site.
We fully respect if you want to refuse cookies but to avoid asking you again and again kindly allow us to store a cookie for that. You are free to opt out any time or opt in for other cookies to get a better experience. If you refuse cookies we will remove all set cookies in our domain.
We provide you with a list of stored cookies on your computer in our domain so you can check what we stored. Due to security reasons we are not able to show or modify cookies from other domains. You can check these in your browser security settings.
Google Analytics Cookies
These cookies collect information that is used either in aggregate form to help us understand how our website is being used or how effective our marketing campaigns are, or to help us customize our website and application for you in order to enhance your experience.
If you do not want that we track your visit to our site you can disable tracking in your browser here:
Other external services
We also use different external services like Google Webfonts, Google Maps, and external Video providers. Since these providers may collect personal data like your IP address we allow you to block them here. Please be aware that this might heavily reduce the functionality and appearance of our site. Changes will take effect once you reload the page.
Google Webfont Settings:
Google Map Settings:
Google reCaptcha Settings:
Vimeo and Youtube video embeds:
Other cookies
The following cookies are also needed - You can choose if you want to allow them:
Privacy Policy
You can read about our cookies and privacy settings in detail on our Privacy Policy Page.