Tip #253: What is Comparison View?
… for Adobe Premiere Pro CC
Tip #253: What is Comparison View?
This is an easy way to compare two shots for color, composition or content.
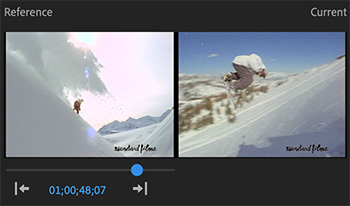

Comparison View is a relatively new feature in Premiere that allows you to compare two different frames in the same sequence at the same time. The image on the left is called the Reference, while the one on the right is called the Source.
Once this view is setup, you can play or pause the sequence, but the Reference is always a still frame.
To use it:
- Put the playhead on the frame you want to compare.
- Click the Comparison View icon on the far right of the Program Monitor button bar.
- The Comparison View screen appears (see screen shot).
- Drag the blue dot under the left image to display any other image in the same timeline. (Or, enter the timecode for the frame you want to use.) This displays a Reference image.
- Change how images are displayed by clicking on of the three icons just above the time ruler; horizontal, vertical or side-by-side.
- Click the Shot or Frame Comparison button to switch between a reference frame and the current clip in its previous state when adjusting visual effects.
- Click the Swap Sides button (two stacked arrows) to switch current frame to the left or right.
EXTRA CREDIT
Split screen shot comparison works with the Lumetri Scopes Waveform, making it useful for matching brightness levels precisely.
Leave a Reply
Want to join the discussion?Feel free to contribute!