Tip #413: Mask Multiple Clips with an Adjustment Layer
… for Visual Effects
Tip #413: Mask Multiple Clips with an Adjustment Layer
Larry Jordan – LarryJordan.com
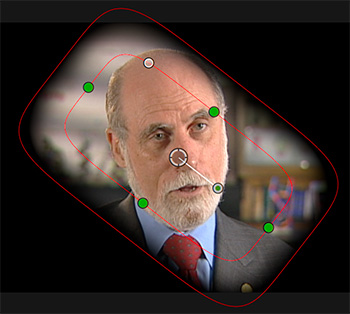
Adjustment layer masks can apply to one or more clips.

Both Adobe Premiere Pro and Apple Final Cut Pro X support adjustment layers; though you’ll need to create one first for Final Cut. This is a technique you can use in both.
NOTE: This tutorial explains how to create an adjustment layer for FCP X.
If you want to mask a single clip, Draw Mask in FCP X, or the masking tools in the Effect Controls panel (Premiere) work great. But, what if you want to mask multiple clips?
Well, you could create a mask in one clip, then copy and paste it to multiple clips. That works, until you need to make a change. Adjusting multiple clips is a pain in the neck.
Here’s the better way: Use an adjustment layer.
In Premiere:
- Open the sequence you want to mask.
- Choose File > New > Adjustment layer and match the settings in your sequence.
- Add the adjustment layer to the top of your timeline, then select it.
- Use the masking tools in the Effect Controls panel to create the shape and effect you want.
In FCP X:
- After you create an adjustment layer, you’ll find it in the Titles browser. Drag it so it is on top of all other clips in the timeline.
- Apply Effects > Masks > Draw Mask to the adjustment layer.
- Create the shape and effect you want.
In both software, once the mask is applied to the adjustment layer, all clips under it will be masked. If you need to make changes, you only need to change the adjustment layer.
This is a huge timesaver.
Leave a Reply
Want to join the discussion?Feel free to contribute!