Tip #911: The Skin Tone Line is Your Friend
… for Adobe Premiere Pro CC
Tip #911: The Skin Tone Line is Your Friend
Larry Jordan – LarryJordan.com
All of us are the same color, but not the same grayscale value.
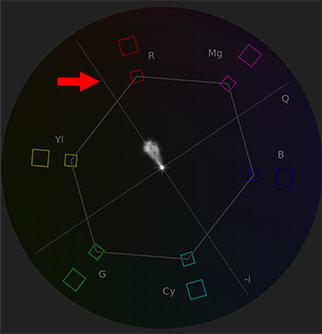

One of the most powerful color correction / grading tools that we have is the skin tone line. (Indicated by the red arrow in the screen shot.) Once you know how to use it, it is easy to quickly fix color problems and make your on-screen talent look great.
Human skin is translucent. That which gives skin it’s color is the red blood circulating underneath; and all of us have the same color red blood.
That which adds variation to our skin is its grayscale. You can verify this for yourself the next time a piece of dead skin falls off. If you look at it, it doesn’t have any color, just varying shades of gray. Some of us have lighter or darker gray skin than others.
So, if you have a shot with an incorrect color balance, crop to isolate a well-exposed piece of skin – avoid makeup or hair – then adjust color settings so the color values are parked ±2° on the skin tone line.
NOTE: Generally speaking, Asians tend to be 2° below the line, everyone else is either on it or 2° above it.
Of course, there are individual exceptions and lighting can make a big difference. But, if you are looking to salvage a problem shot, the skin tone line can help you get things back on track.
EXTRA CREDIT
Here’s a tutorial from my website that describes this in more detail.
Leave a Reply
Want to join the discussion?Feel free to contribute!