The key to making this transition invisible is to find matching colors in the two shots.
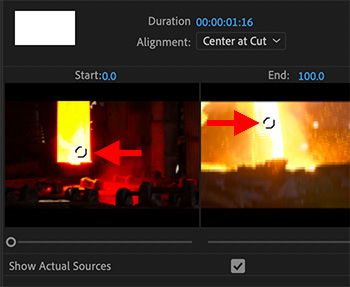
The small white circles indicate the targets for a zoom cut.
A Zoom cut zooms into the middle of a clip, cuts to a second shot, then zooms back out. What you may not know is that this transition can be customized to make it even more effective.
Apply Effects > Video Transitions > Zoom > Cross Zoom to a transition in the timeline.
NOTE: Any transition needs “handles,” extra media before the In and after the Out, in order to exist.
Select the transition in the timeline.
Open the Effect Controls panel and check Show Actual Sources.
In addition to showing images of the actual timeline clips, these small thumbnails also show two white circles (indicated by red arrows in the screen shot). These white circles define the target of each zoom.
Drag these “zoom targets” so that they both are on top of reasonably matching colors.
Now, when you zoom, the cut will occur when both shots display similar colors, making the actual transition harder to see and, therefore, more convincing.
Please rate the helpfulness of this tip.
Click on a star to rate it!
https://www.theinsidetips.com/wp-content/uploads/2019/09/Tips-Logo-700x150.jpg00Larry Jordanhttps://www.theinsidetips.com/wp-content/uploads/2019/09/Tips-Logo-700x150.jpgLarry Jordan2021-01-12 01:30:002021-01-12 01:30:00Tip #1319: Customize a Zoom Cut
Ganging plays two clips in sync to help figure out the best place to place an edit.
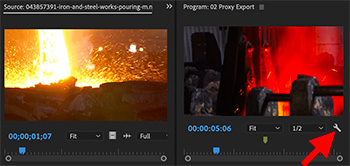
Set ganging using the menu under the Wrench icon in the Program Monitor.
When you display the Wrench icon menu in either the Source or Program monitors, the first choice is “Gang Source and Program.” What does this do?
Ganging plays two clips in sync – one in the Source panel and the other in the Program Monitor – to help you figure out the best place to place an edit.
To set this up, open a clip into the Source monitor.
Then, place the playheads in both the Source panel and timeline on the frame where you want each clip to start.
Click the Wrench icon in the Program Monitor and select Gang Source & Program from the popup menu.
Now, as you drag the playhead in the timeline, the Source monitor will follow along; perfectly in sync.
Please rate the helpfulness of this tip.
Click on a star to rate it!
https://www.theinsidetips.com/wp-content/uploads/2019/09/Tips-Logo-700x150.jpg00Larry Jordanhttps://www.theinsidetips.com/wp-content/uploads/2019/09/Tips-Logo-700x150.jpgLarry Jordan2021-01-12 01:30:002021-01-12 01:30:00Tip #1320: What Does “Ganging Monitors” Do?
The Comparison Viewer is very helpful when doing color grading to match shots.
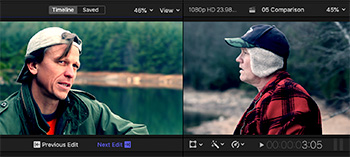
The Comparison Viewer (left) with buttons displayed on bottom.
I discovered this tip while researching a recent PowerUP webinar covering the new features in Apple Final Cut Pro v. 10.5.
The Comparison Viewer displays two timeline images side-by-side, which can simplify color grading or other tasks where comparing two images is helpful (see screen shot).
To display the Comparison Viewer, go to Window > Show in Workspace > Comparison Viewer (Shortcut: Control + Cmd + 6).
There are two buttons at the top:
Timeline. This displays the last frame of the previous clip, or the first frame of the following clip relative to the position of the playhead in the timeline. Switch between views using the Previous Edit / Next Edit buttons at the bottom.
Saved. This saves up to 30 still frames, captured at the position of the playhead in the timeline, then displays whichever you select in the Comparison Viewer.
I find using this very helpful whenever I do color grading.
Please rate the helpfulness of this tip.
Click on a star to rate it!
https://www.theinsidetips.com/wp-content/uploads/2019/09/Tips-Logo-700x150.jpg00Larry Jordanhttps://www.theinsidetips.com/wp-content/uploads/2019/09/Tips-Logo-700x150.jpgLarry Jordan2021-01-11 01:30:002021-01-08 17:25:55Tip #1312: The Comparison Viewer Saves Time
Proxy-only libraries are small, fast and easy to share.
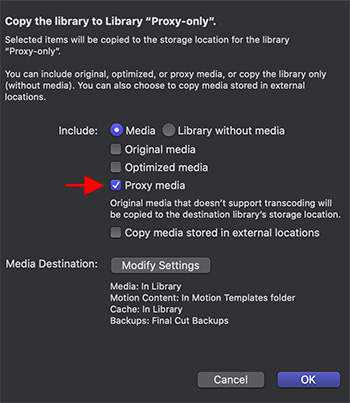
The “Copy to Library” dialog box, with settings to create a Proxy Library.
I discovered this tip while researching a recent PowerUP webinar covering the new features in Apple Final Cut Pro v. 10.5.
A new feature in Final Cut 10.5 is the ability to create a proxy-only Library. This is extremely useful when you need to share a library with a remote editor who doesn’t already have access to the project’s media.
Here’s how.
Control-click an existing library you want to share in the Library List to the left of the Browser.
Choose Copy to Library > New Library
NOTE: You can also copy one library into another library, for example, to consolidate files.
In the resulting window, check the Proxy checkbox.
This copies all library databases, events, projects into a new library. It duplicates any existing proxy files – though doesn’t create new proxies – and vastly reduces the size of the new library, making it much easier to send via the web to another editor.
EXTRA CREDIT
There are a number of other settings in this window. Read more about what this can do in Apple’s Final Cut Pro Help.
Please rate the helpfulness of this tip.
Click on a star to rate it!
https://www.theinsidetips.com/wp-content/uploads/2019/09/Tips-Logo-700x150.jpg00Larry Jordanhttps://www.theinsidetips.com/wp-content/uploads/2019/09/Tips-Logo-700x150.jpgLarry Jordan2021-01-11 01:30:002021-01-11 01:30:00Tip #1313: Copy a Library as Proxy-only
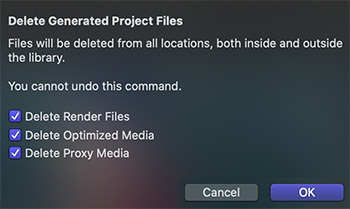
Generated media take storage space – which, sometimes, you need to get back.
This window allows you to select which generated media you want to delete.
I discovered this tip while researching a recent PowerUP webinar covering the new features in Apple Final Cut Pro v. 10.5.
Generated media are files created by Final Cut to enable your editing. These files are based on your original camera media, serve a variety of purposes, and include:
Optimized files
Proxy files
Render files
The problem is that these files take a lot of space and, most of time, Final Cut does not erase them, just in case you need to use them again. Most of the time, Final Cut needs these for your projects. But, for projects you’ve been working on a while, the storage space required for this generated media can get out of hand.
New with the 10.5 update are more ways to get rid of it. We can now deleted generated media by:
Clip
Selected group of clips
Events
Selected group of events
Projects
Selected group of projects
Library
Once you’ve selected something, go to File > Delete Generated [ name of selection ] Media. In the resulting dialog (see screen shot) select the types of files you want to delete.
EXTRA CREDIT
Deleting generated media can not be undone. However, if you delete something that Final Cut needs, FCP will automatically regenerate it. So deleting generated medis is less risky than it seems.
Please rate the helpfulness of this tip.
Click on a star to rate it!
https://www.theinsidetips.com/wp-content/uploads/2019/09/Tips-Logo-700x150.jpg00Larry Jordanhttps://www.theinsidetips.com/wp-content/uploads/2019/09/Tips-Logo-700x150.jpgLarry Jordan2021-01-11 01:30:002021-01-11 01:30:00Tip #1314: Delete Generated Media More Easily
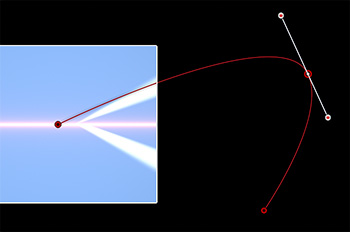
There are multiple ways to add curves to motion paths.
Double-click a motion path line, then drag to create a curve.
All motion paths in Motion are straight lines. However, adding a curve is easy. Here’s how.
PEN or PAINTBRUSH TOOL
When drawing a line with either the Pen or Paintbrush tool, drag when setting a corner. This changes the corner from a sharp edge to a curve.
MOTION PATH
Double-click anywhere on the red motion path line to set a control point.
Drag the control point to create a curve.
Drag one or both of the white control handles to change the shape of the curve.
A CONTROL POINT
Control-click an existing corner in a motion path line. From the popup menu, change it from Linear to Smooth to add a curve.
Change from Smooth to Linear to change a curve to a corner.
Please rate the helpfulness of this tip.
Click on a star to rate it!
https://www.theinsidetips.com/wp-content/uploads/2019/09/Tips-Logo-700x150.jpg00Larry Jordanhttps://www.theinsidetips.com/wp-content/uploads/2019/09/Tips-Logo-700x150.jpgLarry Jordan2021-01-07 01:30:002021-01-07 01:30:00Tip #1303: Add a Curve to a Motion Path
This is a fast and interactive way to change the view in the Viewer.
Default 3D screen control (top). Roll over it to change to an expanded controller (bottom).
When you switch to 3D space in Motion, an innocuous control, illustrated at the top of the screen shot, appears.
I’ve happily ignored this for years.
But, if you hover your mouse over it, the control expands into a multi-purpose screen controller (bottom of screen shot).
Click one of the outside boxes to switch between Top, Bottom, Left, Right, or Back views.
Click the edge of the center box itself to switch to Perspective View.
Click the center of the box to switch to Front View.
Type Control + A to switch back to Active Camera view.
There are keyboard shortcuts for these, but clicking the controller creates a very cool effect.
Please rate the helpfulness of this tip.
Click on a star to rate it!
https://www.theinsidetips.com/wp-content/uploads/2019/09/Tips-Logo-700x150.jpg00Larry Jordanhttps://www.theinsidetips.com/wp-content/uploads/2019/09/Tips-Logo-700x150.jpgLarry Jordan2021-01-07 01:30:002021-01-07 01:30:00Tip #1304: Secret 3D View Control
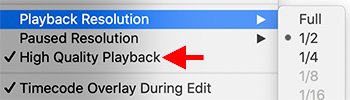
High-quality compensates for the visual difference when playing or pausing a clip.
Premiere allows control over playback quality and resolution. By default High Quality Playback is turned off. When should you turn it on?
Here’s the answer, from Adobe Help.
NOTE: Click the Wrench icon in either the Source or Program Monitors to see these menu options.
Playback vs. Paused Resolution
Some formats are difficult to display in full-motion playback, due to their high compression or high data rate. A lower resolution permits faster motion playback, but at the expense of display image quality. This tradeoff is most visible when viewing AVCHD and other H.264 -codec based media. Below full resolution, these formats have error correction turned off, and artifacts are common during playback. These artifacts, however, do not show up in exported media.
Providing separate playback and pause resolutions gives you more control over your monitoring experience. With high-resolution footage, you can set playback resolution to a lower value (for example, 1/4) for smooth playback, and set the pause resolution to Full. These settings allow you to check the quality of focus or edge details when playback is paused. Scrubbing puts the monitor in playback resolution, not pause resolution.
Not all resolutions are available for all sequence types. For Standard Definition sequences, such as DV, only Full and 1/2 are available. For many HD sequences up to 1080 frame size, Full, 1/2, and 1/4 are available. For sequences with frame sizes larger than 1080, such as RED, more fractional resolutions are available.
High Quality Playback
To optimize playback performance, playback quality at any of the monitor’s playback resolutions (Full, ½, and ¼) is lower than it is when pausing the video. Due to the difference in quality, users may notice a slight “bump” in image quality between playback and pause. Frames can have a slightly softer look during playback versus pause at the default settings, even when both are set to full resolution. With High-Quality Playback toggled on, the quality of playback frames will match paused frames when they’re set to the same resolution and eliminate the quality “bump” when starting and stopping playback. However, turning High-Quality Playback on can decrease playback performance, including causing dropped frames.
EXTRA CREDIT
For my projects, I set:
Playback resolution to 1/2
Paused Resolution to Full
And turn High Quality Playback off
When I get a newer/faster system, I’ll turn High Quality on.
Please rate the helpfulness of this tip.
Click on a star to rate it!
https://www.theinsidetips.com/wp-content/uploads/2019/09/Tips-Logo-700x150.jpg00Larry Jordanhttps://www.theinsidetips.com/wp-content/uploads/2019/09/Tips-Logo-700x150.jpgLarry Jordan2021-01-05 01:30:002021-01-01 15:15:44Tip #1301: Enable High Quality Playback
I use these tips all the time when I need to tweak a clip into better position.
Select a connected clip, then type comma or period to move it left or right.
While clips in the Primary Storyline are magnetically “connected” to each other, that is not true for any connected clip. Here’s a quick tip that allows you to move connected clips or storylines using only the keyboard.
Select the connected clip(s) you want to move.
Type comma to move the selected clips left one frame.
Type Shift + comma to move the selected clips left ten frames.
Type period to move the selected clips right one frame.
Type Shift + period to move the selected clips right ten frames.
NOTE: This keyboard shortcut won’t work on clips in the Primary Storyline.
EXTRA CREDIT
This same keyboard shortcut also works for selected edit points.
Please rate the helpfulness of this tip.
Click on a star to rate it!
https://www.theinsidetips.com/wp-content/uploads/2019/09/Tips-Logo-700x150.jpg00Larry Jordanhttps://www.theinsidetips.com/wp-content/uploads/2019/09/Tips-Logo-700x150.jpgLarry Jordan2021-01-04 01:30:002021-01-01 14:46:13Tip #1298: Shortcuts to Move Clips
Typing in timecode is often faster and more precise than dragging the playhead.
Click and enter either absolute or relative timecode values.
Here’s a quick tip to help you move around Premiere’s timeline more easily.
Double-click the timecode display in the top left corner of the timeline, then enter the timecode position where you want to move the playhead.
NOTE: Unlike earlier versions of Premiere, you only need to enter digits, not punctuation.
To jump to an absolute timecode reference, enter the full number (i.e. 00001000 in the screen shot).
To jump a relative distance to the right, enter the amount you want to move as a positive number (i.e. +25 jumps 25 frames forward).
To jump a relative distance to the left, enter the amount you want to move as a negative number (i.e. -215 jumps 2 seconds, 15 frames back).
NOTE: If you enter 75, Premiere will automatically calculate the number of seconds and frames to move the playhead based on the frame rate of the sequence.
EXTRA CREDIT
In the timecode display, a semi-colon before the frame number indicates drop-frame timecode. All colons means non-drop frame timecode.
Please rate the helpfulness of this tip.
Click on a star to rate it!
https://www.theinsidetips.com/wp-content/uploads/2019/09/Tips-Logo-700x150.jpg00Larry Jordanhttps://www.theinsidetips.com/wp-content/uploads/2019/09/Tips-Logo-700x150.jpgLarry Jordan2020-12-29 01:30:002020-12-29 01:30:00Tip #1278: Jump in Time
We may request cookies to be set on your device. We use cookies to let us know when you visit our websites, how you interact with us, to enrich your user experience, and to customize your relationship with our website.
Click on the different category headings to find out more. You can also change some of your preferences. Note that blocking some types of cookies may impact your experience on our websites and the services we are able to offer.
Essential Website Cookies
These cookies are strictly necessary to provide you with services available through our website and to use some of its features.
Because these cookies are strictly necessary to deliver the website, refuseing them will have impact how our site functions. You always can block or delete cookies by changing your browser settings and force blocking all cookies on this website. But this will always prompt you to accept/refuse cookies when revisiting our site.
We fully respect if you want to refuse cookies but to avoid asking you again and again kindly allow us to store a cookie for that. You are free to opt out any time or opt in for other cookies to get a better experience. If you refuse cookies we will remove all set cookies in our domain.
We provide you with a list of stored cookies on your computer in our domain so you can check what we stored. Due to security reasons we are not able to show or modify cookies from other domains. You can check these in your browser security settings.
Google Analytics Cookies
These cookies collect information that is used either in aggregate form to help us understand how our website is being used or how effective our marketing campaigns are, or to help us customize our website and application for you in order to enhance your experience.
If you do not want that we track your visit to our site you can disable tracking in your browser here:
Other external services
We also use different external services like Google Webfonts, Google Maps, and external Video providers. Since these providers may collect personal data like your IP address we allow you to block them here. Please be aware that this might heavily reduce the functionality and appearance of our site. Changes will take effect once you reload the page.
Google Webfont Settings:
Google Map Settings:
Google reCaptcha Settings:
Vimeo and Youtube video embeds:
Other cookies
The following cookies are also needed - You can choose if you want to allow them:
Privacy Policy
You can read about our cookies and privacy settings in detail on our Privacy Policy Page.