… for Adobe Premiere Pro CC

Tip #1279: Marker Tips & Tricks

Larry Jordan – LarryJordan.com

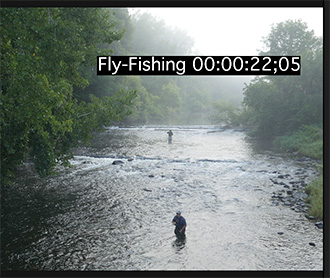
Markers are perfect for navigation, or just leaving yourself a note.

The Edit Marker dialog box.

Topic $TipTopic

Markers do so much in Premiere, it is hard to list all the options. But here are some of my favorites:

  • Markers are always placed at the position of the playhead.
  • You can add markers in the Source Monitor or Program Monitor
  • If a clip is selected, markers are added to the clip. If not, they are added to the timeline.
  • Markers can be dragged into a new position.
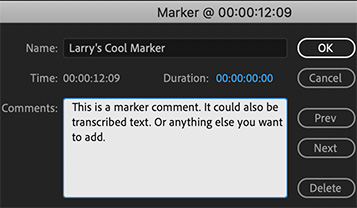
  • Double-click a marker to open it for editing.
  • Markers can have titles, descriptions/transcripts and/or colors.
  • Comment markers can be exported and added to QuickTime and MP4 movies.
  • The Markers panel displays all sequence markers and enables jumping between them.

EXTRA CREDIT

  • To set a marker, type M
  • To delete a marker, put the playhead at the marker position and type Option + M
  • To delete all markers, type Option + Cmd + M
  • To jump the playhead to the next marker, type Shift + M
  • To jump to a previous marker, type Shift + Cmd + M

Please rate the helpfulness of this tip.

Click on a star to rate it!

… for Adobe Premiere Pro CC

Tip #1280: Quick Project Panel Tricks

Larry Jordan – LarryJordan.com

List view is similar to a spreadsheet – with the addition of dozens of hidden columns.

Drag and resize columns in List View just like a spreadsheet.

Topic $TipTopic

When you switch to List view in the Program panel, clips and sequences are sorted into rows and columns. This gives you lots of different ways to look at the elements of your project.

List View is similar to a spreadsheet:

  • Drag the name of a column header to move it to a new location.
  • Drag the vertical line between column headers to resize the column.
  • Click the column header to sort by that column.
  • Click twice to sort in descending order
  • Shift-click a second column header to sort on a second column (for example, click first on Scene to sort by Scene number, then, shift-click on Log Note to sort by circled takes.)

NOTE: The Name column can not be moved.

To hide or display more columns, Control-click any column EXCEPT the Name column and choose Metadata Display.

While you can display any metadata fields listed there, the one that will be most helpful are the fields inside Premiere Pro Project Metadata.


Please rate the helpfulness of this tip.

Click on a star to rate it!

… for Apple Final Cut Pro X

Tip #1251: Add & Resize Emojis

Larry Jordan – LarryJordan.com

Emojis convey emotions – why not use them in your projects?

The Emoji picker, Smileys category – featuring Mrs. Claus.

Topic $TipTopic

This holiday season, add some emojis to spice your visuals. Here’s how to add, adjust and size them in your next project.

  • All emojis are text. So, start by adding a text clip to the timeline.
  • Place your cursor in the text clip where you want an emoji to appear.
  • Type Control + Cmd + Spacebar.
  • Double-click any emoji icon to add it to your title at the position of the cursor.

Just as with text, select an emoji and adjust its size using the Font Size controls. These will still look good at 400 points!

NOTE: Press and hold any emoji to see variations on that character (see screen shot).

EXTRA CREDIT

Emojis are much more than smiley faces. There are thousands to choose from. Scroll through the different categories to see what’s available.


Please rate the helpfulness of this tip.

Click on a star to rate it!

… for Apple Final Cut Pro X

Tip #1277: Trim – With More Options

Larry Jordan – LarryJordan.com

“Crop & Feather” is more accurately called “Trim & Feather.”

A cropped & feathered clip, with the settings I used to achieve this effect.

Topic $TipTopic

I create a lot of picture-in-picture effects in my projects. Recently, I discovered a way to make this process faster. Here’s how.

We often trim a clip to hide portions of the image so we can see the image beneath. Trimming (which Photoshop calls “masking”) hides part of the image without changing its size.

NOTE: Cropping on the other hand, removes portions of the image, then changes its size to fill the frame.

The Crop & Feather effect (Effects > Distortion) both trims a clip and adds feathering – either to the inside or out – of the trimmed clip. This means we don’t need to use a separate effect simply to feather the edges of a trimmed image.

In the screen shot, I trimmed the image to focus on the tree, then feathered the edges to the inside.

The screen shot shows the settings I used to achieve this.


Please rate the helpfulness of this tip.

Click on a star to rate it!

… for Apple Motion

Tip #1258: Change Keyframe Ease In/Out Speed

Larry Jordan – LarryJordan.com

Bezier control dots adjust Ease In/Out speeds and the shape of the motion path.

Drag the white Bezier control dot to or from the keyframe to change Ease In/Out speeds.

Topic $TipTopic

I discovered this tip while researching a recent PowerUP webinar. We can change the ease-in / ease-out speed when animating objects using keyframes.

Ease In and Ease Out refer to the acceleration of an object when it is animated using keyframes.

  • Ease In. The speed of an object approaching a keyframe.
  • Ease Out. The speed of an object leaving a keyframe.

By default, all keyframes in Motion have both Ease In and Ease Out applied. This means an object accelerates when leaving a keyframe and decelerates when approaching a keyframe.

You can change the speed of this acceleration after applying a keyframe by selecting the keyframed object in the Layers panel, then click the keyframe you want to adjust.

This reveals a thin white line with a white dot at the end of it. (This line is called a Bezier control handle.) Drag the dot along the motion path line to change the Ease In/Out speeds.

NOTE: Dragging the dot around the keyframe puts a curve into the motion path (the dotted red line).

EXTRA CREDIT

Control-click a keyframe and set it to Linear to have a constant speed between keyframes.


Please rate the helpfulness of this tip.

Click on a star to rate it!

… for Apple Final Cut Pro X

Tip #1259: Change Keyframe Ease In/Out Speed

Larry Jordan – LarryJordan.com

Bezier control dots adjust Ease In/Out speeds and the shape of the motion path.

Drag the Bezier control handle along the motion path to change the Ease In/Out speed.

Topic $TipTopic

I discovered this tip while researching a recent PowerUP webinar. We can change the ease-in / ease-out speed when animating objects in Final Cut using keyframes.

Ease In and Ease Out refer to the acceleration of an object when it is animated using keyframes.

  • Ease In. The speed of an object approaching a keyframe.
  • Ease Out. The speed of an object leaving a keyframe.

By default, all keyframes in Final Cut Pro have both Ease In and Ease Out applied. This means an object accelerates when leaving a keyframe and decelerates when approaching a keyframe.

Here’s how to change the speed of this acceleration after applying a keyframe:

  • Select the clip in the timeline.
  • Rotate the object to move the position of the rotation handle.
  • Grab the small white dot at the end of the thin white line attached to the keyframe. (This line is called a Bezier control handle.)
  • Drag the dot along the motion path line to change the Ease In / Out speed.

NOTE: Dragging the dot around the keyframe puts a curve into the motion path (the dotted red line).

EXTRA CREDIT

Once you’ve adjusted the Ease In/Out speed, you can unrotate the object to the angle you need.

Control-click a keyframe and set it to Linear to have a constant speed between keyframes.


Please rate the helpfulness of this tip.

Click on a star to rate it!

… for Apple Final Cut Pro X

Tip #1260: How to Burn Timecode Into Video

Larry Jordan – LarryJordan.com

This generator can display either project or source clip timecode.

(Drone image courtesy of Terry Holland.)

Topic $TipTopic

Final Cut Pro provides a fast way to add timecode to your review videos using a generator.

Add Generator > Elements > Timecode to the top layer of your project. Final Cut will automatically superimpose it over all lower video layers.

In the Video Inspector, you can change:

  • Whether to display project or source clip timecode
  • The position of the timecode
  • Font, size and color
  • Background color
  • The starting timecode number
  • The label that appears to the left of the timecode (“Fly-Fishing” in the screen shot).

This feature makes it easy for both you and the people reviewing your videos to be sure you are talking about the same point of your project.


Please rate the helpfulness of this tip.

Click on a star to rate it!

… for Apple Motion

Tip #1243: Hidden Clip Control Options

Larry Jordan – LarryJordan.com

Controls, behaviors, and filters are all available from this contextual menu.

Control-click a video clip in the Motion Viewer to reveal this menu. (Image courtesy of StandardFilms.com.)

Topic $TipTopic

There is a wealth of clip control options hidden in the Motion Viewer. The trick is finding them.

Here’s the secret: Control-click a video clip that’s placed in the Viewer to reveal the options shown in the screen shot.

NOTE: Clicking in the Viewer, without clicking on a clip, does not reveal this menu.

From this menu, you can select a variety of tools, behaviors, filters and other options.


Please rate the helpfulness of this tip.

Click on a star to rate it!

… for Apple Final Cut Pro X

Tip #1240: Turn Categories Off or On

Larry Jordan – LarryJordan.com

Categories can easily be hidden – if you click in the right place.

The blue “Categories” button for the Titles browser.

Topic $TipTopic

The longer I use Final Cut, the more hidden features I discover. Here’s another. (I don’t know when this feature first appeared, but it is in the 10.5 version of Final Cut and probably many versions prior to that. )

Effects are grouped into categories, displayed on the left of the appropriate browser. If you click the button for that Browser once, the contents of that Browser are displayed.

However, if you click that now-blue button a second time, the category display is hidden. Click it a third time to show it again.

This “hiding” technique works for the:

  • Library List
  • Photos & Music browser
  • Titles & Generators browser

To hide/display categories for either the Effects or Transitions browsers, click the small sidebar icon in the lower-left corner of each browser.


Please rate the helpfulness of this tip.

Click on a star to rate it!

… for Apple Final Cut Pro X

Tip #1241: Shortcuts for On-screen Viewer Controls

Larry Jordan – LarryJordan.com

The on-screen controls make effect adjustments a lot faster and more intuitive.

On-screen Viewer controls in the Viewer (top) and Video Inspector (bottom).

Topic $TipTopic

The Transform, Crop and Distort inspector settings can all be adjusted on-screen. There are actually two places these can be enabled.

The first is at the bottom left of the Viewer. Click the small downward pointing arrow just to the left of the “Magic Wand” and select the controls you want to activate.

If the correct controls – indicated by the icon – are already selected, you only need to click the icon itself to enable them; as illustrated by the left red arrow in the screen shot.

– OR –

Go to the Video Inspector and click the small icon to the right of the name of the controls you want to activate – “Transform,” “Crop,” or “Distort.”

If the icon is gray, clicking will enable the controls. If the icon is blue, as shown by the right red arrow in the screen shot, clicking will disable the controls.

EXTRA CREDIT

Remember, when you are done using the on-screen controls to either click “Done” in the top right corner of the Viewer or click the now-blue icon in the Video Inspector to disable the controls.


Please rate the helpfulness of this tip.

Click on a star to rate it!