… for Apple Final Cut Pro X

Tip #1242: How to Move a Generated Shape

Larry Jordan – LarryJordan.com

Scaling a generator scales the frame, not the object. Use Transform to move it.

Don’t drag the white circle, use Transform > Position settings instead.

Topic $TipTopic

I use Generators > Shapes frequently in my projects – especially the arrow. However, if I don’t pay attention, when I scale the arrow smaller, then drag it around the screen, it disappears. Here’s why.

When you add Generators > Shapes to a project, use the Generator Inspector to set the shape, colors and shadows, but don’t change the Center setting.

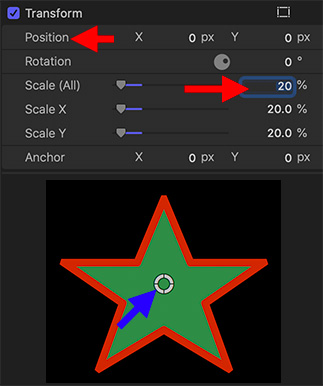
Next, go to the Video Inspector and adjust Scale and Rotation to the size and orientation you need (bottom red arrow in the screen shot).

Finally, to adjust the position of the generator, DON’T use the white circle in the Viewer!! (Blue arrow.) Why? Because when you scaled the generator, you actually scaled the frame that contains it. Dragging the white circle drags the frame, not the image.

Instead, change the position of a generator using Video Inspector > Transform > Position (top red arrow). Or the on-screen Transform controls.

EXTRA CREDIT

This “disappearing generator” drove me nuts until I finally figured it out.


Please rate the helpfulness of this tip.

Click on a star to rate it!

… for Apple Final Cut Pro X

Tip #1214: Unlock the Timeline Index

Larry Jordan – LarryJordan.com

CommandPost provides hundreds of shortcuts and features for Final Cut Pro, After Effects and the Finder.

The CommandPost menu.

Topic $TipTopic

Here’s a very handy free utility that I use in every edit. It’s called CommandPost. One of my favorite features is that it unlocks the data stored in the Timeline Index.

CommandPost is a free and open source native macOS application that acts as a bridge between control surfaces, and software that doesn’t natively support control surfaces, such as Apple’s Final Cut Pro X and Adobe After Effects.

CommandPost requires macOS Sierra 10.12.1 or later (including macOS Mojave, Catalina & Big Sur). It also supports Final Cut Pro 10.4.4 and later (including Final Cut Pro 10.4.10).

There are many features that make this worth using in Final Cut, here are my three favorites:

  • Scrolling timeline!!
  • Export the contents of the currently active panel in the Timeline Index
  • Multiple and shared clipboards.

There are many other features for both FCP X and the Finder that make CommandPost an essential utility. It’s one I use every time I open Final Cut.

Website: https://commandpost.io.


Please rate the helpfulness of this tip.

Click on a star to rate it!

… for Adobe Premiere Pro CC

Tip #1164: How to Retime a Clip in AME

Larry Jordan – LarryJordan.com

Retiming ALWAYS changes the playback speed of a clip.

The ‘Interpret Footage” option linked to the media file in Adobe Media Encoder.

Topic $TipTopic

(This tip is from a recent webinar on Media Compression in Adobe Media Encoder.)

Retiming a clip means to change the frame rate at which a clip plays back. For example, from 24 fps to 25 fps. This can easily be done in Adobe Media Encoder. Here’s how.

  • Open Adobe Media Encoder. (Any version will do, this isn’t a new feature.)
  • Using the Media Browser, import the clip who’s speed you want to change into the Queue.
  • Control-click the name of the movie file in the Queue (see screen shot) and select Interpret Footage.
  • In the resulting dialog, change “Assume this frame rate:” to the new frame rate you want to use for playback.
  • Click OK and you are done.

NOTE: When retiming clips, while you can convert these into any codec, it is a good practice to convert them into a high-quality intermediate codec like ProRes 422, or a high-data rate GoPro Cineform or DNx file. This retains the maximum image quality during the conversion.

EXTRA CREDIT

Unlike changing the frame rate, which drops or adds frames, interpreting footage plays every frame in the clip, but at a different speed.

So, going from a faster frame rate to a slower one creates slow motion, while going from a slower frame rate to a faster one creates a timelapse.


Please rate the helpfulness of this tip.

Click on a star to rate it!

… for Adobe Premiere Pro CC

Tip #1205: Display the Compression Log in AME

Larry Jordan – LarryJordan.com

AME’s log summarizes everything that was done to compress a file.

The Status column in Adobe Media Encoder.

Topic $TipTopic

(This tip is from a recent webinar on Media Compression in Adobe Media Encoder.)

Every compression job in Adobe Media Encoder is logged in a hidden log file. This log shows how long it took to compress a file, where the file is stored and what settings were applied to it.

To display the log, after a file has been compressed, click Done in the Status column.

The compression log appears almost instantly. The latest files will be located at the bottom.

EXTRA CREDIT

This is a text file. The contents can be copied and pasted into the word processor of your choice if you need to make this report prettier.


Please rate the helpfulness of this tip.

Click on a star to rate it!

… for Adobe Premiere Pro CC

Tip #1206: Reset a Compression Job in AME

Larry Jordan – LarryJordan.com

To reset the status, Control-click the status and reset it.

The Reset Status menu, which is accessed by Control-clicking the status for a job.

Topic $TipTopic

(This tip is from a recent webinar on Media Compression in Adobe Media Encoder.)

When Adobe Media Encoder (AME) completes a compression task, it flags the job as Done (Tip #1205).

However, what if you discover a problem with the file? Once that Done flag is set, AME won’t recompress it.

Unless…. you know this simple tip to resetting the status of a clip.

Simply Control-click the Status (the word “Done”) for the file you need to recompress and reset it. (See screen shot.)

EXTRA CREDIT

This reset is typically needed when you compress a file, only to discover that one of the settings was wrong, or an overlay was misspelled, or the data rate was too low.

Resetting the status is much faster than recreating the entire compression setting.


Please rate the helpfulness of this tip.

Click on a star to rate it!

… for Codecs & Media

Tip #1211: What Is “Clean Aperture?”

Larry Jordan – LarryJordan.com

Clean Aperture is most helpful for images transferred from analog tape.

The Clean Aperture option in Compressor > Video Properties panel. It

Topic $TipTopic

You may have seen this “Clean Aperture” checkbox in Apple Compressor and wondered what it does and when to use it. Apple has it On by default.

Here’s what Apple’s Help Files say:

“Select this checkbox to define clean picture edges in the output file. This property adds information to the output file to define how many pixels to hide, ensuring that no artifacts appear along the edges. When you play the output file in QuickTime Player, the pixel aspect ratio will be slightly altered. This process doesn’t affect the actual number of pixels in the output file—it only controls whether information is added to the file that a player can use to hide the edges of the picture.”

In general, if you have an image recorded from analog tape, you’ll have this problem. Most current digital images don’t need this.

While it is on by default, I generally turn this off.


Please rate the helpfulness of this tip.

Click on a star to rate it!

… for Apple Final Cut Pro X

Tip #1193: New On-screen Controller for Compressor

Larry Jordan – LarryJordan.com

This “map” is a fast navigational aid to moving around inside a larger image.

The Zoom menu (150%) and the navigation map (white rectangle).

Topic $TipTopic

I’m not sure when this feature first showed up in Compressor, but it seems relatively new to me.

Once you’ve imported a clip into Compressor, if you zoom into the image in the Preview monitor so that it is bigger than the screen can display, a small “map” appears (see screen shot).

The white field represents the entire image. The darker portion represents the portion of the image that’s visible in the Viewer.

Grab the small, dark icon inside the white rectangle and drag it to reveal other portions of the image in the Viewer.

EXTRA CREDIT

This is similar to the “red box” that appears in Final Cut Pro X when the image in the Viewer is zoomed larger than the Viewer can display.

In both Compressor and Final Cut, to fit the zoomed image back into the Viewer either:

  • Type Shift + Z
  • Select Fit from the popup menu displaying the zoom percentage of the image (150% in the screen shot)

Please rate the helpfulness of this tip.

Click on a star to rate it!

… for Apple Final Cut Pro X

Tip #1212: What Does This Icon Do?

Larry Jordan – LarryJordan.com

Workflow extensions extend Final Cut to seamlessly work with other software.

The Workflow Extensions menu in FCP X. This shows two extensions are installed.

Topic $TipTopic

In the top left corner of the Final Cut Pro X interface, you may see this icon (see screen shot). What does it do?

The icon indicated by the red arrow in the screen shot is the “Workflow Extension” menu for FCP X.

These are plug-ins that work inside Final Cut. Currently, Apple lists nine on its website:

  • APM Music
  • CatDV
  • EVC ShareBrowser
  • Frame.io
  • KeyFlow Pro
  • Primestream
  • Ripple Training
  • Shutterstock
  • Simon Says

Once an extension is installed, you access it from this menu.

Here’s a link to Apple’s ecosystem webpage to learn more.

EXTRA CREDIT

There are probably more extensions than Apple lists. If you know of others, please mention them in the Comments.


Please rate the helpfulness of this tip.

Click on a star to rate it!

… for Apple Final Cut Pro X

Tip #1213: Find & Delete Clips – Fast!

Larry Jordan – LarryJordan.com

The Timeline Index is a fast way to find just about anything in your timeline.

Timeline Index > Clips section with a selected audio clip.

Topic $TipTopic

The Timeline Index is an underutilized feature of Final Cut Pro X. But, if you take the time to explore it, you’ll find all kinds of interesting things it can do. Here’s a quick list.

With an edited project in the timeline, open the Timeline Index (Shortcut: Shift + Cmd + 2).

Click the Clips tab at the top.

Select any clip in the Index. This also selects it in the timeline and places the playhead at the start of the selected clip.

With the timeline clip selected, you can:

  • Solo the clip (Option + S)
  • Play the clip
  • Delete the clip
  • Apply an effect to the clip

The Timeline Index is a fast way to jump to any clip, title, or marker.

EXTRA CREDIT

If you can’t find a clip, use the search box at the top to track it down.


Please rate the helpfulness of this tip.

Click on a star to rate it!

… for Apple Motion

Tip #1197: Stay Oriented in 3D Space

Larry Jordan – LarryJordan.com

The key to 3D space is to stay oriented. Top view, and tracking the grid, help.

These are the nine views when working with cameras. Top is my favorite.

Topic $TipTopic

When I first started learning Motion, I got hopelessly lost when exploring 3D space. (I still remember how frustrated I felt when 3D in Motion did not equate to the 3D in my normal life…)

The 3D world opens up when you assign a camera to a project (Object > New Camera). While explaining how 3D space and cameras work requires at least a chapter in a book, there is a cool orientation tip that helps me stay oriented.

Once you’ve applied a camera, the View menu in the top left corner of the Viewer provides nine different perspectives on how to view your scene.

  • Active camera shows what Motion will output; in other words the finished view.
  • Top, for me, is the best way to create a 3D effect because it emulates an architectural floor plan – and I’ve been looking at set designs all my life.

So I use Top to determine position and movement, then tweak based upon what Active Camera shows the results to be.

EXTRA CREDIT

In the Standard keyboard command set:

  • Active Camera uses Control + A as it’s shortcut.
  • Top can be assigned a shortcut using Motion > Commands.

Please rate the helpfulness of this tip.

Click on a star to rate it!