… for Adobe Premiere Pro CC

Tip #911: The Skin Tone Line is Your Friend

Larry Jordan – LarryJordan.com

All of us are the same color, but not the same grayscale value.
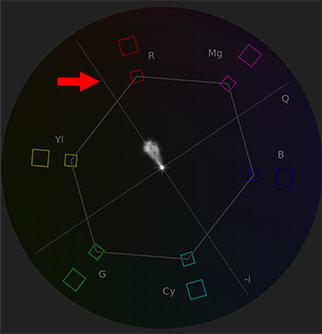
The skin tone line (red arrow) in the Lumetri scopes.

Topic $TipTopic

One of the most powerful color correction / grading tools that we have is the skin tone line. (Indicated by the red arrow in the screen shot.) Once you know how to use it, it is easy to quickly fix color problems and make your on-screen talent look great.

Human skin is translucent. That which gives skin it’s color is the red blood circulating underneath; and all of us have the same color red blood.

That which adds variation to our skin is its grayscale. You can verify this for yourself the next time a piece of dead skin falls off. If you look at it, it doesn’t have any color, just varying shades of gray. Some of us have lighter or darker gray skin than others.

So, if you have a shot with an incorrect color balance, crop to isolate a well-exposed piece of skin – avoid makeup or hair – then adjust color settings so the color values are parked ±2° on the skin tone line.

NOTE: Generally speaking, Asians tend to be 2° below the line, everyone else is either on it or 2° above it.

Of course, there are individual exceptions and lighting can make a big difference. But, if you are looking to salvage a problem shot, the skin tone line can help you get things back on track.

EXTRA CREDIT

Here’s a tutorial from my website that describes this in more detail.


Please rate the helpfulness of this tip.

Click on a star to rate it!

… for Adobe Premiere Pro CC

Tip #912: The Hidden Dynamic Search Bin

Larry Jordan – LarryJordan.com

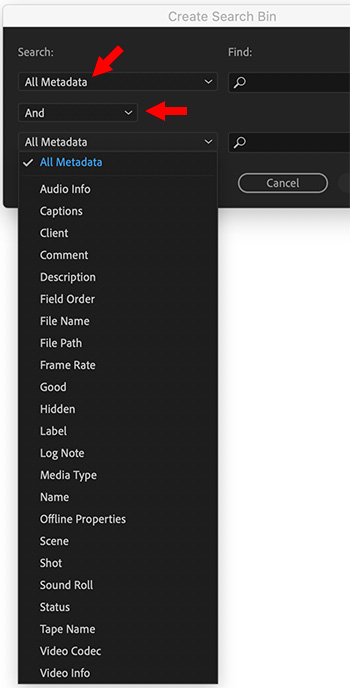
All searches are dynamic, with bins appearing in the Files panel.

The Create Search Bin window, displaying searchable metadata.

Topic $TipTopic

Hidden in plain sight in Premiere’s Files panel is the ability to create bins that search all clips in a project based on specific criteria and display the results – dynamically – in a bin in the Files panel.

It’s called a Search Bin.

Click the small folder icon immediately to the right of the text search box at the top of the Files panel. This displays the Create Search Bin dialog (screen shot).

You can search on a variety of metadata, as indicated by the popup menu.

Additionally, lower red arrow, you can refine your search using Boolean logic; specifically AND or OR; by selecting it from the middle popup menu.

The results of these search criteria are stored in a bin in the Files panel, named after your search.

Best of all, the results are dynamic. As different clips meet your search criteria, they will appear, or disappear, from this search bin.


Please rate the helpfulness of this tip.

Click on a star to rate it!

… for Apple Motion

Tip #894: What is the HUD?

Larry Jordan – LarryJordan.com

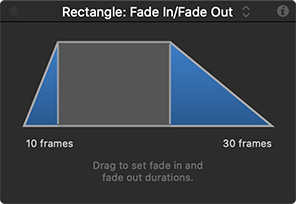
The HUD is a fast way to adjust common settings for selected elements.

The HUD displaying a customized Fade In/Fade Out behavior.

Topic $TipTopic

The HUD, originally called the “Heads-up Display,” is a floating, interactive control panel for whatever you have selected in the Layers panel.

The HUD icon is located in the upper right corner of the Motion interface. You can access it by clicking the icon, choosing Window > Show HUD or using a keyboard shortcut.

Back when Motion was first released, the HUD was assigned F8 as a keyboard shortcut. However, Apple is moving away from F-keys in all it’s apps. While Motion still supports some F-keys, the HUD was recently reassigned to Option+Cmd+L.

The HUD makes it easy to make quick, intuitive changes to selected layers and effects. For instance, in this screen shot, dragging the vertical line for each blue triangle allows altering the duration of a Fade In / Fade Out behavior from the default 20 frames to whatever makes sense for your project.

If you haven’t used the HUD, it is an excellent tool filled with the most common settings you need to tweak for whatever is selected.

If you were wondering why the HUD doesn’t appear when you press F8, now you know.

And, if you use the HUD on a regular basis, consider yourself one of the “smart folks in the know.”


Please rate the helpfulness of this tip.

Click on a star to rate it!

… for Apple Final Cut Pro X

Tip #890: Better Effect Previews

Larry Jordan – LarryJordan.com

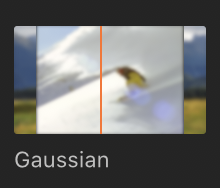
Option-dragging previews adjusting the principal parameter before applying an effect.

Hovering over a Gaussian Blur effect.

Topic $TipTopic

Final Cut Pro X allows you to preview effects two different ways before you apply them to a clip. One you probably know, the other you probably don’t.

To preview any effect in the Effects Browser:

  • Select a clip in the timeline.
  • Hover the cursor over an effect in the Effects Browser.
  • The timeline clip will appear in the Viewer as though the effect was applied.
  • Next, press the Option key while hovering. This previews the effect AND changes the principal parameter for the effect as you drag; from not applied on the left to fully applied on the right.

NOTE: Try this using Blur > Gaussian to quickly see how this works.

This is a great way to see what an effect will look like, even after tweaking, before applying it.

EXTRA CREDIT

To apply an effect, either:

  • Drag the effect on top of a timeline clip
  • Select one or more clips in the timeline and double-click an effect in the Effects Browser

To remove all effects from a clip, select the clip and choose Edit > Remove Effects.


Please rate the helpfulness of this tip.

Click on a star to rate it!

… for Apple Motion

Tip #878: Get More Space for Layers

Larry Jordan – LarryJordan.com

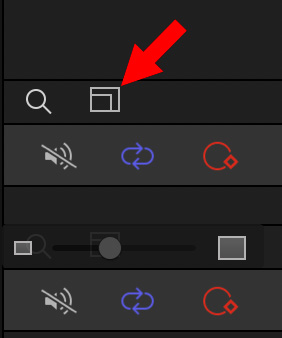
Adjusting Layer height is a simple way to help manage larger projects.

A composite showing the nested rectangle, then, below, the slider it reveals.

Topic $TipTopic

At the bottom of the Layers panel is a nested rectangle shape. Here’s what it does.

Click the nested rectangle (red arrow in screen shot) and a small slider appears.

As you drag the slider, the height of each layer in the Layers panel is scaled vertically.

Click elsewhere to hide this slider.


Please rate the helpfulness of this tip.

Click on a star to rate it!

… for Adobe Premiere Pro CC

Tip #874: A Faster Way to Add “Presence”

Larry Jordan – LarryJordan.com

Most sound effects are subtle. This setting helps sound reinforce the image.

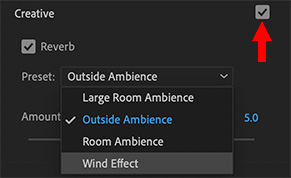
The Creative > Reverb settings for Ambience and Sound Effects.

Topic $TipTopic

I was playing with the Essential Sound panel, looking for an idea to write about, when I discovered this: Reverb. This alters the reflections, or reverb, of a clip to more accurately sound like it is playing in a specific space.

NOTE: This effect only applies to clips that are tagged as Sound Effects or Ambience.

  • Switch to the Audio workspace and display the Essential Sound panel.
  • Tag a timeline clip as either Sound Effects (a short duration sound) or Ambience (a longer duration sound).
  • Click the word “Creative” to display this section of the panel.
  • Check the checkbox next to Creative to enable it.
  • Click the Preset menu to choose the style of reverb/reflectance that best matches the sound to the picture.
  • Vary the Amount slider until the effect sounds the best.

This is a fun effect to play with.


Please rate the helpfulness of this tip.

Click on a star to rate it!

… for Apple Motion

Tip #858: A Faster Way to Configure a New Project

Larry Jordan – LarryJordan.com

“Import as Project” can be a big time-saver when you need to add effects to a clip.

The “Import as Project” button on the Project Browser screen.

Topic $TipTopic

Hidden in plain sight, “Import as Project” imports a movie file, then configures a project around it. This can be a big time-saver when you need to add effects to a clip. Here’s how it works.

  • Start Motion.
  • Then, from the Project Browser (which is what that opening screen is called), click Import as Project in the lower left corner. (See screen shot.)
  • This opens a standard file picker window, for you to select a file to work on.
  • Motion then imports that file, creates a new project to match the specs of the video file and adds the clip to the Layers panel.

This is a very fast technique when you need to add effects to a clip, such as green screen, motion tracking, or modify its visual look.


Please rate the helpfulness of this tip.

Click on a star to rate it!

… for Adobe Premiere Pro CC

Tip #853: Hidden Access to Photoshop Layers

Larry Jordan – LarryJordan.com

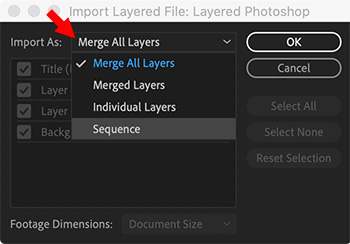
Merge All Layers is easiest, Sequence, though, tends to be more flexible.

The Import Layered File window in Premiere.

Topic $TipTopic

When importing Photoshop images into Premiere, you are given four choices. Here’s a description of what each of these mean.

At the top of the Import Layered File window (which is most often used for importing Photoshop documents) is a menu with four choices:

  • Merge All Layers. This converts the separate layers in the document into a single, flattened PSD image. This is a good choice when you need to be sure that the entire image is displayed.
  • Merge Layers. Like Merge All Layers, this creates a single, flattened PSD image, but you chose which layers will be combined. This is a good choice when multiple versions are stored in the same image.
  • NOTE: Most Photoshop images contain dozens of layers. The buttons on the right simplify checking, unchecking or resetting the status of all the layers in the image.

  • Individual Layers. This imports each layer as a separate image into a bin containing one clip for each source layer. This is a good choice when there is no relationship between the layers and you need to manipulate each layer separately.
  • NOTE: When you import one layer as a single clip, its name in the Project panel consists of the layer name followed by the original filename.

  • Sequence. This imports the image as a sequence where each Photoshop layer is a separate layer in the sequence and stored in its own bin. This is a good choice when you want to adjust timing or animation of each layer separately, while still keeping them together in a single place.
  • NOTE: You enable or disable the display of a layer by checking the appropriate box in this window.

EXTRA CREDIT

Once an image is flattened, it can’t be “un-flattened.” Your only alternative to regain control over individual layers is to reimport it.

Here’s a tutorial with more details.


Please rate the helpfulness of this tip.

Click on a star to rate it!

… for Adobe Premiere Pro CC

Tip #856: Create a New Sequence Preset – FAST!

Larry Jordan – LarryJordan.com

Sequence presets are used to conform clips to match a standard.

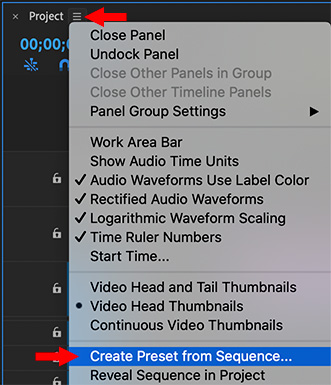
Click the “stacked pancakes” icon to reveal a hidden timeline menu.

Topic $TipTopic

The problem with creating sequence presets is that you need to know a LOT of technical specs to accurately create one. Wouldn’t it be great if there was an easier way? There is! Here’s how.

  • Create a sequence by dragging a clip with the specs you need – codec, frame size, frame rate and so on – onto the “folded paper” icon in the low-right corner of the Project panel. Most of us do this all the time.
  • Go to Sequence > Sequence Settings and verify those are the specs you need. (This step isn’t required, but it’s a good idea to double-check.)
  • Then, click the “stacked pancakes” icon next to the Project name in the timeline (see screen shot) and select Create Preset from Sequence.
  • The Sequence Preset dialog window opens, allowing you to name this new setting and add a description.
  • Click OK to save it.

Done.

EXTRA CREDIT

The benefit to creating a sequence preset is that when you add clips to the sequence that don’t match the setting, they will automatically be “conformed” or transcoded to math the sequence settings.

This solves the problem of not having a clip with the right specs to initially configure a sequence.


Please rate the helpfulness of this tip.

Click on a star to rate it!

… for Apple Final Cut Pro X

Tip #850: A Quick Way to View Photoshop Layers

Larry Jordan – LarryJordan.com

Double-click a Photoshop image

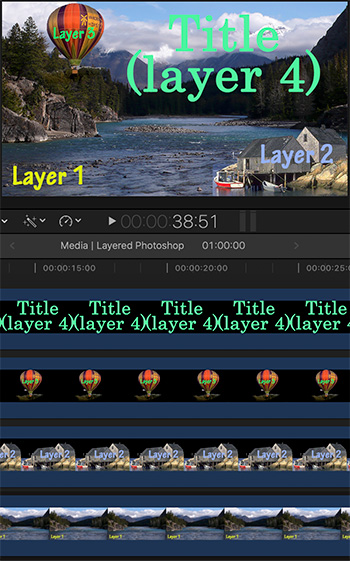
A Photoshop image (top), with it’s layers displayed in the timeline (bottom).

Topic $TipTopic

One of the benefits to using Photoshop images in your projects is that FCP X allows you to access each layer in the Photoshop document separately. But how?

Double-click it.

Whether the image is in the browser or the timeline, the Photoshop image will open in a special section of the timeline, where each layer is displayed.

At this point you can:

  • Hide a layer by selecting it and typing V
  • Animate a layer, for example, to have it slide into the frame
  • Change the timing of when a layer appears by trimming an edge
  • Add transitions to a layer; for example to have a layer fade in at a specific time
  • Delete a layer by selecting it and pressing Delete
  • Scale a layer
  • Reposition a layer

The possibilities are endless.

EXTRA CREDIT

If you adjust the clip in the browser, it will affect every iteration of that clip that is edited into the timeline.

If you adjust a clip in the timeline, it will affect only that iteration of the clip.

To “close” a Photoshop image opened into the timeline, open a different project into the timeline.


Please rate the helpfulness of this tip.

Click on a star to rate it!