… for Adobe Premiere Pro CC

Tip #803: Optimize the Audio Meters

Larry Jordan – LarryJordan.com

Modifying the audio meter display helps us better control audio levels.

Control-click inside the audio meters to display this configuration menu.

Topic $TipTopic

The configuration settings for the audio meters in Premiere aren’t “bad,” but they can be optimized to better monitor audio for the video editing most of us do.

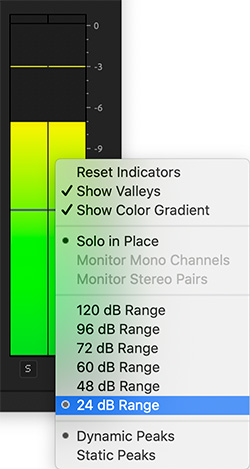
Control-click inside the audio meters to display the configuration menu shown in this screen shot. These settings illustrate how I customize the audio meters for my work.

  • Dynamic Peaks. This is the yellow bar at the top, showing the loudest level of your audio for the last second.
  • Show Color Gradient. This displays a smooth color shift from green to red as levels increase.
  • 24 dB Range. We don’t really care about how soft our audio is. We care about how loud it is. This displays just the top 24 dB of a mix. Since we want peaks to bounce between -3 and -6 dB for video posted to social media, this provides the clearest indication of audio level.
  • Show Valleys. These are the blue bars in the middle of the color gradient, showing how soft our audio has been during the last second.

Try these settings and see if they don’t give you a better idea of your audio levels.


Please rate the helpfulness of this tip.

Click on a star to rate it!

… for Apple Final Cut Pro X

Tip #789: The Floating Source Timecode Window

Larry Jordan – LarryJordan.com

The Source Timecode window displays timecode for all project clips under the playhead.

The floating Source Timecode window.

Topic $TipTopic

Most of the time, we don’t need to pay attention to the specific timecode of the clips in a project. However, for those times when we do, Final Cut makes it easy.

  • Choose Window > Source Timecode to display a floating window containing the timecode of every clip under the playhead in the timeline.
  • Drag any edge to change the size of the display.

Control-click a clip to:

  • Copy just the timecode of the control-clicked clip to the clipboard
  • Copy the file name and the timecode of the control-clicked clip to the clipboard
  • Copy the file name and the timecode of all clips displayed in the window to the clipboard

NOTE: If a clip is selected, as “Barn in wheat fields” is here, it is highlighted with a gold box.

EXTRA CREDIT

Tip #788 discussed the floating Project timecode window.


Please rate the helpfulness of this tip.

Click on a star to rate it!

… for Apple Motion

Tip #794: The Texture Adjuster

Larry Jordan – LarryJordan.com

3D text provides a wealth of lighting, texture and format controls.

3D text, using the Drama Top Right light setup and customized texture.

Topic $TipTopic

Hidden at the bottom of the Material section for 3D text – below where you select surfaces – are additional controls that allow changing the texture of each surface.

These controls vary depending upon which surface is selected. For instance, with Plaster, you can adjust:

  • Color type
  • Paint color
  • Sheen (reflectivity)
  • Surface texture
  • Texture depth
  • Opacity
  • Placement

One of the benefits to working with 3D text is the vast amount of control we have over the texture and lighting of the text.

If you haven’t explored these options yet, when you do you’ll discover a whole lot more texture control than you ever expected.


Please rate the helpfulness of this tip.

Click on a star to rate it!

… for Adobe Premiere Pro CC

Tip #769: Two Keyboard Shortcut Secrets

Larry Jordan – LarryJordan.com

Shortcuts in Premiere are far more flexible than you might at first think.

Two shortcuts are applied to the top “Fit,” while both “Fits” share the same shortcut.

Topic $TipTopic

As I was researching last week’s webinar on Adobe Premiere, I re-discovered some hidden secrets about keyboard shortcuts.

Tip #1

You can apply multiple keyboard shortcuts to the same menu. For example, in the screen shot, I applied two shortcuts to the top menu (right red arrow).

  • To add a shortcut, double-click in the shortcut column to open a shortcut field.
  • To add a second shortcut, double-click just to the right of any existing shortcut.

NOTE: I added a second shortcut in the screen shot just to illustrate where to click and what it looks like.

An example of where two shortcuts are helpful is that I applied both “V” and “A” to the Selection tool. Why? Because I frequently shift between Premiere and Final Cut and trying to figure out which shortcut to use to access the most basic of tools was driving me nuts.

Tip #2

You can apply the same shortcut to two different menu items. (See screen shot.)

For example, there is no default “Fit to Window” shortcut for either the Source Monitor or Program panel. So, I searched for “fit” in the Keyboard Shortcuts panel, then applied a new shortcut (Shift + Z) to both.

Now, whether I’m in the Source Monitor or Program panel, typing Shift + Z fits the image into the window.

Cool.

EXTRA CREDIT

I don’t know the actual upper limit, but you can add at least five different shortcuts to the same menu, if you want to get that carried away.


Please rate the helpfulness of this tip.

Click on a star to rate it!

… for Adobe Premiere Pro CC

Tip #787: Change Label Color Defaults

Larry Jordan – LarryJordan.com

Labels can help organize complex projects.

The Label Defaults section of Preferences > Labels.

Topic $TipTopic

As I was researching last week’s webinar on Adobe Premiere, I re-discovered some interesting facts about labels.

Labels can be used to:

  • Color clips in the timeline
  • Add color patches to media and sequences in the Project panel

I often use colors to flag dialog, B-roll, or stock footage clips. While totally optional, colors can help you organize a complex project. You can assign any color to anything, though there are default settings (see Tip #3).

To apply a color to an element in the Timeline or Project panel, select the object(s), then choose Edit > Label.

NOTE: You can also control-click a clip and choose Label, but the Edit menu allows you to select multiple elements and change them all at the same time.

TIP #1

  • In Preferences > Labels, there are 16 different colors you can select from.
  • To change a color, double-click the color chip.

TIP #2

  • To change the name of a color, double-click the name and type the new text.

TIP #3

  • To change the default color of a type of clip – for example, a sequence – select the color name from the Label Defaults section of the Labels preference panel.

Please rate the helpfulness of this tip.

Click on a star to rate it!

… for Apple Final Cut Pro X

Tip #786: Get Rid of Multiple Markers – Fast!

Larry Jordan – LarryJordan.com

The Timeline Index makes it easy to delete multiple markers.

The Timeline Index, with five markers highlighted.

Topic $TipTopic

I use markers in all my projects, for chapters for navigation or to help me remember something. However, all those markers need to be cleaned up before I export the final project.

While we can’t copy or paste multiple markers in Final Cut Pro X, we can select multiple markers and delete them. Here’s how.

  • Open the project containing the markers you want to delete into the timeline.
  • Open the Timeline Index (Shortcut: Shift + Cmd + 2).
  • Click the Tags text button.
  • Select the markers you want to delete.
  • Press the big Delete key.

Gone.

EXTRA CREDIT

It may help to click either the Marker or Chapter Marker buttons at the bottom of the Timeline Index to make it easier to isolate markers from other timeline elements.


Please rate the helpfulness of this tip.

Click on a star to rate it!

… for Random Weirdness

Tip #767: Import Media From an iPhone – FAST!

Larry Jordan – LarryJordan.com

Importing media from an iPhone is fast and easy with Preview.

The File menu for Preview on a Mac.

Topic $TipTopic

Importing media from an iPhone into a Mac is fast and easy … if you know the secret.

OK, I’ll tell you.

  • Connect your iPhone to a Mac using a Lightning > USB cable.
  • Unlock your phone.
  • Open Preview (the app) on the Mac.
  • Go to File > Import from iPhone.

Preview then displays a directory of all the images and video on your phone. Simply drag the files you want from this window to your desktop – or wherever you want them stored.

This method, unlike Air Drop, allows you to easily select multiple files to transfer and copies them at a much faster rate. When you are done, simply unplug the cable. Nothing to eject or shut down.

Very, very easy – if you know the secret.


Please rate the helpfulness of this tip.

Click on a star to rate it!

… for Random Weirdness

Tip #773: Add Atmosphere to Your Shots

Larry Jordan – LarryJordan.com

Light needs something to bounce off – atmosphere provides it.

(Image courtesy of Pexels.com)

Topic $TipTopic

This article, written by Tanner Shinnick, first appeared in PremiumBeat.com. This is an excerpt.

If you do a quick search on cinematography blogs, you’ll find that one of the most common questions is How do I create the texture of blinds on a wall? There are two parts to the equation: a hard light source and atmosphere.

The DF-50 Hazer is the industry standard. You’ll find it at every rental house, and it’s a breeze to use. Typically, it creates an oil-based haze. This formula helps the haze hang in the air for longer, so you’re not constantly re-hazing the scene. While it’s not the cheapest rental, it’s consistent, and you’ll find it on most professional sets.

A Halloween (or party fog machine) is a cheap and efficient option. In fact, you can purchase a fog machine for roughly the same price as the hazer rental. You can find them at most party stores, especially around Halloween. However, there are some drawbacks. The fog they create is water-based, so it doesn’t hang in the air quite as long as the fog from an oil-based hazer.

If you’re on a budget (or working as a one-man band), Atmosphere Aerosol is a great alternative. The compact cans fit right into your camera bag, which is great to keep around for whenever you need fog in a pinch.


Please rate the helpfulness of this tip.

Click on a star to rate it!

… for Apple Motion

Tip #775: Examine and Alter Media Clip Properties

Larry Jordan – LarryJordan.com

Inspector > Media changes the character of the media itself.

The Inspector > Media pane for a selected clip in Apple Motion.

Topic $TipTopic

Have you ever selected a clip in Motion, then looked at the source media controls in the Inspector? Yeah, me neither. But there’s some cool stuff there. Take a look.

To show this pane:

  • Click Media in the Project pane.
  • Select the clip you want to review.
  • Open Inspector > Media (see screen shot).

This pane allows you to change:

  • Alpha (transparency)
  • Color space
  • Pixel aspect ratio
  • Field order (interlacing)
  • Frame rate
  • And more…

EXTRA CREDIT

Here’s an Apple Support page with more details.


Please rate the helpfulness of this tip.

Click on a star to rate it!

… for Apple Motion

Tip #776: Copy & Paste Into a Region in Motion

Larry Jordan – LarryJordan.com

We can select a region in the timeline, then copy and paste into it.

A region (lighter color) selected in the timeline.

Topic $TipTopic

In Motion, we can make changes to a range of frames, known as a region. For example, you can cut or copy a section of time to remove it from your project completely, or just move it to a new position in Timeline. Regions need not align with object edges in the Timeline—you can create a region that begins midway through an object.

You can also paste objects into a defined region using the Paste Special command, which lets you insert, overwrite, or exchange objects in the Timeline. Additionally, you select a region and insert blank frames, creating an empty placeholder for a clip you don’t yet have.

Here’s how to paste into a selected region:

  1. In Motion, select an object.
  2. Press Cmd + C to copy or Command-X to cut your selection.
  3. Press and hold the Command and Option keys, drag in the timeline ruler to select a region.
  4. Choose Edit > Paste Special.
  5. The Paste Special dialog appears.
  6. Select “Insert into time region” or “Overwrite into time region,” then click OK.

The Clipboard contents are pasted into the region using the method you specified.

NOTE: This requires selecting a region in the Timeline, not the mini-timeline.

EXTRA CREDIT

Here’s an Apple Support page with more options about working with regions.


Please rate the helpfulness of this tip.

Click on a star to rate it!