… for Adobe Premiere Pro CC

Tip #737: 5 Interesting Audio Preferences

Larry Jordan – LarryJordan.com

Not all of these are enabled. Check your preferences to be sure.
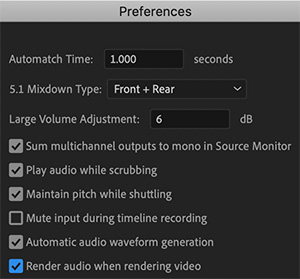
A detail of Preferences > Audio in Adobe Premiere Pro 2020.

Topic $TipTopic

The last time you looked at all the audio preference settings, you probably just wondered what these did and moved on. Well, let me explain five of the most interesting.

  1. Large Volume Adjustment. This preference lets you set the number of decibels to increase when using the Increase Clip Volume Many command.
  2. Play Audio While Scrubbing. Enables audio scrubbing. You can create a keyboard shortcut called “Toggle Audio During Scrubbing” to toggle audio scrubbing on or off while scrubbing. Using a keyboard shortcut is preferable to returning to the Preferences dialog box each time you want to turn audio scrubbing on or off.
  3. Maintain Pitch While Shuttling. Lets you maintain the audio pitch during scrubbing and playback while using the J,K,L keys. Selecting this preference helps improve the clarity of speech when playback is at a higher or slower than normal speed.
  4. Mute Input During Timeline Recording. To prevent monitoring of the audio inputs while recording the timeline, check this box.
  5. Render Audio When Rendering Video. To let Premiere Pro automatically renders audio previews whenever it renders video previews, select this preference.

Please rate the helpfulness of this tip.

Click on a star to rate it!

… for Apple Final Cut Pro X

Tip #715: How to Reset FCP X to Fix Problems

Larry Jordan – LarryJordan.com

Deleting FCP X Preferences does a lot to fix problems.

The Delete Preferences window in Apple Final Cut Pro X.

Topic $TipTopic

Most of the time, Final Cut Pro X is a solid, reliable program. Until it isn’t. Fortunately, there’s one keyboard shortcut that fixes most problems by resetting Final Cut perferences to their factory default settings. Here’s how:

  • Quit the application.
  • Then, press and hold Shift + Cmd while restarting the application from the Dock.

When this window (screen shot) appears, click the blue Delete Preferences button.

WHAT THIS DOES

  • All preferences reset back to default settings.
  • The list of recently opened libraries is emptied. (HOWEVER, your libraries are NOT erased. You’ll find them stored at the location you specified when you first created them.

Final Cut preferences do a lot, much more than simply determine what the interface looks like. They are deeply embedded into the operation of the program, even if we can’t directly modify most of them.

SUMMARY

In the old days, with FCP 7, we needed to do this every couple of weeks. Now, you may only need to do this a few times a year. Still, when FCP X is acting up, restart your computer. If that doesn’t fix it, this keyboard shortcut probably will.


Please rate the helpfulness of this tip.

Click on a star to rate it!

… for Apple Final Cut Pro X

Tip #713: Color Picker Secrets

Larry Jordan – LarryJordan.com

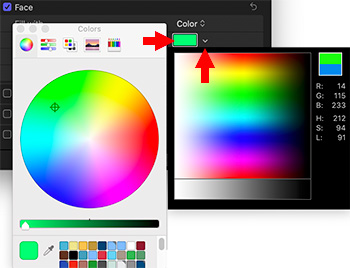
The color picker you get depends upon where you click.

The two color pickers. Which one you get depends upon where you click.

Topic $TipTopic

There are two different color pickers in Apple Motion and Final Cut. Which one you get depends upon where you click.

THE macOS COLOR PICKER

Click the color chip to view the traditional color picker. Tips:

  • Press the Shift key to lock the color, but adjust saturation.
  • The color wells at the bottom hold an unlimited number of colors
  • To see more wells, drag the horizontal line just above them up or down.
  • To also see more wells, increase the size of the color picker.
  • Click one of the icons at the top to see more ways to choose colors

THE MOTION COLOR PICKER

Click the downward-pointing arrow to the right of the color chip to reveal the color picker first introduced in Motion. Tips:

  • This picker is designed for realtime color picking, simply drag your mouse over the color area, then click the color you like.
  • This option does not support color wells or the different ways to select colors available in the traditional color picker.

Please rate the helpfulness of this tip.

Click on a star to rate it!

… for Apple Motion

Tip #683: How Motion Processes Behaviors and Keyframes

Larry Jordan – LarryJordan.com

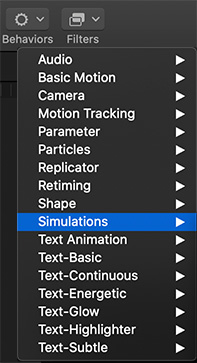
Keyframes are processed first, then simulations, then behaviors.

The Behavior menu in Apple Motion.

Topic $TipTopic

This tip originally appeared as an Apple KnowledgeBase article. This is an excerpt.

There’s no limit to the number of behaviors you can add to an object. Multiple behaviors applied to a single object work together to create a final animated effect. But, what happens when you have multiple behaviors, keyframes and simulations applied? Here’s how Motion handles this.

When combining different behavior types (such as Parameter and Simulation behaviors) or combining behaviors and keyframes, it’s important to understand the behaviors’ order of operations. Motion evaluates behaviors and keyframes in the following order:

  1. Keyframes
  2. Simulation behaviors
  3. All other behaviors

Parameter behaviors are applied in the order in which they are added, from the bottom of the Layers list up (like the order of filters and the compositing order of image layers).

IMPORTANT: The order of operations is always in effect—regardless of the order in which behaviors are applied or keyframes are added to a layer or group.

  • When you animate an object with keyframes and then apply a behavior, the effect of the keyframes is evaluated first.
  • When you animate an object with any behavior and then add keyframes, the effect of the keyframes is evaluated first.
  • When you animate an object with a behavior and then apply a Simulation behavior, the Simulation behavior is evaluated before the first behavior (and therefore may have no effect).

NOTE: Although the Spin behavior appears in the Basic Motion category, Spin is treated as a Simulation behavior in the order of operations.

EXTRA CREDIT

The article, linked above, has more details and examples.


Please rate the helpfulness of this tip.

Click on a star to rate it!

… for Apple Motion

Tip #705: 3 Functions of the Hand Tool

Larry Jordan – LarryJordan.com

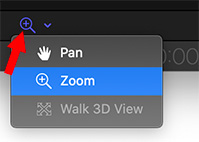
The fastest way to reposition the display is to press and drag with Pan or Zoom.

The Hand menu in Motion, has three different options: Pan, Zoom and Walk 3D View.

Topic $TipTopic

The Hand menu in Motion, has three different options: Pan, Zoom and Walk 3D View. Most of the time, we use the hand (Pan) tool. But, there’s a lot more you can do. Watch.

  • Pan. (Shortcut: H). This option moves the image in the Viewer horizontally or vertically. This only affects the display in the Viewer, no changes are made to the project.
  • Zoom. (Shortcut: Z). This option zooms in when clicking in the Viewer. Press Option and click to zoom out. Press, hold and drag the cursor to zoom in or out. This only affects the display in the Viewer, no changes are made to the project.
  • Walk 3D View. The Walk 3D View tool lets you position a camera in 3D space as you would in a computer game, using a keyboard-and-mouse navigation method.

MORE ON THE WALK 3D VIEW OPTION

  • The pointer changes to indicate that the Walk 3D View tool is active.
  • Use the Up Arrow, Down Arrow, Right Arrow, and Left Arrow keys to move the camera in 3D space; press and hold the Option key while using the arrow keys to move the camera more slowly.
  • You can also drag in the canvas to orient the camera.
  • If you’re using a scene camera, you can also record the movement you create using the Walk 3D View tool, by creating keyframes.

NOTE: The Walk 3D View tool is available only when Active Camera, Camera, or Perspective is selected from the Camera pop-up menu.


Please rate the helpfulness of this tip.

Click on a star to rate it!

… for Apple Final Cut Pro X

Tip #695: Display the Event Viewer

Larry Jordan – LarryJordan.com

The Event Viewer gives FCP X the ability preview browser images.

The Event Viewer (left) provides previews of browser images.

Topic $TipTopic

Hidden inside Final Cut Pro X is the Event Viewer, which allows us to compare images in the browser with images in the timeline.

To enable it, go to Window > Show in Workspace > Event Viewer.

Whatever clip you select in the browser, will be previewed in the Event Viewer.

  • To play a clip, click the image, then press spacebar
  • Set Ins or Outs in the browser.
  • All keyboard shortcuts that work in the browser also work in the Event Viewer
  • To change the size of both monitors, drag the vertical edge between them
  • If two-monitor viewing is enabled, the Event Viewer will appear on the same monitor as the viewer.

EXTRA CREDIT

Go to View > Show in Event Viewer to see the different display options the Event Viewer provides.


Please rate the helpfulness of this tip.

Click on a star to rate it!

… for Apple Final Cut Pro X

Tip #641: The Secret is Blend Modes

Larry Jordan – LarryJordan.com

The secret is blend modes and a compound clip.

Text, filed with a video, placed over a second video, with a drop shadow applied.

Topic $TipTopic

Here’s a straight-forward technique to put video inside a text clip, then key the results over a second video clip. And, for extra credit, I’ll show you how to add a drop shadow.

This is a three-layer effect using blend modes and a compound clip.

SETUP

  • On the Primary Storyline, put the background. The blue clip, in my screen shot.
  • On the layer above that, put the video you want to place inside the text. The glowing orange in my example.
  • On the layer above that, on the top layer, put the text.
  • Select the Primary Storyline clip and type V to make it invisible.

FILL THE TEXT

  • Select the text clip.
  • Go to the Video Inspector and set the blend mode for the text clip to Stencil Alpha.

The text is now filled with the image on Layer 2

PUT IT OVER THE BACKGROUND

  • Select the background clip and type V to make it visible again.
  • Select the text clip and the video on layer 2.
  • Go to New > Compound Clip.
  • Accept the default name and click OK.

The filled text now appears over the background on the Primary Storyline.

Done!

EXTRA CREDIT

  • Select the compound clip.
  • Go to Effects > Stylize and apply a drop shadow to the compound clip.
  • Adjust until it looks good to you.

Please rate the helpfulness of this tip.

Click on a star to rate it!

… for Apple Final Cut Pro X

Tip #662: Sustaining a Musical Chord

Brian Thomas

The Retiming bar showing an audio clip slowed 75%.

Topic $TipTopic

Brian Thomas writes:

At the end of a recent video I wanted the music to fade out slowly but the piece I had chosen came to a fairly abrupt end. I tried cutting out various short lengths of that final chord and repeating it a number of times with ever decreasing volume while applying various audio effects but there was always some sort of reverberating echo effect in there – not cool.

Suddenly I had a brain wave: Use the Retime facility on the last chord and stretch it out to the desired length!

Usually we think of retiming (speeding up or slowing down of footage) as applying to the image part of the video but it can be very useful to manipulate independent soundtracks since whatever you do FCP X will do its best to retain the original pitch.

In my case I cut the soundtrack a few frames after the last chord had started, clicked on the remaining part of the chord, pressed Cmd + R to invoke Retiming and then clicked on the small vertical line at the right of the green area of the clip dragging it out to the new desired length of time.

NOTE: Clicking on the downward arrow in the middle of the clip, followed by “Slow” offers some convenient values of 50% or 25% straight off.

Dragging the chord out to 20% still gave me great results.

EXTRA CREDIT

  • Bonus 1: If you notice a slight absence of the upper frequencies then you may need to apply the audio EQ effect and boost appropriately.
  • Bonus 2: Apply this technique to make a whole piece of music exactly fit your footage – it will still sound right as the pitch doesn’t get altered. Neat, huh!

Please rate the helpfulness of this tip.

Click on a star to rate it!

… for Apple Motion

Tip #653: Adjust Keyframe Landing Speed

Larry Jordan – LarryJordan.com

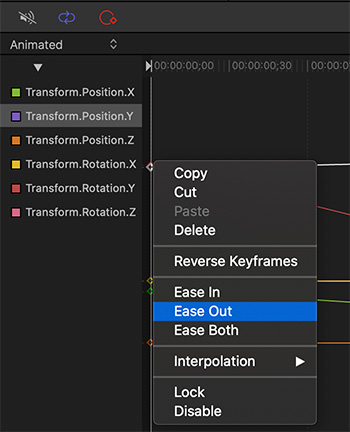
Ease In/Out Behavior can be changed in the Keyframe Editor

Control click any keyframe in the Keyframe timeline to display timing options.

Topic $TipTopic

Normally, keyframes move at a linear rate. However, this can be altered. Here’s what you need to know.

To adjust the speed with which animation approaches or leaves a keyframe:

  • Display the Keyframe Editor (Window > Keyframe Editor)
  • Control-click any keyframe and choose:
  • Ease In to slow animation as it approaches a keyframe.
  • Ease Out to accelerate from a keyframe
  • Ease Both to slow as animation approaches a keyframe and accelerate animation as it leaves it.

For additional control, experiment with the options in the Interpolation menu.

NOTE: Keyframes must be applied before they can be modified.


Please rate the helpfulness of this tip.

Click on a star to rate it!

… for Adobe Premiere Pro CC

Tip #651: Make Adjusting Color Curves More Precise

Larry Jordan – LarryJordan.com

Curves make selecting and correcting specific ranges of color easy.

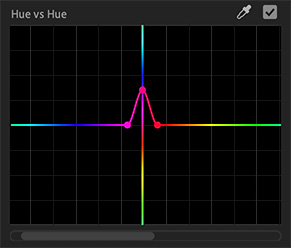
The Hue vs. Hue curve in Premiere’s Lumetri color panel.

Topic $TipTopic

Here are three tips to help make color adjustments more precise using Curves in the Lumetri color panel.

When adjusting color using Curves in the Lumetri color panel, press the Shift key to lock the control point so it only moves up and down.

Use the eyedropper to select more than one color in the same image. Each color will have it’s own control points. To restrict the range, use three control points.

While moving a control point, a vertical band appears to help you judge your final result. It is useful in the Hue versus Hue curve, where it can be tricky to judge the resulting hue. For example: you want to fine-tune some skin tone values which look a bit red. You can use the Hue versus Hue curve to select a range of red colors; with the center control point selected the vertical indicator helpfully shows you that pulling down shifts the red toward orange, which is much better for skin-tone.

NOTE: To make adjustment easier to see, drag the slider at the bottom to center your adjustments.

EXTRA CREDIT

Here’s an Adobe Help page to learn more.


Please rate the helpfulness of this tip.

Click on a star to rate it!