… for Adobe Premiere Pro CC

Tip #652: The Five Lumetri Color Curves

Larry Jordan – LarryJordan.com

The Color curves allow you to adjust colors in a wide variety of ways.

The Hue vs. Luma curve, with its range indicator visible.

Topic $TipTopic

Premiere Pro offers five color curves in the Lumetri color panel that you can use to make different types of curve-based color adjustments to your clip.

  • Hue versus Saturation. Select a hue range and adjust its saturation level
  • Hue versus Hue. Select a hue range and change it to another hue
  • Hue versus Luma. Select a hue range and adjust the luma
  • Luma versus Saturation. Select a luma range and adjust its saturation
  • Saturation versus Saturation. Select a saturation range and increase or decrease its saturation

SAMPLE A COLOR

With one of the color curves tabs open, click the Eyedropper tool to sample a color in the Program Monitor. Three control points are automatically placed on the curve. The center point corresponds to the color you selected. For the three Hue curves, this Hue value is for the selected pixel. For the Luma and Sat curves, the point is placed corresponding to the Luma or Saturation value of the pixel selected.

By default, the Eyedropper samples a 5 x 5 pixel area and averages the selected color. Press the Command (Mac) or Control (Win) keys while using the Eyedropper to sample a larger 10 x 10 pixel area.

REMOVE CONTROL POINTS

  • To remove a single control point, select the control point and press Command + Click (Mac) or Control + Click (Windows).
  • To remove all control points and reset the curve, double-click any control point.

EXTRA CREDIT

Here’s an Adobe Help page to learn more.


Please rate the helpfulness of this tip.

Click on a star to rate it!

… for Apple Final Cut Pro X

Tip #640: Faster Freezes in Final Cut

Larry Jordan – LarryJordan.com

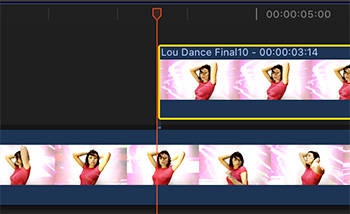
This creates freezes from both the Browser and Timeline.

A match frame freeze added at the position of the timeline.

Topic $TipTopic

You can always create a hold frame (Shift + H) in a clip. But, a hold frame is locked into the clip that created it. A freeze frame is a stand-alone piece of media that can be moved anywhere. Here’s a fast way to add freeze frames to the timeline in Final Cut Pro X.

  • Position the playhead on the frame you want to freeze in the timeline.
  • Type Shift + F. This creates a match frame for the same clip in the Browser.
  • Type Option + F. This adds a freeze frame of the frame under the playhead in the Browser on a layer above the Primary Storyline in the timeline.

NOTE: The duration of the freeze is based on the Still Image duration in Preferences > Editing.

EXTRA CREDIT

  • To add a freeze frame from any clip in the Browser, position the playhead on the Browser frame you want to freeze, then type Option + F.
  • To freeze a frame in the Timeline and add it to the Primary Storyline, position the timeline playhead on the frame you want to freeze and type Option + F.

Please rate the helpfulness of this tip.

Click on a star to rate it!

… for Apple Motion

Tip #620: Clone vs. Copy in Apple Motion

Larry Jordan – LarryJordan.com

Clones simplify syncing style changes.

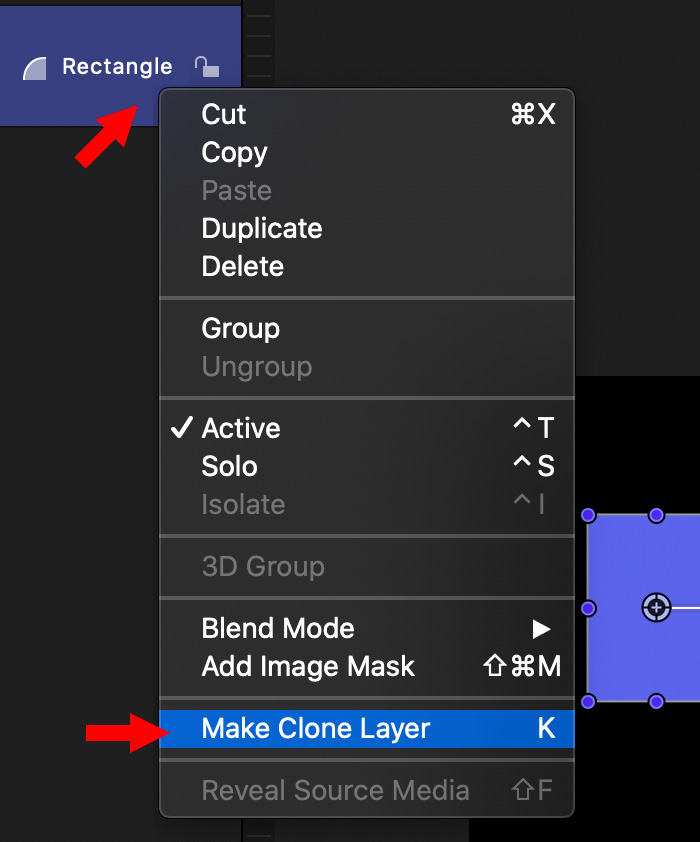
Control-click any layer and choose Make Clone Layer.

Topic $TipTopic

I just discovered clones in Motion recently. Clones are an easy way to make multiple elements all look the same and change their look in sync with each other.

Create an element and make of copy of it. These become independent elements. When you change the color of one, it doesn’t affect the other.

Clones, though, are different. Clones are EXACT style and geometry replicas of the original. While you can apply different effects and transform settings to each, all the options in Inspector > Shape disappear for a clone.

When you change any of the Style or Geometry settings of the master, they are instantly reflected in the clone. And you can’t change the color or geometry of a clone – the options themselves don’t exist.

The more you play with this, the more ways you’ll find to use it.

EXTRA CREDIT

To create a clone, control-click an element in the Layer panel and choose Make Clone Layer (shortcut:K).


Please rate the helpfulness of this tip.

Click on a star to rate it!

… for Adobe Premiere Pro CC

Tip #609: What Does Uniform Scale Do?

Larry Jordan – LarryJordan.com

Disabling Uniform Scale allows stretching images assymetrically.

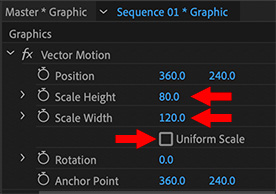
When Uniform Scale is turned off, height and width can be scaled independently.

Topic $TipTopic

By default, when you scale (resize) an image, Premiere maintains the aspect ratio. This means the image gets larger or smaller, but retains its overall shape. But, what if that’s not what you want?

When Uniform Scale is checked, whenever you adjust the size of an image, both height and width scale in proportion. This retains the overall shape (aspect ratio) of an image.

When Uniform Scale is unchecked, horizontal and vertical size can be scaled independently. This allows for some very interesting – and weird – visual effects. Especially when you keyframe the size changes over time.


Please rate the helpfulness of this tip.

Click on a star to rate it!

… for Adobe Premiere Pro CC

Tip #621: Color Management Secret in Premiere

Larry Jordan – LarryJordan.com

Color management not easy – but this menu choice helps.

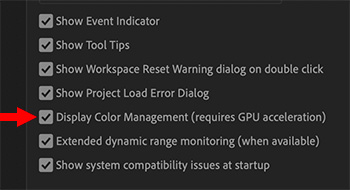
Display Color Management is off by default. Turn it on.

Topic $TipTopic

A common complaint about Premiere is that colors often look darker in Premiere than in other software. This is caused by color management differences between software.

First, if you have a modern system, go to Preference > General and turn ON Display Color Management. (It is off by default.)

Second, read this very helpful blog by Carolyn Sears, at Adobe.


Please rate the helpfulness of this tip.

Click on a star to rate it!

… for Codecs & Media

Tip #635: HTTP Live Streaming

Larry Jordan – LarryJordan.com

HTTP Live Streaming compensates for shifts in bandwidth for mobile devices.

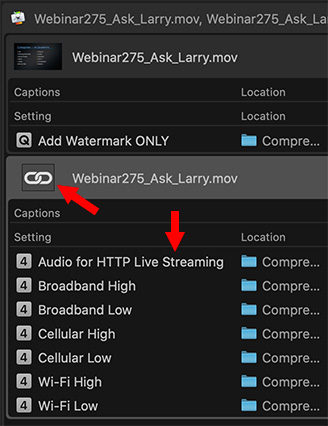
HTTP Live Streaming compression settings applied to a job-chained clip.

Topic $TipTopic

The problem with mobile devices is that the bandwidth that connects them to the web changes as they move from one cell tower to another. This becomes important when watching movies that are longer than 10 minutes.

Apple Compressor has a feature – called HTTP Live Streaming – that compensates for this difference in bandwidth. This process compresses a master file into ten-second segments, using seven different frame sizes and bandwidths. In the case of my one-hour webinars, it generates about 2,000 separate segments.

This allows the server to seamlessly switch between different quality levels as bandwidth changes. If you are connected via a high-speed Internet WiFi connection, all these different segments are ignored. They only apply to mobile devices connected via cell towers.

My website has supported this playback style for seven years now. The problem is that implementing this takes a bit of programming from your webmaster.

EXTRA CREDIT

Here’s an article that explains this process in more detail. Remember, this only applies to movies longer than ten minutes which are NOT streaming on a social media service.

The reason you don’t need to worry about this if your files are streamed on Facebook or Vimeo, et al, is that these services create the HLS versions automatically on their servers.


Please rate the helpfulness of this tip.

Click on a star to rate it!

… for Codecs & Media

Tip #637: Compressor: Job Chaining

Larry Jordan – LarryJordan.com

Job chaining creates an intermediate master file, which saves time creating derivatives.

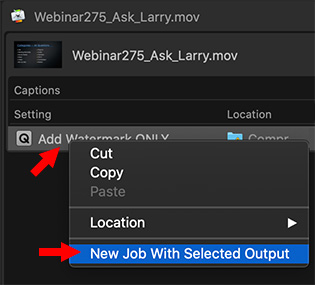
The Job Chain menu in Apple Compressor.

Topic $TipTopic

There is a hidden feature in Apple Compressor that can save time when creating multiple versions of the same master file. It’s called “Job Chaining” and here is how it works.

Every week, when I post my webinars, I add a watermark of my website URL into all the compressed versions. However, I never export the master file with a watermark, so that I always have a clean copy for archiving.

One of the versions I create is an HTTP Live Streaming (HLS) version of it for mobile devices. (See Tip #635). The problem is that HLS compression creates thousands of short ten-second movies from the master file. There’s no easy way to add watermarks to them.

So, I do this in two steps:

  • First, create an intermediate master file – using ProRes 4444 – with a watermark.
  • Then take the output of that process and “job chain” it as the source file for HLS compression. (see screen shot)

Specifically:

  • Import your master file into Compressor
  • Apply the setting to create the interim master – in my screen shot, this is called “Add Watermark Only.” All it does is burn a watermark into the intermediate master. Because I am working with ProRes 4444 there is no loss in audio or video quality.
  • Control-click the compression setting and choose New Job with Selected Output.
  • This creates a new line in Compressor to which I apply the HTTP Live Streaming settings.

This allows me to create one master file with the watermark, rather than re-create it over and over again.

I use this technique every week.


Please rate the helpfulness of this tip.

Click on a star to rate it!

… for Apple Final Cut Pro X

Tip #622: Two Ways to Import Captions

Larry Jordan – LarryJordan.com

Importing XML brings in the entire project. Importing captions just brings in captions.

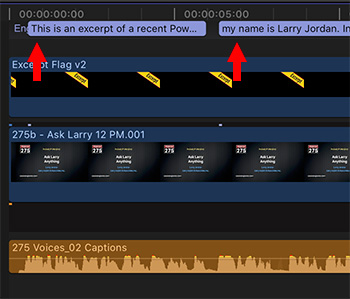
SRT captions imported into a Final Cut project timeline.

Topic $TipTopic

Recently, I was writing a tutorial on how to create, add and modify closed captions for Final Cut Pro X and I discovered this cool trick.

Final Cut supports SCC (CEA-608), SRT and iTT captions; each with different forms of formatting control. (See Tip # 623.)

  • When importing iTT captions, which are most often stored in a XML file, use File > Import > XML.
  • When importing SRT or SCC captions, use File > Import Captions.

When importing XML files, the entire project will be imported, including captions, media and timeline. When importing SRT captions, this will just import the captions themselves and place them on the timeline.


Please rate the helpfulness of this tip.

Click on a star to rate it!

… for Apple Motion

Tip #606: Motion: Password Protect Still Frame Exports

Larry Jordan – LarryJordan.com

Secure PDFs are far smaller than media stills and excellent for emailing.

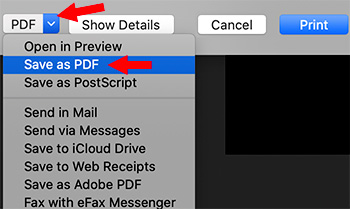
Select Save as PDF from the Print menu to create a secure PDF of a still frame.

Topic $TipTopic

It’s easy to export a still frame of a project using File > Share > Save Current Frame. But… what if you need to password protect that still frame so that only the people who need to see it can see it?

Simple. Watch.

What we are going to do is print a PDF of the current frame.

  • Choose File > Page Setup to set the page size.
  • Choose File > Print to print the current frame under the playhead.
  • In the Print window, choose Save as PDF from the PDF menu.
  • In the PDF window, click Security Options.
  • In the Security Options window, enable the level of security you need, then assign a password.
  • Click OK to accept all settings.
  • Give the file a name and storage location and click Save.

Done.


Please rate the helpfulness of this tip.

Click on a star to rate it!

… for Adobe Premiere Pro CC

Tip #611: Tracking Adjusts Letter-spacing

Larry Jordan – LarryJordan.com

In general, widen body text, narrow title text.

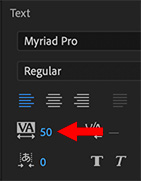
Increased tracking widens the spacing between letters, decreased tracking narrows it.

Topic $TipTopic

Tracking adjusts the spacing between letters. This is a helpful technique for titles in video because opening letter spacing often makes text more readable. Here’s how.

The tracking control is located under the font name in the Essential Graphics panel, or as part of the Text effect in Effect Controls.

Opening tracking (adding a positive number) expands the width between characters. Often, for video, widening the tracking makes smaller point size text easier to read.  While I don’t tighten tracking for body text, I do tighten tracking for title text.

How much you adjust tracking is up to you – there’s no magic number. However, in general, you don’t need to adjust tracking by much.

EXTRA CREDIT

In some cases, though, tracking doesn’t give us enough control. That’s where kerning comes in. Tip #610 discusses kerning in Premiere, which is a more precise way to adjust the horizontal spacing between specific pairs of letters; most often for title text.


Please rate the helpfulness of this tip.

Click on a star to rate it!