… for Random Weirdness

Tip #476: Better Content Aware Fills in Photoshop

Larry Jordan – LarryJordan.com

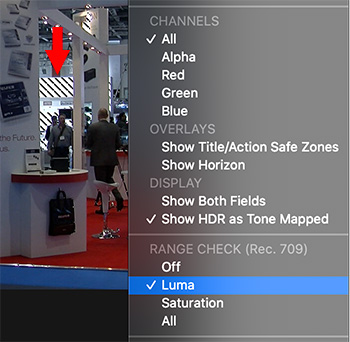
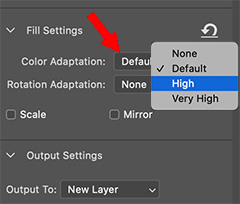
Color Adaptation modifies how replacement background colors and textures are handled.

The Color Adaptation menu, part of Content-Aware Fill, in Photoshop.

Topic $TipTopic

This trick was first reported in a YouTube video by PiXimperfect. This is an excerpt.

One of the new, and exceedingly powerful, image cleanup features in Photoshop is Content-Aware Fill. This removes a selected object and replaces it with the background behind it, as if the object never existed.

Most of the time, the default settings are fine. But, sometimes, the background colors are not quite perfect, or colors bleed in from the surrounding area. Either way, the replacement image isn’t ideal.

That’s where Color Adaptation comes into play. You’ll find it part of the menus that control Content-Aware Fill.

For solid-color backgrounds, you may get better results switching this to High. For edge bleed, you’ll get better results setting this to None.


Please rate the helpfulness of this tip.

Click on a star to rate it!

… for Apple Motion

Tip #497: A Hidden Map in Motion

Larry Jordan – LarryJordan.com

These three maps can provide a variety of elements for effects.

Hidden deeply in Motion are three world maps you can use for effects.

Topic $TipTopic

Hidden deep inside Motion are three world maps that can be used for effects. Here’s where they are and an idea on how to use them.

In Motion, go to Library > Content > Images > Extras. Inside, you’ll find three maps:

  • Earth Color
  • Earth Transparent Outlines
  • Earth Transparent

These three maps perfectly align and can be used for different effects, including a spinning globe.

For example, in the effect in the screen shot:

  • Stack Earth Transparent Outlines on top of Earth Color.
  • Set the Opacity of Earth Color to 15%
  • Change the Scaling in the group that contains these two images to:
    • X = 210%
    • Y = 140%
    • Z = 118%

At this point, you’ll have a nice outline on your map, the countries will all look reasonably correct and you can use this in a variety of ways.

Cool.

EXTRA CREDIT

See Tip #498 to learn how to turn these maps into a spinning globe.


Please rate the helpfulness of this tip.

Click on a star to rate it!

… for Apple Motion

Tip #498: Create a Spinning Globe

Larry Jordan – LarryJordan.com

Create a spinning glove from elements in the Motion Library.

Here are the settings I used to create a spinning globe from elements in the Motion Library.

Topic $TipTopic

Tip #497 showed how to create a glowing map. This tip explains how to take those elements and turn them into a globe that spins. (Review Tip #497 for instructions on where these maps are located and how to create the initial effect.)

Starting with the map effect we created in Tip #497, select the group that contains the maps. Then:

  • Select the group containing the maps and change Inspector > Properties > Scale to 140% on all axes.
  • Apply Filters > Distort > Sphere. This converts the flat maps into a globe.
  • Set a starting keyframe for Sphere > Center X = 0.
  • Set an ending keyframe for Sphere > Center X = -370. This spins the globe, however, it slowly wanders off-screen.
  • Apply Behaviors > Basic Motion > Motion Track. Change Direction from Forward to Reverse.
  • Then, adjust the starting and ending point of the Motion Track so that it moves the globe in the opposite direction to Sphere. With a bit of tweaking, the movements of the two effects will cancel and cause the globe to spin motionlessly. (It took me about five minutes to get these to balance.)

At this point, you have a spinning globe you can scale and place anywhere in the frame.

COMMENT

There may be an easier way to do this, but I haven’t discovered it yet.


Please rate the helpfulness of this tip.

Click on a star to rate it!

… for Apple Final Cut Pro X

Tip #471: Create Visual Effect Keyframes Automatically

Larry Jordan – LarryJordan.com

The Range tool allows quickly setting keyframes for a variety of effects.

Using the Range tool to select a range for keyframing a visual effect.

Topic $TipTopic

You may know that we can set audio level keyframes quickly by selecting a range within a clip, then dragging the audio level line up or down. But did you also know you can use this same trick for visual effects? Here’s how.

  • Apply a video effect, such as a blur, to a clip.
  • Select the clip and choose Clip > Video Animation.
  • Double-click the disclosure triangle for the effect you want to adjust. (Top arrow)
  • Using the Range tool (shortcut: R), select the range where you want to automate the effect. (Bottom arrow)
  • Drag the setting line up or down. Keyframes are automatically created!

EXTRA CREDIT

To hide the Video Animation, choose Clip > Video Animation, again.


Please rate the helpfulness of this tip.

Click on a star to rate it!

… for Apple Final Cut Pro X

Tip #472: What Are Auditions in Final Cut Pro X?

Larry Jordan – LarryJordan.com

Auditions allow for quickly reviewing different clips to pick the one you like.

To create an audition, drag a Browser clip on top of a Timeline clip.

Topic $TipTopic

This tip first appeared in an Apple KnowledgeBase article. Here’s a link to learn more about Auditions.

In Final Cut Pro, you can organize related clips into sets, called auditions, from which you can choose one clip to use. You can create an audition composed of different clips to try out multiple takes, or you can create an audition composed of multiple versions of the same clip to preview different effects.

An audition’s filmstrip displays the currently selected clip, called the pick. All other clips in the audition are referred to as alternates. You can open an audition to see the selected clip and the alternates.

Auditions allow you to preserve alternate edits without affecting the other clips in the timeline. When you’re not reviewing the clips in an audition, the audition functions like an individual clip. You can trim an audition, apply transitions between auditions and other clips, and add keywords and markers.

After you’ve reviewed the clips in the audition and decided which one works best in your project, you can finalize the audition, which converts it into an individual clip in the timeline. The pick retains the audition’s position in the timeline and all keywords and markers applied to the audition.


Please rate the helpfulness of this tip.

Click on a star to rate it!

… for Apple Final Cut Pro X

Tip #490: What is Range Check?

Larry Jordan – LarryJordan.com

Range Check flags excessive white levels or chroma (color) saturation.

The View menu in the top right corner of the Final Cut Viewer, showing Range Check options.

Topic $TipTopic

Have you ever wondered what “Range Check” does in the View menu? It’s actually really useful – it flags excessive white and chroma (color) saturation levels. Here’s what you need to know.

If you are posting media to the web, virtually any gray-scale or chroma value will be fine. The web is very forgiving.

But, not so broadcast, cable or digital cinema. Here, because of technical constraints, white levels can not exceed 100% and chroma levels can’t exceed certain amounts of saturation.

What Range Check does is flag – using a moving series of red lines (see screen shot) – areas of the frame that exceed white level limits (Luma), excessive saturation (Chroma) or both (All).

To fix this problem, either adjust your color grading or apply Effects > Color > Broadcast Safe.


Please rate the helpfulness of this tip.

Click on a star to rate it!

… for Apple Motion

Tip #484: Put a Background Behind Filled Text

Larry Jordan – LarryJordan.com

The key is to change the blend mode of the group, not the text.

Switching the blend mode to “Normal” displays what’s behind a group.

Topic $TipTopic

In Tip #475, I illustrated how to fill text with an animated video. But, if you try to put a background behind that filled text, all you get is black. Here’s how to solve this dilemma.

Fill the Text

  • Add text into a group.
  • In the same group, put a background below the text that you want to fill the text.
  • Change the Blend Mode for the text to Stencil Alpha.

Add the Background

  • Create a new group and put it below the group containing the text.
  • Put the background you want to put behind the text effect into this second group.
  • Change the Blend Mode of the top group to Normal.

NOTE: In this last step, you are changing the Blend mode for the group, not the text inside the group.

EXTRA CREDIT

The screen shot shows the Inspector settings to create this effect. I then added the final effect so you could see it. The text is Kraash Black, the background inside the text is Two Color Ray, the blue background is Sudden Impression. All are found in the the Motion Library.


Please rate the helpfulness of this tip.

Click on a star to rate it!

… for Apple Motion

Tip #486: Add Drop Shadows to Text

Larry Jordan – LarryJordan.com

The secret to adding drop shadows is to add them to the group.

To add drop shadows, you apply them to the group, not the text, when blend modes are involved.

Topic $TipTopic

In Tip #475, I showed how to fill text with an animated background. In Tip #484, I showed how to put a background behind the filled text. Now, I want to show how to put a drop shadow on the text, because you can’t do it on the text itself.

Fill the Text

  • Add text into a group.
  • In the same group, put a background below the text that you want to fill the text.
  • Change the Blend Mode for the text to Stencil Alpha.

Add the Background

  • Create a new group and put it below the group containing the text.
  • Put the background you want to put behind the text effect into this second group.
  • Change the Blend Mode of the top group to Normal.

Add the Drop Shadows

  • Select the group that contains the text.
  • Go to Inspector > Properties, then enable and modify the drop shadow settings.

NOTE: If you try to apply a drop shadow to the text, it will disappear as soon as you change the blend mode.

EXTRA CREDIT

The screen shot shows the Inspector settings, plus the finished effect.


Please rate the helpfulness of this tip.

Click on a star to rate it!

… for Adobe Premiere Pro CC

Tip #407: Highlight Your Favorite Fonts in Premiere

All it takes is one little star.

The Premiere font menu with Favorites (the stars) enabled.

Topic $TipTopic

This article first appeared in MotionArray.com. This is an excerpt.

(This tip requires Premiere CC 2018 or later.)

There is a huge variety of fonts you can select from in Premiere Pro, but there are probably less than 10 that you consistently go back to. It can be super helpful to pinpoint your favorites, so instead of scrolling through a list of all the fonts you don’t want to use, you have all your favorites available at the click of a button.

Click on the little star to the left of the font name to add it to your favorites, and click on the star at the top of the font list to show only the fonts you have starred.

How easy is that?


Please rate the helpfulness of this tip.

Click on a star to rate it!

… for Adobe Premiere Pro CC

Tip #479: Copy and Paste Masks in Premiere

Larry Jordan – LarryJordan.com

Masks are easy to copy, provided you select the right thing.

To copy a mask, first select it in Effect Controls.

Topic $TipTopic

This article first appeared in MotionArray.com. This is an excerpt.

There are two ways to apply the same mask to more than one clip: an adjustment layer or copying and pasting a mask.

Adjustment layers are great for those times when you need to affect lots of clips. But, copy and paste is faster when you are only working with a few clips.

To copy a mask:

  • Select the clip with the mask you want to copy
  • Go to the Effects Control panel and select the mask.
  • Choose Edit > Copy
  • Select the clip in the timeline where you want to paste the mask.
  • Choose Edit > Paste.

Done.


Please rate the helpfulness of this tip.

Click on a star to rate it!