Rigging is the process of creating effect controls in Motion that can be used in Final Cut. Normally, you create a rig, then add a widget (effect control), then add one or more snapshots (settings for the widget).
A rig in Motion has no effect until it contains a widget with assigned snapshots (parameter states).
As an alternative to creating a widget using the buttons in the Rig Inspector, you can create a rig and a widget and then apply a parameter to the widget in a single step.
In Motion, do one of the following:
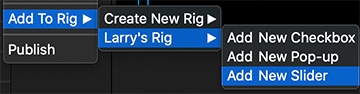
In the Inspector, click a parameter’s Animation menu (the down arrow that appears when you position the pointer over the right side of a parameter row), choose Add To Rig, choose a rig, then choose a widget type from the submenu.
Drag a parameter row from any Inspector pane to a rig object in the Layers list.
Dropping the parameter row immediately on the rig object creates a slider widget. Pausing briefly causes a drop menu to appear, allowing you to select the widget type you want to create.
A new widget appears in the Layers list, under its parent rig. In the Widget Inspector, the parameter you chose appears under the Edit Mode button, ready for snapshot assignment.
Please rate the helpfulness of this tip.
Click on a star to rate it!
https://www.theinsidetips.com/wp-content/uploads/2019/09/Tips-Logo-700x150.jpg00Larry Jordanhttps://www.theinsidetips.com/wp-content/uploads/2019/09/Tips-Logo-700x150.jpgLarry Jordan2020-01-09 01:30:002020-01-03 14:41:54Tip #325: Add a Widget and Parameter in One Step
Adjustment Layers are a fast way to change multiple clips all at once.
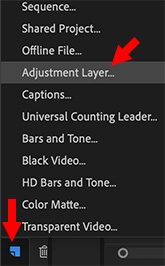
Create a new Adjustment Layer using the New Item menu in the Project panel.
An Adjustment Layer is a special kind of video clip that is placed above one or more clips in the Premiere timeline to which, when you apply an effect, those effects apply to every video clip under the adjustment layer.
If you’ve worked with adjustment layers in Photoshop, these work the same way, except they apply to layers of video, rather than layers in a still image.
To create an adjustment layer, click the New Item icon in the lower right corner of the Projects panel (blue in this screen shot) and select Adjustment Layer from the menu.
The next menu allows you to specify the size and timebase for the clip. For most situations, accept the defaults.
Then, watch what happens as you add different effects to this new clip. Remember, an adjustment layer ONLY affects clips that are stacked below it in the timeline.
NOTE: A good place to start using adjustment layers is to use one to create a consistent color look for all your clips.
Please rate the helpfulness of this tip.
Click on a star to rate it!
https://www.theinsidetips.com/wp-content/uploads/2019/09/Tips-Logo-700x150.jpg00Larry Jordanhttps://www.theinsidetips.com/wp-content/uploads/2019/09/Tips-Logo-700x150.jpgLarry Jordan2020-01-07 01:30:002020-01-03 14:14:30Tip #280: Adjustment Layers are Magic
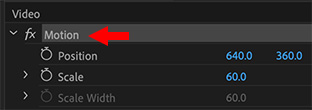
Click “Motion” to enable modifying elements in the Program Monitor.
This is a very cool tip that I didn’t discover until I’d been using Premiere for several years.
Premiere provides the ability to resize, move and scale elements on screen in the Program Monitor, but you need to turn this feature on. And THAT is not easy to find. Here’s how.
Select a clip in the Timeline.
Click the word Motion in the Effect Controls panel.
A blue box surrounds the selected elements in the Program Monitor.
Drag a white dot to resize. Dragging a corner preserves the aspect ratio.
Click near, but outside, a corner to rotate the element
Click and drag inside the box to move the element.
To exit this mode, deselect the clip.
EXTRA CREDIT
Press the Shift key to constrain movement to horizontal or vertical directions.
Press the Command key to display guidelines.
Press Shift and Command to quickly center an object vertically or horizontally.
Favorites are a fast way to build a “selects” reel.
Favorites are a fast way to flag clips that you really like, or really don’t want.
Apple made a big deal of Favorites when Final Cut Pro X was first launched. Now, you need to know where to look to find them. But, they are absolutely worth learning, because they can make finding the right clip a lot faster. Here’s how.
Favorites allow you tag clips, or ranges within a clip, as either a Favorite, Deleted or unflagged.
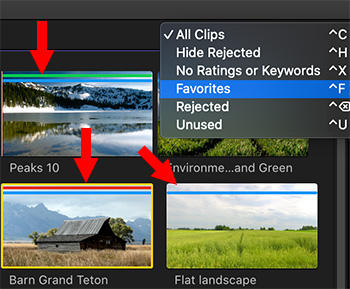
In the screen shot, here’s what the bars mean:
Green. The clip, or the range within a clip, is a Favorite (think of this as a select).
Red. The clip is flagged as deleted. Nothing is actually deleted, the clip is still in the Browser, but not displayed.
No bar. The clip is unflagged.
Dark blue. The clip has keywords assigned to it. (This isn’t a favorite, but I thought you’d like to know anyway.)
To apply a Favorite, select the clip(s), or range within a clip, in the Browser, and type:
F. This marks a Favorite
Delete. This marks a deleted clip. Be sure to use the big Delete key.
U. This removes any flags assigned with that clip; this resets both Favorite and deleted clips.
To see only clips that are Favorites or any other category, go to the Hide Rejected menu at the top of the Browser and select what you want to see.
Please rate the helpfulness of this tip.
Click on a star to rate it!
https://www.theinsidetips.com/wp-content/uploads/2019/09/Tips-Logo-700x150.jpg00Larry Jordanhttps://www.theinsidetips.com/wp-content/uploads/2019/09/Tips-Logo-700x150.jpgLarry Jordan2020-01-06 01:30:002020-01-03 14:04:41Tip #333: Favorites are Faster
Continuous playback allows you to quickly review clips in the Browser without constantly selecting them and pressing Play.
When this setting is chosen, multiple event clips play without interruption (rather than stopping at the end of each clip).
Click the clip icon in the top right corner of the Browser and check Continuous Playback.
Once that’s checked, put your playhead in any Browser clip and press play.
When the first clip finishes, playback immediately continues with the next clip.
EXTRA CREDIT
Remember, you can add markers to any Browser clip by pressing M. This allows you to flag key sections during initial screening.
Please rate the helpfulness of this tip.
Click on a star to rate it!
https://www.theinsidetips.com/wp-content/uploads/2019/09/Tips-Logo-700x150.jpg00Larry Jordanhttps://www.theinsidetips.com/wp-content/uploads/2019/09/Tips-Logo-700x150.jpgLarry Jordan2020-01-06 01:30:002020-01-06 01:30:00Tip #334: What is Continuous Playback?
A lighting kit is better, but a cell phone can salvage a shoot.
An iPhone can create great mood lighting.
These lighting tips first appeared in PremiumBeat. While you never want to rely on your cell phone as the primary light source, here are some ideas you can use in a pinch.
Moody lighting. Make the room as dark as possible. Search for an image of a solid color on the web, say, the color blue. Save it to Photos, then display that image full screen (as a saved photo) on your phone. Ta-DAH! Instant blue light.
Use your flashlight. Prop your phone on a desk or table. Turn on the flashlight. Works great as a backlight. Bounce it off a wall or white foam core as a fill light.
Quick softbox. Find an image on the web that’s all white. Save it to Photos, then display it as a full-screen image. instant softlight. It won’t light a big area, but it can give you a key in a pinch.
Gaffer tape the phone to the ceiling. Put some gel over it to give it a color.
Shine your light through a bottle of mouthwash or any other clear glass container containing colored liquid.
EXTRA CREDIT
Just to state the obvious, be sure to pick a phone that won’t break your heart if it falls, gets taped or gets wet.
Please rate the helpfulness of this tip.
Click on a star to rate it!
https://www.theinsidetips.com/wp-content/uploads/2019/09/Tips-Logo-700x150.jpg00Larry Jordanhttps://www.theinsidetips.com/wp-content/uploads/2019/09/Tips-Logo-700x150.jpgLarry Jordan2020-01-03 01:30:002019-12-28 08:43:37Tip #175: Lighting Tricks with Your Cell Phone
Keeps moving objects pointing in the direction of their movement.
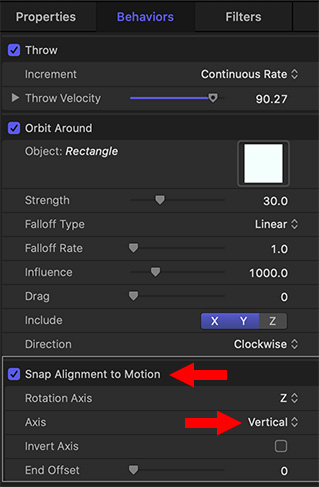
Three motion behaviors applied to a moving object: Throw, Orbit Around & Snap Alignment to Motion.
The purpose of the “Snap Alignment to Motion” behavior is to keep moving objects, like arrows, pointing in the direction of their movement, regardless of how their position changes.
Here’s how this works.
Create an object, then apply behaviors to get it moving.
NOTE: In my case, I created an arrow, then applied a Throw behavior to get it to move, then Orbit Around to get it to circle another object.
Once you have the motion applied the way you want, apply Behaviors > Basic Motion > Snap Alignment to Motion.
Now, when you play the timeline, the arrow – or your object – should now point in the direction it moves.
EXTRA CREDIT
If your object, like mine, is stubbornly pointing 90° away from its line of motion, change the Axis setting from Horizontal to Vertical. Now, the object will track properly.
Please rate the helpfulness of this tip.
Click on a star to rate it!
https://www.theinsidetips.com/wp-content/uploads/2019/09/Tips-Logo-700x150.jpg00Larry Jordanhttps://www.theinsidetips.com/wp-content/uploads/2019/09/Tips-Logo-700x150.jpgLarry Jordan2020-01-02 01:30:002019-12-28 08:34:28Tip #315: Use the Snap Alignment Behavior in Motion
Parameter Behaviors can be applied to any setting to create much more interesting movement.
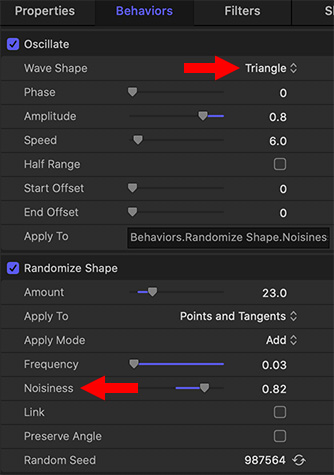
The Oscillate parameter behavior settings applied to Noisiness in the Randomize behavior.
In another tip (#330), we learned how to apply a Parameter Behavior to a filter. In this tip, we’ll learn how to apply a parameter behavior to another behavior; and, along the way, we’ll create our own version of a friendly ghost. Here’s how.
Create a new Motion project.
From Library > Shapes, drag a shape into the Viewer. (I used the Club Suit shape.)
Select the shape in the Layers panel.
Apply Behaviors > Shape > Randomize. This causes the shape to wiggle. To make it more amorphously ghost-like, match my settings in the lower half of the screen shot.
Next, hover your mouse over Noisiness and click the small downward-pointing arrow on the right.
From the menu, select Oscillate. This causes the values in Noisiness to change over time.
Again, match my settings in the top half of the screen shot. Notice the different results you get by changing the wave shape.
NOTE: To remove a setting, select it in the Layers panel and delete it.
EXTRA CREDIT
To make this shape more “ghosty,” I also:
Changed Properties > Opacity to 25%
Changed the color to light blue using Filters > Color > Colorize
Softened the edges using Filters > Blur > Gaussian Blur
Have fun playing.
Please rate the helpfulness of this tip.
Click on a star to rate it!
https://www.theinsidetips.com/wp-content/uploads/2019/09/Tips-Logo-700x150.jpg00Larry Jordanhttps://www.theinsidetips.com/wp-content/uploads/2019/09/Tips-Logo-700x150.jpgLarry Jordan2020-01-02 01:30:002020-01-02 01:30:00Tip #326: Animate a Shape Using Behaviors
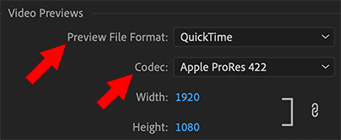
These Video Preview settings are critical to getting Smart Render to work.
I was exploring Adobe’s website for Premiere and discovered Smart Rendering. Smart rendering is, essentially, media optimization before and during editing. It allows you to create better quality output by avoiding recompression where possible. This isn’t a new feature, it first showed up in Premiere CS6. But, if you are outputting MXF files, you’ll need to turn it on.
Smart rendering cuts down on the processing of exporting even more by doing a bit more work up front. Any smart rendering workflow you can add prior to exporting will speed up your exporting process even more than improving hardware and working with optimized media.
Smart rendering works only if the source codec, size, frame rate, and bit rate match the export settings. Smart Rendering is supported for both MXF and QuickTime wrappers.
While you are editing:
Render any clips you have added an effect to whenever you get a free moment, ideally when you are taking a break.
Render the entire timeline before attempting to export.
Before exporting:
Change settings to export to the same codec you ingested and set previews to match it in the Export Settings dialog box.
Check the “Use Previews” checkbox in the Export Settings dialog box, as well. This ensures you are merely copying files rather than processing and encoding the files.
Adobe’s Kevin Monahan adds: “I should also point out that it is a much nicer editing experience when cutting with ProRes or the like, over Long GOP footage like H.264 or AVCHD. You drop fewer frames, and can view in a higher resolution with these intraframe codecs. You can even create proxies for them if you have an underpowered computer system and need better fluidity when editing.”
https://www.theinsidetips.com/wp-content/uploads/2019/09/Tips-Logo-700x150.jpg00Larry Jordanhttps://www.theinsidetips.com/wp-content/uploads/2019/09/Tips-Logo-700x150.jpgLarry Jordan2019-12-31 01:30:002019-12-31 01:30:00Tip #265: Smart Rendering in Premiere Pro CC
We may request cookies to be set on your device. We use cookies to let us know when you visit our websites, how you interact with us, to enrich your user experience, and to customize your relationship with our website.
Click on the different category headings to find out more. You can also change some of your preferences. Note that blocking some types of cookies may impact your experience on our websites and the services we are able to offer.
Essential Website Cookies
These cookies are strictly necessary to provide you with services available through our website and to use some of its features.
Because these cookies are strictly necessary to deliver the website, refuseing them will have impact how our site functions. You always can block or delete cookies by changing your browser settings and force blocking all cookies on this website. But this will always prompt you to accept/refuse cookies when revisiting our site.
We fully respect if you want to refuse cookies but to avoid asking you again and again kindly allow us to store a cookie for that. You are free to opt out any time or opt in for other cookies to get a better experience. If you refuse cookies we will remove all set cookies in our domain.
We provide you with a list of stored cookies on your computer in our domain so you can check what we stored. Due to security reasons we are not able to show or modify cookies from other domains. You can check these in your browser security settings.
Google Analytics Cookies
These cookies collect information that is used either in aggregate form to help us understand how our website is being used or how effective our marketing campaigns are, or to help us customize our website and application for you in order to enhance your experience.
If you do not want that we track your visit to our site you can disable tracking in your browser here:
Other external services
We also use different external services like Google Webfonts, Google Maps, and external Video providers. Since these providers may collect personal data like your IP address we allow you to block them here. Please be aware that this might heavily reduce the functionality and appearance of our site. Changes will take effect once you reload the page.
Google Webfont Settings:
Google Map Settings:
Google reCaptcha Settings:
Vimeo and Youtube video embeds:
Other cookies
The following cookies are also needed - You can choose if you want to allow them:
Privacy Policy
You can read about our cookies and privacy settings in detail on our Privacy Policy Page.