The Video Animation bar allows timeline control for a variety of settings.
Every timeline clip has a Video Animation bar attached to it.
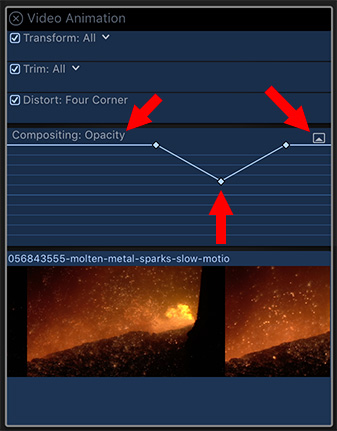
Hidden in the Final Cut timeline is the Video Animation bar. In it, you can set keyframes for automating changes in opacity, cropping, distortion and position. Here’s how to find it.
Let’s illustrate how to set opacity keyframes in a clip in the timeline.
Select the clip you want to modify and type Cntrl – V. This displays the Video Animation bar.
Click the arrow in a box at the right of the Opacity layer. This opens the opacity keyframe timeline.
Option – click on the white line to set a keyframe. (Control – click to remove a keyframe.)
Drag the keyframes down to make a clip translucent. (All the way up is 100% opaque.)
Preview your results. Drag a keyframe sideways to change it’s timing. Drag a keyframe up or down to set the amount of change.
Cool.
Please rate the helpfulness of this tip.
Click on a star to rate it!
https://www.theinsidetips.com/wp-content/uploads/2019/09/Tips-Logo-700x150.jpg00Larry Jordanhttps://www.theinsidetips.com/wp-content/uploads/2019/09/Tips-Logo-700x150.jpgLarry Jordan2019-12-11 01:30:002019-12-11 01:30:00Tip #264: Set Opacity Keyframes in the Timeline
Render faster by clip or by selecting a portion of the sequence.
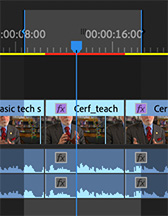
Set an In and Out, then choose Sequence > Render In to Out.
The only problem with rendering is that it takes time. Sometimes a LOT of time. Worse, Premiere wants to render the entire sequence, when that may not be what you need or have time for. Here are three options.
Render and Replace. this lets you flatten video clips and After Effects comps by rendering the clip, then replacing the clip with the render file. Choose Clip > Render and Replace.
NOTE: You can revert to the original clips using Clip > Restore Unrendered.
Render In to Out. This allows you to set a range in the sequence using In and Out shortcuts, then rendering only between them. Choose Sequence > Render In to Out.
Render Effects In to Out. This only renders the portions of those clip that have video effects applied to them between the In and the Out. This tends to be a much faster option. Choose Sequence > Render Effects In to Out.
EXTRA CREDIT
You can render and replace most of the clips including After Effects compositions except for the following:
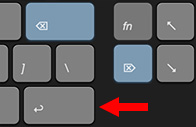
Two delete keys on a full-size keyboard. (Arrow points to Return.)
Whether you edit on a laptop or full-size keyboard, there are two Delete keys at your disposal. One is above the Return key, indicated by the red arrow in the screen shot, the other is… hidden.
The big Delete key, which deletes going backwards, is the normal delete key for most Final Cut operations. In addition to deleting text as you would expect, it also deletes clips.
The smaller Delete key, next to the End key, deletes going forward. You can quickly see the difference by deleting text from the middle of a paragraph. The big difference in Final Cut, though, is when you use this smaller key to delete a clip: It deletes the clip AND replaces it with a gap. Many students find this very distracting.
When deleting clips, the big Delete key always changes the duration of the timeline. The small Delete key does not.
EXTRA CREDIT
The forward delete key exists on laptops, too, but it’s hidden. Simply press the Fn key (in the lower left corner of the keyboard) while typing the big Delete key.
Cool.
Please rate the helpfulness of this tip.
Click on a star to rate it!
https://www.theinsidetips.com/wp-content/uploads/2019/09/Tips-Logo-700x150.jpg00Larry Jordanhttps://www.theinsidetips.com/wp-content/uploads/2019/09/Tips-Logo-700x150.jpgLarry Jordan2019-12-09 01:30:002019-12-05 12:43:00Tip #213: Secrets of the [Hidden] Delete Key
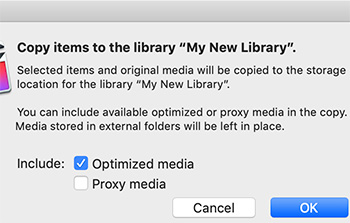
Checking these saves time, but requires more storage space.
You can easily drag clips or projects from one Event to another in the same library. Keep in mind that you can’t store the same clip in more than one Event.
But, what happens if we want to move media or projects between libraries? Well, we have options:
We can COPY them
We can MOVE them
When you copy an item from one library to another, the corresponding files are duplicated on the storage device that contains the receiving library. When you move an item from one library to another, the corresponding files are moved from the library file in the first storage location to the library file in the second location.
Copying or moving items between libraries lets you:
Use multiple libraries on the same storage device to organize a large number of active projects and media assets.
Work on your project and media files on a different Mac that has Final Cut Pro installed.
Back up your project and its media files to a storage device, a network volume, or other storage media.
Allow multiple users to access your media in an external folder on shared storage.
Free up space on your Mac or storage device.
HOW TO COPY
To copy one or more selected clips from one library to another, simply drag them. Or choose File > Copy Clips to Library.
In the resulting dialog, you can choose to copy optimized or proxy media. If you decide not to do this, you can always recreate it later.
HOW TO MOVE
To move one or more selected clips from one library to another, press the Cmd key while dragging. Or choose File > Move Clips to Library.
Again, moving provides the option of also moving optimized and/or proxy media.
EXTRA CREDIT
NOTE: If you have created or customized any Final Cut Pro effects, transitions, titles, or generators in Motion, set the storage location for your Motion content to In Library before starting any copy or move operations between libraries or storage devices. Otherwise, the Motion content is not included in those operations. Regardless, you must manually track and move any third-party (FxPlug) content, because it is not managed within the Final Cut Pro library.
Please rate the helpfulness of this tip.
Click on a star to rate it!
https://www.theinsidetips.com/wp-content/uploads/2019/09/Tips-Logo-700x150.jpg00Larry Jordanhttps://www.theinsidetips.com/wp-content/uploads/2019/09/Tips-Logo-700x150.jpgLarry Jordan2019-12-09 01:30:002019-12-09 01:30:00Tip #215: Tricks to Moving Stuff
There are several color correction commands that are inaccessible, if you don’t create custom keyboard shortcuts for them. For example, open Final Cut Pro > Commands > Customize and search for Color. Then, assign shortcuts to:
Apply Color Wheels
Apply Color Correction from Previous Edit
Apply Color Correction from Two Edits Prior
Apply Color Correction from Three Edits Prior
Color Board: Toggle Correction on/off
Suddenly, all your color corrections will go a LOT faster!
Please rate the helpfulness of this tip.
Click on a star to rate it!
https://www.theinsidetips.com/wp-content/uploads/2019/09/Tips-Logo-700x150.jpg00Larry Jordanhttps://www.theinsidetips.com/wp-content/uploads/2019/09/Tips-Logo-700x150.jpgLarry Jordan2019-12-09 01:30:002019-12-09 01:30:00Tip #236: Faster Color Correction
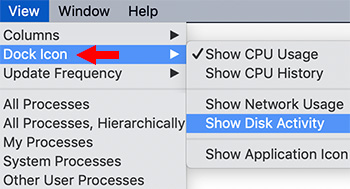
Activity Monitor must be running for the Dock icon to display data.
There’s a “hidden-in-plain-sight” option in Activity Monitor that allows you to monitor your system in real-time directly from the dock.
Open Activity Monitor (Applications > Utilities)
Choose View > Dock Icon
Pick what you want to see
Most of the time, I’m monitoring either Network or Disk activity.
NOTE: Keep in mind that Activity Monitor must be running to see these icons. However, you don’t need to have any of Activity Monitor’s windows open.
Please rate the helpfulness of this tip.
Click on a star to rate it!
https://www.theinsidetips.com/wp-content/uploads/2019/09/Tips-Logo-700x150.jpg00Larry Jordanhttps://www.theinsidetips.com/wp-content/uploads/2019/09/Tips-Logo-700x150.jpgLarry Jordan2019-12-06 01:30:002019-11-28 15:03:01Tip #155: Change the Dock Icon to Show Disk Activity
For best performance, uncheck these options – unless you need them.
A Growing file is a file that has not yet finished recording. A classic example is capturing the video from a sports contest. You need to start editing highlights before the game is complete. So, you capture the sports video as a growing file, which Premiere allows you to edit while the capture is on-going.
Not all video formats support growing files. QuickTime, for instance, does not. However, OP1a MXF does, which is why broadcasters depend upon this format.
The growing files preference setting (in the Media panel) allows you to import files that are not yet complete. Additionally, depending upon your preference settings, Premiere will automatically refresh the Project panel and Source Monitor as new material is recorded.
NOTE: The second preference setting allows you to determine how often you want these files refreshed.
If you don’t use growing files, turn this option off, as it will improve Premiere’s performance.
However, if editing sports is in your future, growing files will make your life easier.
Please rate the helpfulness of this tip.
Click on a star to rate it!
https://www.theinsidetips.com/wp-content/uploads/2019/09/Tips-Logo-700x150.jpg00Larry Jordanhttps://www.theinsidetips.com/wp-content/uploads/2019/09/Tips-Logo-700x150.jpgLarry Jordan2019-12-05 01:30:002019-12-05 01:30:00Tip #217: Growing Files Grow on You
The first rule of great keys is great lighting. But, there are other things you can do improve the quality of your keys. Here are four tips that can make your keys cleaner and easier.
Choose the right background color. We pick green because it isn’t in skin tone and most of us don’t wear green clothes. But, when there’s green in the foreground, use blue. (Also, green is more reflective, which means it tends to contaminate your shots more.)
Don’t overexpose the background. Both foreground and background need to be properly exposed.
Avoid wrinkles and folds in the background. If you use fabric, iron it. If you use paint, paint on a very smooth surface. Both the background lighting and surface need to be flat.
The less compressed the video codec, the better the key. Chroma-key looks for specific color values – and the first thing that gets compressed in any video format is the color information.
Ideally, when your lighting is flat and you follow these tips, you should be able to create a clean key with one click.
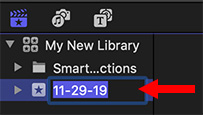
Rename Events by selecting them, then pressing Return.
An Event, in Final Cut, is similar to a folder that can hold dozens, hundreds, or even thousands of video clips, audio clips, and still images, as well as projects. Each event in the library refers to media on your storage device, and a database file keeps track of where everything is.
Events are automatically named with the date they are created. To rename an Event, select it then press the Return key to “open” the file name for renaming. (See screen shot.)
Events are actual folders stored on your hard disk, inside the library package. For this reason, you need to use Event names that the macOS will support. (In other words, avoid most punctuation and special symbols.)
To create a new Event, type: Option – N – or choose File > New > Event.
You can not store an Event inside another Event; though it would be REALLY nice if we could.
There is no limit to the number of Events you can create in a single library.
A file can only exist in one Event in the same Library. However, you can easily move any clip from one Event to another by dragging.
When creating a new Event, you also have the option to create a new Project file. This is the same as using File > New > Project, only faster.
Events are an easy way to organize your media, though keywords provide more precision and search options.
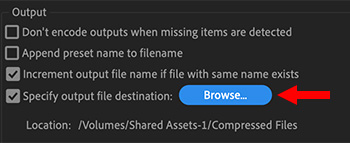
Set a default compression location using this preference checkbox.
By default, Adobe Media Encoder (AME) stores compressed media in the same folder as the source media. Which just confuses me. How am I supposed to remember where I stored all my source media?
To solve this problem of not knowing where AME hid my compressed files, I created a folder on my external storage called “Compressed Files.” Then, I make sure that ALL the files I compress go into that folder.
How? By setting it up as an automatic destination.
Create the folder you want to use as your destination using the Finder.
Start Adobe Media Encoder and go to Media Encoder > Preferences > General.
About 2/3s the way down, in the Output section, check Specify output file destination.
Click Browse and navigate to the Compressed Files folder you just created and click Choose.
Now, every time you import a file into AME, the compressed version will automatically appear in the Compressed Files folder.
Great! One less thing to worry about.
Please rate the helpfulness of this tip.
Click on a star to rate it!
https://www.theinsidetips.com/wp-content/uploads/2019/09/Tips-Logo-700x150.jpg00Larry Jordanhttps://www.theinsidetips.com/wp-content/uploads/2019/09/Tips-Logo-700x150.jpgLarry Jordan2019-12-03 01:30:002019-12-03 01:30:00Tip #126: Set a Default Location in Adobe Media Encoder
We may request cookies to be set on your device. We use cookies to let us know when you visit our websites, how you interact with us, to enrich your user experience, and to customize your relationship with our website.
Click on the different category headings to find out more. You can also change some of your preferences. Note that blocking some types of cookies may impact your experience on our websites and the services we are able to offer.
Essential Website Cookies
These cookies are strictly necessary to provide you with services available through our website and to use some of its features.
Because these cookies are strictly necessary to deliver the website, refuseing them will have impact how our site functions. You always can block or delete cookies by changing your browser settings and force blocking all cookies on this website. But this will always prompt you to accept/refuse cookies when revisiting our site.
We fully respect if you want to refuse cookies but to avoid asking you again and again kindly allow us to store a cookie for that. You are free to opt out any time or opt in for other cookies to get a better experience. If you refuse cookies we will remove all set cookies in our domain.
We provide you with a list of stored cookies on your computer in our domain so you can check what we stored. Due to security reasons we are not able to show or modify cookies from other domains. You can check these in your browser security settings.
Google Analytics Cookies
These cookies collect information that is used either in aggregate form to help us understand how our website is being used or how effective our marketing campaigns are, or to help us customize our website and application for you in order to enhance your experience.
If you do not want that we track your visit to our site you can disable tracking in your browser here:
Other external services
We also use different external services like Google Webfonts, Google Maps, and external Video providers. Since these providers may collect personal data like your IP address we allow you to block them here. Please be aware that this might heavily reduce the functionality and appearance of our site. Changes will take effect once you reload the page.
Google Webfont Settings:
Google Map Settings:
Google reCaptcha Settings:
Vimeo and Youtube video embeds:
Other cookies
The following cookies are also needed - You can choose if you want to allow them:
Privacy Policy
You can read about our cookies and privacy settings in detail on our Privacy Policy Page.