… for Adobe Premiere Pro CC

Tip #136: Hidden Voice-Over Settings

Larry Jordan – https://LarryJordan.com

Premiere can help you record voice-overs.

Tip Screen Shot

Topic $TipTopic

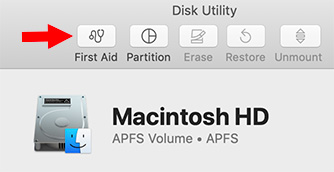
Control-click the microphone icon in a Track Header and choose Voice Over Settings.

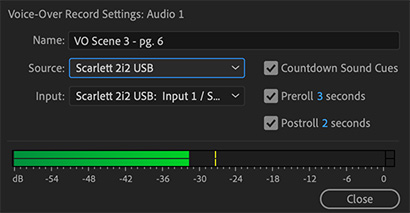
This opens a dialog that allows you to name the recording, as you’d name any other clip, set the audio source you want to use for recording, and select the input audio channel; as well as three other options:

  • Countdown Sound Cues. When checked, this will display a countdown and beep every second to alert you to when the recording will start. The default is three seconds prior.

While you can start a voice-over recording anywhere you place the playhead, the best method is to set an In and Out to precisely determine the duration of the recording. When you do, the following two options become relevant:

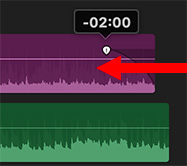
  • Preroll. This determines how far before the recording starts the playhead will be positioned. Most often, this preroll allows talent to get a sense of the pace and content just prior to their recording.
  • Postroll. This determines how many seconds after the Out playback will continue.

The recording itself only exists between the In and Out.

NOTE: For other audio options in the Track Header, see Tip #143.


Please rate the helpfulness of this tip.

Click on a star to rate it!

… for Adobe Premiere Pro CC

Tip #146: Secrets of Freeform View

Larry Jordan – https://LarryJordan.com

Freeform view lets you arrange clips however you want

Tip Screen Shot

Topic $TipTopic

The Project panel has three different ways to view clips: list, thumbnail and Freeform. Freeform is new and, as you’ll discover, there are multiple things you can do in Freeform view. For example:

Zoom in and out of clips

  • Hold down Opt/Alt while scrolling the mouse wheel
  • – or – Pinch zoom on a trackpad
  • – or – Use the + and keyboard shortcuts

Snap the edges of a clip to another

  • Press Alt (on Win) or Opt (on macOS) and drag the clip so that its edge snaps to the edge of another clip

Align all or selected clips to grid

  • Select clips, right-click and choose Align to Grid from the context menu.

Adjust the size of clips

  • Select clips, right click, select Clip Size and choose a size option. The default clip size is Medium.

Hoverscrub the clips

  • Move your mouse pointer to the left and right to scrub the clip. Press I and O keys to mark the In point and Out point.

Customize the displayed metadata in Freeform view

  • You can specify the type of metadata displayed on line 1 and 2 of the Freeform view thumbnail. The label color swatch and thumbnail badges can also be toggled on and off.
  • Click the Project panel hamburger menu, and select Freeform View Options.

BONUS

See Tip #139 for more information on the Project panel.


Please rate the helpfulness of this tip.

Click on a star to rate it!

… for Apple Final Cut Pro X

Tip #066: Pick Your Fastest GPU

Larry Jordan – https://LarryJordan.com

Improve render speeds with this new feature.

Tip Screen Shot

Topic $TipTopic

New in the 10.4.7 release of Final Cut Pro X is the ability to choose which GPU you want to use to render effects and export media. (If you only have one GPU, this option is grayed out.)

For example, if you’ve added an eGPU to your laptop or are using the new Mac Pro, you can select which GPUs FCP X can use.

To select these go to: Preferences > Playback and set Render/Share GPU to the fastest GPU on your system.

Apple’s release notes state:

  • Enhances graphics performance with support for multiple GPUs, including Radeon Pro Vega II and Radeon Pro Vega II Duo on Mac Pro.
  • Select which internal or external GPU is used to accelerate graphics processing.

NOTE: Larger numbers in the GPU name indicate faster performance.


Please rate the helpfulness of this tip.

Click on a star to rate it!

… for Apple Final Cut Pro X

Tip #161: Final Cut Now Includes Sound Effects

Larry Jordan – https://LarryJordan.com

Hundreds of sound effects to choose from.

Tip Screen Shot

Topic $TipTopic

If you are like me, you avoid using Photos or iTunes to store images or music.

Why? Because if you ever need to share or archive these files they are really hard to find. I find it much easier to store all project files outside these two applications.

However, what you may not know is that Apple changed the behavior of a Browser so that, while it still shows the contents of your Photos library, it also provides access to a wealth of royalty-free sound effects that you can use in your own projects.

To see what you’ve got, click the second icon in the top left corner of the Browser, select Sound Effects and listen away! You can freely use these files in any project without worrying about royalties or copyright.


Please rate the helpfulness of this tip.

Click on a star to rate it!

… for Adobe Premiere Pro CC

Tip #047: Pretty Panel Moves

Larry Jordan – https://LarryJordan.com

Panels are at the heart of the Premiere interface and… they are shifty!

Tip Screen Shot

Topic $TipTopic

The Premiere interface is very fluid. Any panel can be dragged anywhere – including outside the interface to become a floating window, or moved to a second monitor.

Here’s how:

Grab the title bar of the panel you want to move and drag it.

As you move it purple “wedges” appear at the edges of other panels. Here’s what they mean:

  • Right wedge (illustrated in this screen shot). The panel you are dragging will appear to the right of the panel with the wedge in it.
  • Top wedge. The panel will appear above the panel with the wedget.
  • Bottom wedge. The panel will appear below the panel with the wedge.
  • Left wedge. The panel will appear to the left of the panel with the wedge.
  • Center box. The panel will appear in the same panel bar as the one with the blue box.

This is a lot harder to explain than to do. Grab a panel, drag it and watch what happens.

EXTRA CREDIT

If you like your work, select Window > Workspaces > Save Changes to this Workspace.

If you don’t like it, select Window > Workspaces > Reset to Saved Layout.


Please rate the helpfulness of this tip.

Click on a star to rate it!

… for Apple Final Cut Pro X

Tip #119: Move Around in Final Cut – Hands-Free!

Larry Jordan – https://LarryJordan.com

There are better ways to get around than the Hand tool

Tip Screen Shot

Topic $TipTopic

The Hand tool (shortcut: H) allows you to move around the Timeline with just a click and drag.

However, if you have a trackpad or a mouse with a scroll wheel, you can move around simply by scrolling.

NOTE: If you have a scroll wheel that only moves vertically, press the SHIFT key to scroll from side to side.

You can also very quickly move horizontally by dragging the light gray handle at the very bottom of the timeline. (This handle only shows up if you are zoomed into the timeline.)

Finally, if you want to see your entire timeline at once, type Shift + Z.

For all these reasons, I can’t think of the last time I actually used the Hand tool.


Please rate the helpfulness of this tip.

Click on a star to rate it!

… for Adobe Premiere Pro CC

Tip #122: What is Auto Save Actually Saving?

Larry Jordan – https://LarryJordan.com

Auto Save can protect you from catastrophe.

Tip Screen Shot

Topic $TipTopic

By default, Auto Save saves a copy of your Project file every 15 minutes in the same location as your project.

NOTE: You can change the Auto Save location in Project Settings > Scratch Disks.

However, by default, Auto Save does NOT save your current project or media. Think of Auto Save as a backup file in case something really bad happens to your main project file. As well, if you don’t make any changes to your project for 15 minutes, it does not create a new Auto Save file.

Also, by default, it saves up to 20 versions. When it saves the 21st version, the oldest version is deleted. This means that it only keeps the 20 most recent versions of your project file to avoid filling your hard disk with backups.

You can have Premiere automatically save the project you are working on by checking the Auto Save also saves the current project(s) checkbox in Preferences > Auto Save.

I tend to leave this option off because I want to decide when to save my project – in case I’m experimenting and don’t want all those changes saved… yet.

But, automatically saving a project file can decrease your stress if you are someone who tends to forget to save frequenty.

Also, if you have a fast enough Internet connection, you can backup your project files, but NOT your media, to the Creative Cloud. My Internet connection is far to slow to make this viable.


Please rate the helpfulness of this tip.

Click on a star to rate it!

… for Adobe Premiere Pro CC

Tip #133: Open Sequences Between Projects

Larry Jordan – https://LarryJordan.com

Premiere supports opening unlimited sequences from any project!

Tip Screen Shot

Topic $TipTopic

Premiere allows you to open (more accurately, “import””) one or more sequences from different projects. This makes it easy to share work between projects. Here’s how:

  • Open, or create, the project into which you want to import a sequence.
  • Open the Media Browser.
  • Navigate to the project file that contains the sequence you want to open. Then, double-click it.
  • A message appears saying that Premiere is starting the Dynamic Link database. This technology allows different Adobe apps to share data between apps.
  • After a few more seconds, all the sequences, bins and clips in that project are displayed in the Media Browser.
  • Right-click the sequence you want and choose Import.

Virtually instantly, this project will appear in the Program panel.

NOTE: This simply imports a sequence, it doesn’t link them. Any changes you make are not reflected back to the original project.


Please rate the helpfulness of this tip.

Click on a star to rate it!

… for Apple Final Cut Pro X

Tip #103: Add an Audio Fade Without Using Keyframes

Larry Jordan – https://LarryJordan.com

This is a fast way to add fades.

Tip Screen Shot

Topic $TipTopic

In the Timeline, select an audio clip. Then, look very carefully at the edges.

Just above the volume control line you’ll see a small dot at each edge. This is the Audio Fade dot.

Drag the Dot to add a fade to the beginning or end of each clip.

To change the duration of the fade, simply slide the position of the dot left or right.


Please rate the helpfulness of this tip.

Click on a star to rate it!

… for Random Weirdness

Tip #098: What’s the Best Way to Repair the Boot Disk?

Larry Jordan – https://LarryJordan.com

Not all repairs work the same – this is better.

Tip Screen Shot

Topic $TipTopic

A common question, when it comes time to maintain your computer system, is whether it really makes a difference to switch to Recovery mode to repair a hard disk. There are two answers:

  • No, if it is an external disk
  • Yes, if it’s the boot disk

WHY?

While we can repair an external drive at any time, we really can’t repair the boot disk when it is running AS the boot disk. By definition, all the OS files need to be open and active and we can’t repair an open, running file. Disk Utility compensates for this, but it can’t do a complete repair.

By launching into Recovery mode, we are booting from a completely different part of the hard drive, using totally different files. This allows Disk Utility to fully repair everything on the main boot disk – Macintosh HD – without interference.

EXTRA CREDIT

To launch into Recovery Mode, restart your Mac while pressing Cmd + R. Startup will take longer, but, when complete, you’ll be able to run First Aid from Disk Utility. I try to do this once a month or so.


Please rate the helpfulness of this tip.

Click on a star to rate it!