… for Adobe Premiere Pro CC

Tip #064: Secrets of Premiere’s Dock Icon

Larry Jordan – https://LarryJordan.com

Lurking, hidden, in the Dock are helpful options for Premiere.

Tip Screen Shot

Topic $TipTopic

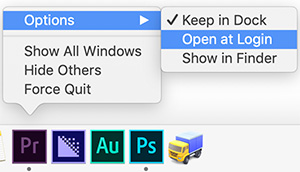
Hidden in the Dock icon for Premiere are several options that you may find useful. There are two ways to access them:

  • Control-click the Dock icon
  • Click and hold the Dock icon

Control-clicking is faster but you need to remember to press the Control key.

Either way, here you’ll find options to:

  • Open Premiere when you first log into your computer
  • Keep its icon in the Dock
  • Hide everything else EXCEPT for Premiere
  • Force quit the application if it starts misbehaving

Nice to know the Dock, too, has it’s secrets.


Please rate the helpfulness of this tip.

Click on a star to rate it!

… for Apple Final Cut Pro X

Tip #075: Display a Custom Search (Part 1)

Larry Jordan – https://LarryJordan.com

This insignificant little icon opens a wealth of ways to find exactly the clip you need.

Tip Screen Shot

Topic $TipTopic

The magnifying glass in the top right corner of the Browser highlights the Search box. This allows us to find clips based upon text in their file name, or, if you’ve entered anything, the Notes field. (This Search box does not search Event names.)

NOTE: I’ve found that trying to enter Notes in the Browser often doesn’t work. Instead, use the Info Inspector to enter Notes. This works more reliably and can be searched just like file names.

However, there is a much more powerful search option just to the right of the Search box. Its the icon indicated by the red arrow in this screen shot.

It’s called the Search Filter window and over the next three tips, I’ll explain how it works.


Please rate the helpfulness of this tip.

Click on a star to rate it!

… for Apple Final Cut Pro X

Tip #057: Move Between Projects Faster

Larry Jordan – https://LarryJordan.com

Timeline History: Hard to see – Fast results!

Tip Screen Shot

Topic $TipTopic

If you look carefully at the center-top of the timeline, to the left and right of the project name, you’ll see two tiny arrows; one pointing left and the other pointing right.

These are the Timeline History arrows.

They allow you to move back (left) to earlier projects that you opened in the timeline. Or, forward (right) to projects that you opened after the current project. Simply click the arrow pointing in the direction you want to move.

NOTE: If you hold an arrow down, you’ll see a list of all the projects that you’ve opened into the timeline. Select the one you want and it will immediately open.

While there is no limit to the number of projects you can move between, these arrows will only display projects that were opened into the timeline. Unopened projects still in the Browser are ignored.


Please rate the helpfulness of this tip.

Click on a star to rate it!

… for Adobe Premiere Pro CC

Tip #035: How to Display the Dropped Frame Indicator

Larry Jordan – https://LarryJordan.com

An essential warning when working with media.

Tip Screen Shot

Topic $TipTopic

As Tip #37 explains, dropped frames are caused when either the CPU or your storage is not fast enough to play the video in your current sequence.

Most of the time, it’s a storage problem.

But, you can’t fix a problem if you don’t know it exists and, by default, the dropped frame indicator is hidden.

Here’s how to turn it on:

  • Switch to the Editing workspace.
  • Click the Wrench (Settings) icon in the Program Monitor.
  • Check Show Dropped Frame Indicator. (It’s about 2/3 the way down the menu.)

Now, you’ll see a small green or yellow dot in the lower left corner of the Program Monitor. When this dot is green, your system is able to play current media with no problems.

When this flashes yellow, however, your system is dropping frames. This creates either stuttery or stopped playback. Either fix the problem or shift to editing proxy files.

BONUS

The Dropped Frame indicator also exists in the Source Monitor and you turn it on the same way – except you use the Wrench icon in the Source Monitor.


Please rate the helpfulness of this tip.

Click on a star to rate it!

… for Adobe Premiere Pro CC

Tip #040: How to Delete Premiere Preference Files

Larry Jordan – https://LarryJordan.com

Most of the time, Premiere preference files are fine. Until…

Tip Screen Shot

Topic $TipTopic

Most of the time, Premiere’s preference files don’t break. But… every so often, things in the application start to go… awry.

When that happens:

  • Quit Premiere.
  • Then, restart the application pressing Shift + Option as it launches. (Windows: Shift + Alt). You can launch from either the Dock or Applications folder.

You know you did this correctly when the Welcome screen does not display any projects.

NOTE: Deleting preferences does not delete any media or projects. However, it WILL reset any customized settings like unsaved workspaces and custom preferences.


Please rate the helpfulness of this tip.

Click on a star to rate it!

… for Adobe Premiere Pro CC

Tip #083: Float a Panel in It’s Own Window

Larry Jordan – https://LarryJordan.com

“Floating a panel” means that it appears in it’s own window.

Tip Screen Shot

Topic $TipTopic

Any panel can be “un-docked” and float in its own window above the standard Premiere interface. This is especially useful for information you want to keep a close eye on – such as the timecode display.

There are three ways to undock a panel:

  • Click the three horizontal bars (called the “thumb”) next to the name of an active (selected) panel and choose Undock Panel.
  • Drag the panel name outside the regular Premiere interface.
  • Select the panel from the Window menu; for example, Timecode.

In any of these three cases, the selected panel will appear in its own window, ready to be dragged wherever you need it.

EXTRA CREDIT

If you decide you don’t want the panel undocked and it came from an existing interface, choose Window > Workspaces > Reset to Saved Layout.

If the floating panel was called from the Window menu, simply close the window to put it away.


Please rate the helpfulness of this tip.

Click on a star to rate it!

… for Apple Final Cut Pro X

Tip #063: Secrets of the FCP X Dock

Larry Jordan – https://LarryJordan.com

Clicking the Dock is fast – this is faster.

Tip Screen Shot

Topic $TipTopic

Final Cut’s Dock icon holds a lot of secrets – and several very nice shortcuts – if you know how to unlock them.

Control-click the Final Cut Pro X Dock icon and you’ll see:

  • A list of recently opened libraries
  • The ability to automatically start Final Cut when you log into your computer
  • And a variety of other options.

This is a very fast way to get Final Cut started and the library you need opened all at once.


Please rate the helpfulness of this tip.

Click on a star to rate it!

… for Random Weirdness

Tip #062: Secrets of the Audio Meters

Larry Jordan – https://LarryJordan.com

Audio meters are essential to clean audio.

Tip Screen Shot

Topic Icon

Audio meters, whether in Avid, Premiere or Final Cut, show the peak (instant) levels of your audio. But, if you know where to look, they can also tell you a lot more.

For instance:

  • Audio meters measure peak audio on the dBFS scale (deciBels Full Scale).
  • Audio meters show the absolute levels of your audio. This is unlike clips, where adjusting the “rubber band” is making a “relative” adjustment – relative to the level at which the audio was recorded.
  • The left bar represents the left audio channel. The right bar represents the right audio channel.
  • Any audio levels that exceed 0 dB on the audio meters will distort when your project is exported.
  • Audio levels are logarithmic. For every 6 dB that audio levels drop, the volume of the sound is cut in half.
  • The thin line above the green bar shows the loudest level for that clip over the last 1-2 seconds.
  • The top of the green bar represents the loudest level of the clip at that instant.

Audio meters are essential to keeping your sound clean and distortion free.


Please rate the helpfulness of this tip.

Click on a star to rate it!

… for Adobe Premiere Pro CC

Tip #004: Little-Known Secrets of the Font Menu

Larry Jordan – https://LarryJordan.com

Three Tips To Make Using Fonts Faster

Tip Screen Shot

Topic Icon Here are three secrets you may not know about the Font menu in Premiere:

  • All the fonts you have used recently are listed at the top of the menu, above the thin gray line.
  • Click a star to flag a font as a Favorite. Then, click the Star icon at the top of the menu to display all Favorite fonts. (To remove a Favorite flag, deselect the star next to the font name.)
  • A fast way to find a font is to type the first few letters of its name in the Font menu. All font names containing those letters will be displayed. Click to choose the one you want.

These tips, plus the ability to see what a font looks like BEFORE you apply it, makes the new Font menu a lot more powerful – and faster to use.


BONUS

  • Click the Creative Cloud icon at the top left of the menu to see all Adobe fonts.
  • Click the red Creative Cloud icon at the top right of the menu to add more TypeKit fonts.

Please rate the helpfulness of this tip.

Click on a star to rate it!

… for Apple Final Cut Pro X

Tip #052: A Better Way to Preview an Effect

Larry Jordan – https://LarryJordan.com

Here’s how to see an effect without applying that effect.

Tip Screen Shot

Topic Icon

In the Timeline, put the playhead in the middle of a clip to which you want to add an effect.

This displays the clip in the Viewer.

Next, open the Effects Browser (shortcut: Cmd + 5) and find the effect you want to apply.

Instantly, the effect – at its default settings – is displayed in the Viewer as though it was applied to the clip, but it isn’t… yet.

Even better, press the Option key. Now as you hover and drag over an effect in the Effects browser you’ll see the effect applied to the clip and, as you drag, the principle setting – for example, the amount of a Gaussian blur – changes allowing you to see how altering the setting will alter the effect.

If you like the results, double-click the effect to apply it.


Please rate the helpfulness of this tip.

Click on a star to rate it!