… for Adobe Premiere Pro CC

Tip #1679: What is Adaptive Audio?

Larry Jordan – LarryJordan.com

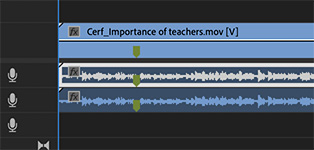
Premiere provides flexibility in assigning audio formats and channels.

Audio channel format options inside Adobe Premiere.

Topic $TipTopic

Most of the time, Adobe Premiere Pro guesses the audio format and channel assignments correctly when you import a clip. But, sometimes, you need to make changes.

To do so:

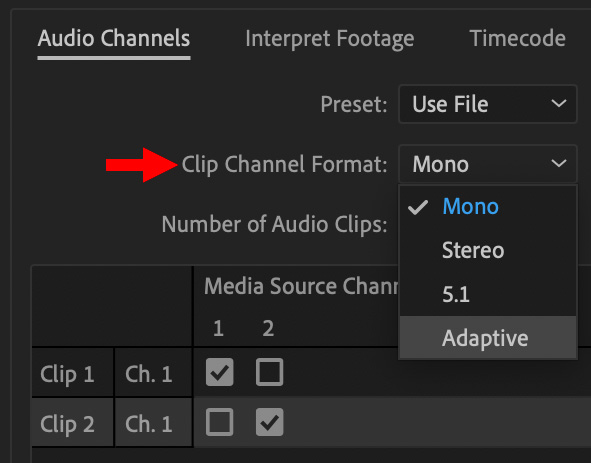
  • Control-click the audio clip you want to adjust in the Project or Bin panel.
  • Select Modify > Audio Channels.
  • In the popup window, set Clip Channel Format to Mono, Stereo, 5.1 or Adaptive.
  • Finally, using the checkboxes at the bottom, you can remap which channel in the audio clip plays on which channel in Premiere.

One of the Format options is “Adaptive.” Adobe describes Adaptive as: “The adaptive track can contain mono, stereo, and adaptive clips. With adaptive tracks, you can map source audio to output audio channels in the way that works best for your workflow. This track type is useful for working with audio from cameras that record multiple audio tracks. Adaptive tracks can also be used when working with merged clips, or multicam sequences.”


Please rate the helpfulness of this tip.

Click on a star to rate it!

… for Adobe Premiere Pro CC

Tip #1680: The Option Makes the Difference

Larry Jordan – LarryJordan.com

The simplest shortcuts often make the biggest difference.

Press Option to click and select just one track in a linked clip.

Topic $TipTopic

Sometimes, the simplest shortcuts make the biggest difference. Here’s one option I can’t live without.

Normally, when you click a synced clip in the Timeline, the entire clip is selected. And, most of the time, that’s exactly what you want.

Sometimes, though, you want to select just the audio or just the video portion of a synced clip. Perhaps you want to delete it, or move it into sync, or apply an audio filter to one channel and not another.

You could click the Link Selection button at the top left of the Timeline, but, frankly, it’s just easier to press Option, then click the portion of the clip you want to select.

When Option is not pressed, clicking selects the entire clip. When Option is pressed, clicking selects only the track you click on.

I’ve used this trick for years – it has saved me countless hours because it’s so simple… and effective.


Please rate the helpfulness of this tip.

Click on a star to rate it!

… for Apple Final Cut Pro X

Tip #1677: Working with Dual-Channel Audio

Larry Jordan – LarryJordan.com

Final Cut Pro makes handling multi-channel audio easy and very flexible.

Converting stereo to mono audio is easy using Audio Configuration.

Topic $TipTopic

Normally, when you import a two-channel audio clip, Final Cut Pro treats it as stereo. But Final Cut makes working with multi-channel audio easy. Here’s how:

  • Select the clip in either the Browser or the Timeline.
  • Open the Audio Inspector.
  • Scroll down to Audio Configuration.
  • Click the menu – which, for two-channel clips, should say Stereo – and change it to 2 Mono.

NOTE: In this screen shot, I’m working with a six-channel audio clip, where only the first two channels have audio. Here, I selected “6 Mono.”

Once you see the different channels you can:

  • Skim a channel to review it at high-speed
  • Click inside a channel, then press spacebar to play just that channel.
  • Uncheck a channel to mute it.

EXTRA CREDIT

Converting a 2-channel Mono clip to Stereo is just as easy: Change the menu from 2 Mono to Stereo.


Please rate the helpfulness of this tip.

Click on a star to rate it!

… for Apple Motion

Tip #1674: Make a Particle System 3D

Larry Jordan – LarryJordan.com

Switching a particle system to 3D takes just one mouse click.

The 3D checkbox – Inspector > Emitter (top) – and a field of flying baseballs.

Topic $TipTopic

Particles, like cameras, lights, replicators and 3D Objects, can expand into 3D space. (All other Motion elements are 2D.) However, by default, all particle systems are set to 2D. Here’s how to make the switch.

  • Add the particle system you want to use into the Viewer. (Library > Particle Emitters).

NOTE: This setting also works for particle systems you create – again, the default is 2D.

  • Select the name of the particle emitter in the Layers panel, not the group you moved it into.
  • Open Inspector > Emitter and check the 3D check box (top of screen shot).
  • A warning message appears reminding you to switch the group containing the particle system to 3D. Click the blue button to make the switch.

Done. Now, the particle system occupies volume as well as a position in space.

NOTE: Depending upon what particles are used to create the system, you can dolly through a particle cloud and see individual particles! It will take experimenting to find what works best for you – and you’ll need to render to see movement at full speed.

EXTRA CREDIT

In the lower screen shot, we see a camera dollying through a field of flying baseballs. The baseballs are the 3D baseball object that was turned into a particle system.


Please rate the helpfulness of this tip.

Click on a star to rate it!

… for Adobe Premiere Pro CC

Tip #1666: Customize the Audio Mixer Meters

Larry Jordan – LarryJordan.com

Customizing audio meters makes sure they show you want to need to see.

Audio meter options: Clip Mixer (left) Track Mixer (right)

Topic $TipTopic

Premiere Pro supports customizing the audio meter display in the timeline, as well as the Audio Clip and Track Mixers. Here’s what’s possible.

Open the Audio Clip Mixer (you can find it in the Windows menu, if it isn’t part of your current workspace). Control-click inside the area where the audio levels are displayed (i.e. the black stripe, not the numbers).

  • Show Valleys. This displays the lowest level of your audio during the last two seconds.
  • Show Color Gradient. This displays a smoother color ramp from green to yellow to red.
  • Dynamic Peaks. This displays the loudest level of your audio during the last two seconds.
  • Static Peaks. This displays the loudest level of your audio until something louder comes along. This is a good way to determine if any part of your mix exceeds 0 dB.
  • Show Peaks. This enables either Dynamic or Static peak display.
  • Show Channel Volume. This displays the current level of the audio clip in numbers.

Open the Track Mixer, control click in the same area and the options change. (These options are the same as Control-clicking in the timeline audio meters.) The one new choice is:

  • dB Range. This only displays audio levels that exceed the level selected here. This is a good way to focus on the louder portions of your mix.

Please rate the helpfulness of this tip.

Click on a star to rate it!

… for Apple Motion

Tip #1647: Create a Constant Speed Change in Motion

Larry Jordan – LarryJordan.com

Changing clip speed isn’t easy in Motion, but it is possible.

The clip Timing panel in Inspector > Properties.

Topic $TipTopic

Motion makes it possible for you to change the playback speed of clips, but this feature is pretty well hidden. Here’s how this feature works.

  • Select the video clip who’s speed you want to change in the Layers panel.
  • Go to Inspector > Properties and scroll to the bottom and show Timing (see screen shot).

Here is what some of the settings mean for a Constant speed change:

  • Time Remap switches between Constant and Variable Speed. (Tip #1648 discusses Variable Speed settings.)
  • To play a clip in reverse, check the Reverse checkbox.
  • To play a clip in slow motion, adjust the Speed setting.
  • To have a clip end on a certain frame, adjust either the Duration or Out timecode values. (These are paired, so if you adjust one, the other moves.)
  • If the speed goes below around 50%, change Frame Blending from None to Motion-Blur Blending.
  • If you increase the speed of a clip and don’t have enough frames to cover the total duration, set the End Condition to Hold, then add frames to the End Duration until the clip is as long as you need it.

Please rate the helpfulness of this tip.

Click on a star to rate it!

… for Apple Motion

Tip #1648: Create a Variable Speed Change in Motion

Larry Jordan – LarryJordan.com

Variable speed changes requiring using frame counts, not timecode.

A variable speed change in Motion. Note keyframes and Retime Value settings.

Topic $TipTopic

Creating a variable speed change to a video clip in Motion is involved and somewhat hidden. Also, the Help files don’t help.

NOTE: While this feature is called “Variable Speed Change,” you are not ramping into that speed. You are switching, instantly, from one speed – say 100% – to another – say, 50%.

Here’s how this works.

  • Select the clip you want to modify in the Layers panel.
  • Go to Inspector > Properties and scroll down to show the Timing panel.
  • Change the Time Remap setting to Variable Speed. This sets a 100% speed timing keyframe at the beginning and end of the clip.
  • Put the playhead where you want the speed change to start, then set a Retime Value keyframe.
  • Move the playhead where you want the speed change to end and set a second Retime Value keyframe.
  • Then, adjust the Retime Value (which is a frame counter) to adjust which frame appears at that keyframe.

NOTE: This is a good reason to switch the timecode display to frames, by clicking the small, down-pointing white arrow to the right of the timecode display. All timing changes are measured in frames.

For example, let’s say you want the clip to run at 50% speed for the first two seconds, then freeze for two seconds, then return to normal. The project is 30 fps. (You need to know the project frame rate for this to work.)

  • Set a keyframe on the starting frame (Frame = 0)
  • Set a keyframe at the two second mark (Frame = 60)
  • With the playhead parked on the second keyframe, change the Retime Value to 30. This slows clip playback so that the 30th frame in the clip appears at 60th frame of the project. In other words, the clip plays at 50% speed.
  • Move the playhead to Frame 120 and set another Retime Value keyframe.
  • Set the Retime Value to 30. This creates a still frame from the second keyframe to the third. Why? Because the Retime Values are the same.
  • When the still frame is done, the clip returns to 100% speed as it heads to the last keyframe. Remember, these keyframes represent instantaneous switches in speed, not ramps.

EXTRA CREDIT

This feature takes experimentation to learn what works. However, as a tip, don’t remove the starting and ending keyframes.

The frame rate of the source clip does not appear to be significant.

One other note, resetting the clip does not seem to remove keyframes. If you reset a parameter, you may need to remove keyframes manually.


Please rate the helpfulness of this tip.

Click on a star to rate it!

… for Apple Motion

Tip #1649: Shear vs. Rotation Effects

Larry Jordan – LarryJordan.com

Shear deforms the image, as well as add a 3D feel.

A rotated image (top), Shear image (bottom). The lower image lost perspective.

Topic $TipTopic

Shear is a Transform property that you probably haven’t played with. But it is quite different from Rotation. Here’s an illustration.

We have long had the ability to rotate elements in 3D, thanks to the 3D Transform tool (top image in screen shot).

However, Rotation keeps everything properly in perspective. Shear does not.

  • Select an element.
  • Go to Inspector > Properties > Transform. Then drag the X or Y value and watch what happens.
  • Shear distorts the clip in a variety of non-perspective ways, creating a sort of a deformed 3D rotation look.

This is easier to see as you play with it, especially when moving X and Y in combination.

EXTRA CREDIT

Remember, all Transform settings can be keyframed, so you can animate your weirdness, along with applying behaviors to it.


Please rate the helpfulness of this tip.

Click on a star to rate it!

… for Adobe Premiere Pro CC

Tip #1646: Timing Trick When Slowing Clips

Larry Jordan – LarryJordan.com

It’s a question of whether you want to adjust the duration or not.

The Clip Speed / Duration window with “Ripple Edit…” checked.

Topic $TipTopic

I re-discovered this technique while researching my recent webinar: Clip Speed Effects in Adobe Premiere Pro.

There’s a “hidden” option when you change the speed of a clip in the Timeline that can make your editing life easier. But, it is off by default. When you want to change the speed of a clip, for example to create slower or faster motion:

  • Select the clip in the timeline and type Cmd + R.
  • This opens the Clip Speed / Duration window (see screen shot).
  • To alter the speed, change the Speed setting.

However, down lower, is an equally important option.

  • When Ripple Edit is off, changing the speed of a clip will not change its duration. (Unless you are increasing the speed of the clip and don’t have enough frames to fill the existing duration.) This means that all downstream clips don’t move.
  • When Ripple Edit is turned on, changing the clip speed will always change the duration of the clip AND adjust the position of all downstream clips so that there is no gaps.

The problem with Ripple Edit turned off is that not all frames in the original clip will be displayed. Once the original duration is reached, any unplayed frames are ignored.

The problem with Ripple Edit turned on is that, while all frames will play, the clip duration will change, altering the position of all downstream clips and, ultimately, the duration of your sequence.

There are reasons for selecting either option – and I’ve used both in projects – but it is important to know you have a choice.

Ripple Edit is turned off by default.


Please rate the helpfulness of this tip.

Click on a star to rate it!

… for Apple Final Cut Pro X

Tip #1642: How to Add A Speed Transition

Larry Jordan – LarryJordan.com

Speed transitions will often make hold frames look much more believeable.

A hold frame (red bar) followed by a speed transition (gray bar).

Topic $TipTopic

I re-discovered this technique while researching my recent webinar: Clip Speed Effects in Apple Final Cut Pro.

A speed transition gradually alters the playback speed of a clip, for example, from a Hold frame back to normal speed. Here’s how to add a speed transition to smooth speed changes in Apple Final Cut Pro.

NOTE: Speed transitions are added automatically to speed ramps, but they can also be added to coming into or out of a Hold frame.

In this example, let’s add a speed transition coming out of a Hold frame:

  • Put the timeline playhead on the frame you want to freeze and type Shift + H. This creates a Hold frame, indicated by a red bar.
  • At the end of the Hold frame, in the red bar, is a vertical black bar, called the “thumb.” Double-click the thumb.
  • In the speed menu that appears, check Speed Transition.
  • A gray bar appears to the right of the Hold frame. This is the speed transition. Grab the right edge and drag it to change the duration of the speed transition.

Play this and you’ll see how it smooths the transition from still to full speed.

EXTRA CREDIT

In the screen shot:

  • The left arrow indicates the frame that is held (frozen)
  • The middle arrow indicates the Hold frame “thumb.”
  • The right arrow indicates the speed transition.
  • The Speed Transition menu is displayed above the timeline clip.

Speed transitions can be added at any speed thumb by double-clicking.


Please rate the helpfulness of this tip.

Click on a star to rate it!