… for Apple Motion

Tip #1637: An Invaluable Preference Setting

Larry Jordan – LarryJordan.com

This one preference setting can decrease your frustration.

An edited screen shot of the Motion > Preferences > Project pane.

Topic $TipTopic

If, like me, you add new elements to a Motion project only to discover that they seem to land anywhere EXCEPT where you want them, here’s a very simple fix.

By default, whenever you add a new element to a project – either by dragging into the Canvas or the Layers panel – that element starts at the position of the playhead in the mini-Timeline.

Which is great – except, I NEVER remember to move the playhead to the right spot until AFTER I add the element.

Grrr… I spend most of my time repositioning the In or the Out of an element.

So, here’s a FAST way to fix this:

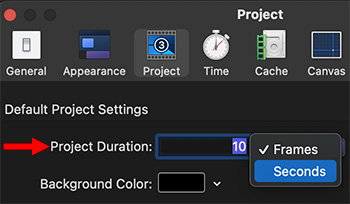
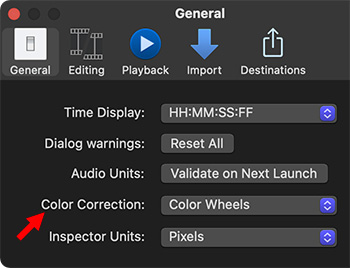
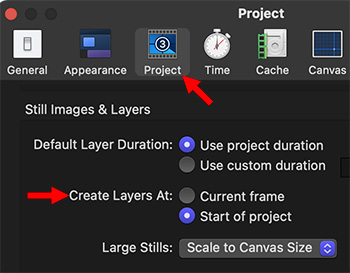
  • Open Motion > Preferences.
  • Click the Project icon (see screen shot).
  • Change Create Layers at to Start of Project.

NOTE: The default setting Current frame, always places the In of a new element at the position of the playhead in the mini-Timeline.

Now, whenever you add something new, it will always start at the beginning of a project. This may not be where you want it, but it will always be where you expect it.

EXTRA CREDIT

In addition to dragging elements into position in the Timeline, you can also place the playhead where you want them to start and type I (in) or O (out).


Please rate the helpfulness of this tip.

Click on a star to rate it!

… for Apple Motion

Tip #1638: Create a Default Motion Project Duration

Larry Jordan – LarryJordan.com

Preset preferences control everything except project durations.

Project durations, which can be in frames or seconds, are set from Preferences > Project.

Topic $TipTopic

Here’s another Motion preference setting that can simplify your life.

When you create a new preset (Motion > Preferences > Presets), you can specify all sorts of different technical settings for your projects. This allows Motion to auto-configure projects quickly when you create new ones.

The only thing you CAN’T do from the Preset menu is set a default duration. That option is located in Motion > Preferences > Project. (See screen shot.)

Simply change the Project Duration in the Project pane to whatever you prefer for a default.

NOTE: Remember, you can always change this value when creating a new project using the Project Browser.

EXTRA CREDIT

You can specify durations using either frames or seconds.


Please rate the helpfulness of this tip.

Click on a star to rate it!

… for Apple Motion

Tip #1639: Switch Between Timecode & Frames

Larry Jordan – LarryJordan.com

Internally, Motion tracks everything in frames, but can easily display timecode.

Click the white arrow to change the timing display.

Topic $TipTopic

Video folks tend to think in timecode. Animators tend to think in frames. Motion supports both. Internally, Motion tracks everything in frames, but can easily display timecode.

To switch, click the small down-pointing white arrow to the right of the timecode / frame display at the bottom of the Canvas (see screen shot).

Using this popup menu, you can choose to display either frames or timecode, as well as current project time or total project duration.

You can change this setting whenever you want, it is display-only.


Please rate the helpfulness of this tip.

Click on a star to rate it!

… for Adobe Premiere Pro CC

Tip #1633: New! Text Color Gradients in Premiere

Larry Jordan – LarryJordan.com

Text gradients now can be created directly in Premiere.

Text with gradient (top), and the top portion of the Color Picker showing gradient settings (bottom).

Topic $TipTopic

Text gradients have been a part of the legacy Titler in Premiere for a while. Now, however, you can create them directly in Premiere itself. Here’s how.

  • Select the text to which you want to apply the gradient.
  • Switch to the Essential Graphics workspace.
  • In the Appearance section click the Fill color chip.
  • In the Color Picker dialog that opens, select one of the gradient options from the drop-down list at the top left. There are three choices: Solid, Linear Gradient, and Radial Gradient. (Red arrow in the screen shot.)

To adjust the colors in the gradient:

  • Click any of the color stops below the gradient slider to show different color options and change the color.
  • To remove a color stop, click one and either drag it away from the gradient slider and release, or click Delete at the bottom right of the gradient slider.

To adjust the opacity of the gradient:

  • Move the Opacity Stop at the top of the gradient slider.
  • Then change the opacity in the Opacity % field

To adjust the angle and location of the gradient:

  • Angle: Type in a value in the Angle field or drag on the blue hot text to change a linear gradient’s angle.
  • Location: Type in a value in the Location field or drag on the blue hot text for an interactive experience to change the location of a selected stop or midpoint.

As you adjust all the controls in the gradient, you can see your changes to the text live in the Program Monitor.

Click OK to apply the gradient to the text.


Please rate the helpfulness of this tip.

Click on a star to rate it!

… for Apple Final Cut Pro X

Tip #1630: Simplify Transferring a Final Cut Library

Larry Jordan – LarryJordan.com

Store custom Motion templates in the Library to simplify transfers.

Library Storage Locations dialog.

Topic $TipTopic

Here’s a quick tip that makes sharing Final Cut Libraries between editors less stressful by consolidating custom Motion templates into the Library.

Normally, Motion stores – and Final Cut accesses – Motion templates in [ Home Directory ] > Movies > Motion Templates. However, when you send a Library to another editor, none of those templates transfer with it.

Here’s how to fix it:

  • Open a Final Cut Library.
  • Select the Library in the Library List (to the left of the Browser).
  • Open the Inspector and click Storage Locations > Modify Settings
  • Change Motion Content to In Library.
  • Then, click Motion Content > Consolidate. This copies all custom Motion templates used by that Library from the Motion Templates folder into the Library.

Now, wherever you transfer that Library, all custom templates will travel with it.


Please rate the helpfulness of this tip.

Click on a star to rate it!

… for Apple Final Cut Pro X

Tip #1631: Learn Where Your Library Media Is Stored

Larry Jordan – LarryJordan.com

This lists media by type, storage space used and drive.

Media storage data displayed in the Info Inspector in Final Cut Pro.

Topic $TipTopic

Here’s a fast way to learn how much space the media for a Final Cut Library takes, what type of files are using that space, and where it’s stored.

Select a Library in the Library List, then go to the Info Inspector.

At the bottom (see screen shot) is a list of where your media is stored by drive and category.


Please rate the helpfulness of this tip.

Click on a star to rate it!

… for Apple Final Cut Pro X

Tip #1632: Change Default Color Grading Options

Larry Jordan – LarryJordan.com

My personal preference is for Color Wheels.

Set the default Color Correction option using the General preferences tab.

Topic $TipTopic

The Color Board is the default color grading setting for Final Cut Pro. Some people like the Color Board, other folks prefer other color grading options. Here’s how to change the default setting.

  • Open Final Cut.
  • Go to Final Cut Pro > Preferences.
  • Go to the General tab and change Color Correction to the default color tool you want to use.

This choice remains in effect until you either change it, or trash preferences.

NOTE: This sets the default setting. You can always change to something different using the Color Inspector.


Please rate the helpfulness of this tip.

Click on a star to rate it!

… for Apple Motion

Tip #1612: What Do Red Numbers Mean in Motion?

Larry Jordan – LarryJordan.com

Red numbers always indicate values set by keyframes.

Red numbers in the Inspector indicate a parameter that has keyframes applied.

Topic $TipTopic

You are happily creating stuff in Motion when, all of a sudden, red numbers appear. What do they mean?

Red numbers, illustrated in the screen shot, indicate parameter values that have keyframe settings applied.

Most of the time, you created the keyframes and all is good. But, sometimes, Motion creates them without you knowing about it.

Tip #1611 explains how to get rid of them.


Please rate the helpfulness of this tip.

Click on a star to rate it!

… for Codecs & Media

Tip #1608: Add Metadata to Videos in Compressor

Larry Jordan – LarryJordan.com

Metadata can be read by many different applications, as well as asset managers.

Custom metadata fields that can be added to any ProRes, MP4, MP3 or QuickTime movie.

Topic $TipTopic

You can use Apple Compressor to add metadata (labels) to your videos during compression using Compressor. Here’s how.

  • Import one or more files into Apple Compressor.
  • Select the file name in the Job list, not the compression setting.
  • In the Job Inspector (top red arrow in screen shot), scroll down to the Metadata menu (bottom red arrow).
  • Click it and select as many custom fields as you need.

NOTE: No, you can’t add fields that aren’t on this list. However, you can import an XML Property List, if you know how to create XML files.

Metadata can be added to ProRes, MP4, MP3 and QuickTime files.


Please rate the helpfulness of this tip.

Click on a star to rate it!

… for Codecs & Media

Tip #1610: Add Automated Job Actions in Compressor

Larry Jordan – LarryJordan.com

Job Actions can trigger an Automator workflow for extensive automation.

The Job Action menu options inside Apple Compressor.

Topic $TipTopic

Apple Compressor has eight pre-built automation tasks that can be triggered when compression is complete.

These include:

  • Save the file
  • Add to TV Home Videos
  • Create a Blu-ray or AVCHD Disc
  • Create a DVD
  • Open with a specific application
  • Prepare for HTTP Live Streaming
  • Run Automator Workflow
  • Send Email
  • Post to YouTube or Facebook

To access these:

  • Select a file in the Job list.
  • Scroll down in the Job Inspector (top red arrow) to the bottom.
  • In the Action menu (bottom red arrow), select what you want Compressor to do when compression is complete.

Most of the time, I simply want Compressor to save a file. However, I used HTTP Live Streaming every week to provide mobile device support for my webinars.

EXTRA CREDIT

For true flexibility, you can couple Compressor to Automator for significant file processing after compression is complete.


Please rate the helpfulness of this tip.

Click on a star to rate it!