Gradients can create the illusion of depth and/or roundness.
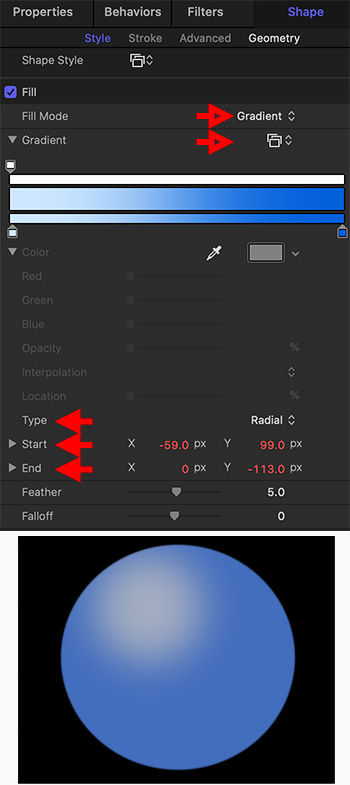
The Shape settings needed to create the 3D ball shape.
This tip started with me wondering: “Um, what happens if I change this?”
I started by drawing a circle.
In Inspector > Shape > Style, I switched the color fill from Color to Gradient.
Twirl down the Gradient triangle (to the left of the name) to reveal a whole flock of additional controls.
Set Type to Radial.
Change the Start and End positions to move the highlight off center.
Boost feathering a little bit to make the ball seem a bit more rounded.
Ta-DAH! A shape that looks a LOT more like a 3D ball than a simple 2D circle.
NOTE: Gradients which have only two colors work the best for this. Feel free to experiment with changing colors and see what looks best for you.
EXTRA CREDIT
You can keyframe the Start and End positions to make it look like the lighting around the ball is moving.
Please rate the helpfulness of this tip.
Click on a star to rate it!
https://www.theinsidetips.com/wp-content/uploads/2019/09/Tips-Logo-700x150.jpg00Larry Jordanhttps://www.theinsidetips.com/wp-content/uploads/2019/09/Tips-Logo-700x150.jpgLarry Jordan2021-02-04 01:30:002021-02-04 01:30:00Tip #1382: Playing With Gradients
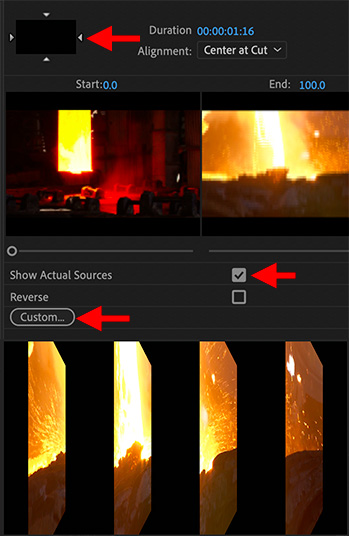
When adding clips to a drop zone, where you click the skimmer determines the In.
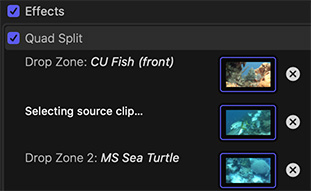
Drop zones displayed in the Video Inspector.
I discovered this tip while researching a recent PowerUP webinar introducing Apple Motion 5.5.
One of the Motion effects I created for this webinar involved combining multiple drop zones into a single “quad split,” where four different images were combined into one.
NOTE: The benefit of creating this as a Motion template is how easily it can be reused, rather than create each effect uniquely in Final Cut.
What I didn’t know till this week was that when you add a video clip to a drop zone, where you click the skimmer (Shortcut: S) in the Browser clip determines the In of the video.
In the past, Final Cut would use the actual start of the video clip. Now, with the Skimmer setting the In, you can use any segment of a clip that you prefer.
Very cool – and a huge time-saver.
Please rate the helpfulness of this tip.
Click on a star to rate it!
https://www.theinsidetips.com/wp-content/uploads/2019/09/Tips-Logo-700x150.jpg00Larry Jordanhttps://www.theinsidetips.com/wp-content/uploads/2019/09/Tips-Logo-700x150.jpgLarry Jordan2021-02-01 01:30:002021-02-01 01:30:00Tip #1386: Drop Zone Secret
For full-screen projects, set the background to a solid color.
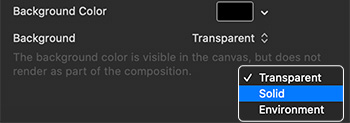
Background settings in Project Properties. Transparent is the default.
By default, the background in Motion is transparent, though it is displayed in the Viewer as black. However, you DO have options.
Also by default, the background color is black. This means that the Viewer displays black behind all elements, BUT it does not export this color.
To change the background, type Cmd + J, this displays the Project Properties panel.
Transparent. The background color does not export, though it does appear in the Viewer.
Solid. The background color appears in the Viewer and is exported as a solid color with your project.
Environment. The background color appears in the Viewer, exports with your project and interacts with elements in your project, for example, using blend modes..
EXTRA CREDIT
To change the background color in the Viewer, change the background color setting in Project Properties.
Please rate the helpfulness of this tip.
Click on a star to rate it!
https://www.theinsidetips.com/wp-content/uploads/2019/09/Tips-Logo-700x150.jpg00Larry Jordanhttps://www.theinsidetips.com/wp-content/uploads/2019/09/Tips-Logo-700x150.jpgLarry Jordan2021-01-28 01:30:002021-01-28 01:30:00Tip #1364: Change the Motion Background
The Wrench icon – in any panel – is the key to customization.
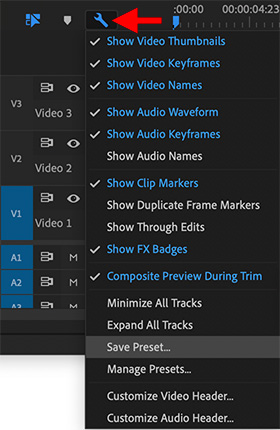
The timeline customization menu. Blue indicates active elements.
The Timeline Wrench icon provides many ways to customize the timeline in Premiere. Located in the top left corner of the timeline (see screen shot), blue elements are active.
Those labeled “Show” affect the display of elements in the Timeline.
The two “Customize” options determine which icons are displayed for video and audio tracks. (By default, all icons are visible.)
Tip #1358 discusses the Save and Manage Preset options.
EXTRA CREDIT
The easiest way to see what the “Show” options do is to uncheck them and watch what happens. Changing these has no effect on your media, edit or project; they only affect the display of objects in the timeline.
Please rate the helpfulness of this tip.
Click on a star to rate it!
https://www.theinsidetips.com/wp-content/uploads/2019/09/Tips-Logo-700x150.jpg00Larry Jordanhttps://www.theinsidetips.com/wp-content/uploads/2019/09/Tips-Logo-700x150.jpgLarry Jordan2021-01-26 01:30:002021-01-22 17:20:02Tip #1357: Customize the Timeline
Track height presets only change the height of tracks, which can also be assigned keyboard shortcuts.
The Manage Presets window. Accessed using the timeline Wrench icon.
One of the challenges in any large edit is seeing what you’ve got across all the tracks you are working with. Track Height presets make this easy. Here’s how.
There are a variety of ways to change the height of tracks:
Type Shift + [plus] to maximize all track heights
Type Shift + [minus] to minimize all track heights
Type Cmd + [plus]/[minus] to change video track heights
Type Option + [plus]/[minus] to change audio track heights
Drag the horizontal line between tracks in the track header up or down
CREATE A PRESET
Let’s say that you like minimizing all tracks EXCEPT V1, A1 & A2, which you want taller for dialog editing.
Configure the track heights as you wish.
Then, click the Wrench icon in the top left corner of the timeline and choose Save Preset.
Give the Preset a name and click OK.
You can assign keyboard shortcuts to these by searching for “Height” in the Keyboard Shortcuts window.
NOTE: Saved presets appear in the timeline Wrench menu.
MANAGE PRESETS
Go to the timeline wrench menu and choose Manage Presets(see screen shot).
Here you can reassign keyboard shortcuts, as well as delete any presets you no longer need.
Double-click a gray speed transition to enable making a gradual speed change.
When you change the speed of a clip segment, Final Cut adds speed transitions to smooth the speed change. You can create the speed changes using the Blade Speed tool (Tip #1352) or a speed ramp. (Both are available in the Modify > Retiming menu.
When a speed change is made Final Cut automatically displays the Retiming bar, which is either green, orange or blue.
At the point of the speed change, a black, vertical timing thumb appears (see screen shot) surrounded by a gray area; that part of a clip that eases into the new speed rather than a hard cut.
This gray area is the speed transition. Double-click the gray area – not the black thumb itself – and the speed transition dialog opens (see screen shot).
This allows to you turn off the transition, thereby cutting from one speed to the next, as well as edit the frame where the speed change occurs by clicking Edit, then dragging the retiming thumb to a new location.
EXTRA CREDIT
To reset the speed of a clip, select it and type Shift + N.
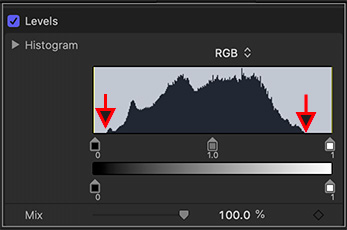
Even without scopes, we can safely adjust images using Levels.
The Levels Histogram, with red arrows showing the edges where the black and white sliders can be dragged.
One of the missing features in Motion that bothers me the most is a lack of video scopes. Granted, many effects don’t require them, but, far too often, we need to know whether the images we are creating are “broadcast legal” or not.
Still, we can still maximize the quality of our images without relying on scopes using Levels.
Select the image you want to adjust.
Apply Filters > Color > Levels.
Display the Levels settings in Inspector > Filters.
That “humpy” thing in the gray box represents the gray-scale values of every pixel in the image to which the Levels filter is applied. Black on the left, white on the right and gray in the middle.
There are five sliders below that histogram. The three we care the most about are on top.
To maximize the gray-scale values in an image, drag the left (black) slider to the right until it just touches where the histogram ramps up. Then, drag the right slider (white) until it just touches where the histogram ramps down.
NOTE: What this does is stretch the grayscale values of the image across the full grayscale range. This tends to make images look richer with a brighter “pop” in the highlights. The KEY is to not drag the sliders into the “humpy” part. Dragging in too far causes lost detail in either the shadows or highlights.
Finally, drag the middle slider (mid-tones) until the image looks “right” to you. Most of the time, I tend to darken mid-tones.
EXTRA CREDIT
Even without scopes, as long as the black and white sliders stay at the edge of the “humpy” part of the histogram, you’ll retain all image detail while still providing a rich, vibrant image.
I should also point out that, sometimes, you don’t want richness. For example, a foggy day has no highlights or shadows – just midtones.
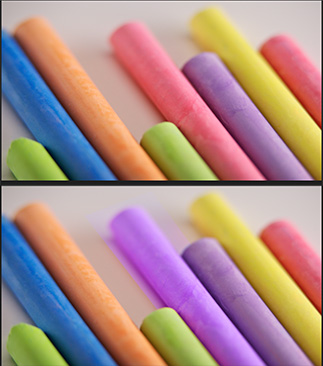
Secondary color changes are a common tool to create colors that better tell our story.
Source image (top) , color-changed chalk using a secondary correction (bottom).
Look closely at this screen shot. What’s the difference between these two images…? Yup, the pink chalk at the top changed color. Here’s how.
A “secondary color correction” is one where a portion of the frame changes color, without affecting the rest of the image.
NOTE: Unlike chroma-key, which makes a color transparent, color replacement keeps all the image grayscale for texture and only alters the color.
Select the element containing the object whose color you want to change.
Apply Filters > Hue/Saturation Curves.
Click the gray eyedropper for Hue vs. Hue. (A blue eyedropper means it is active.) This creates three dots on the color line. The left and right dot indicate the range of the selection.
Drag the center dot up or down until you are happy with the color on screen. (For example, in the screen shot, both the chalk and its shadow/reflection are altered.)
Done.
EXTRA CREDIT
Many times, these color changes will spill to other parts of the image. To prevent that, duplicate the image, remove any filters, then draw a Bezier mask loosely around the object in the top-most layer.
This is what I did for the image in the screen shot.
Please rate the helpfulness of this tip.
Click on a star to rate it!
https://www.theinsidetips.com/wp-content/uploads/2019/09/Tips-Logo-700x150.jpg00Larry Jordanhttps://www.theinsidetips.com/wp-content/uploads/2019/09/Tips-Logo-700x150.jpgLarry Jordan2021-01-14 01:30:002021-01-14 01:30:00Tip #1316: Change the Color of a Single Object
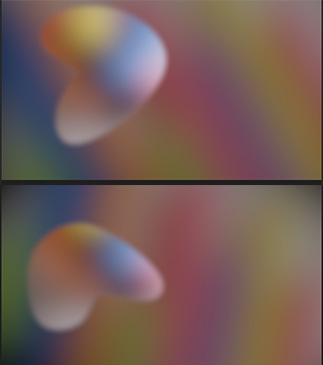
The B-spline mask tool is great when you DON’T want sharp edges.
A morphing blob shape, composed of two still images of colored chalk.
Most of the time, when we need a mask, we’ll use the Bezier tool, because it creates very flexible, highly-precise masks. So, I wondered, when should we use the B-spline mask tool?
The B-spline tool creates “blobs,” masks which have no sharp edges. It reminded me of the Blob generator in Final Cut.
So, I set out to create my own blob and discovered the very interesting effect you see in the screen shot.
Process:
Add Chalk 03 to a layer
Apply Behaviors > Spin to rotate slowly
Apply Filters > Blur > Gaussian Blur
Manually enter an Amount of 700, to make it REALLY blurry
–
Add Chalk 02 on a higher layer
Apply Filters > Blur > Gaussian Blur
Manually enter an Amount of 700
Use the B-spline mask tool to create a blob of this upper layer, then add as much feathering as possible
–
Finally, add keyframes to different B-spline control points so that the shape of the blob animates/morphs over time
Cool.
EXTRA CREDIT
There’s lots of other effects you can add to change the look of this effect. Feel free to play as much as you want.
Please rate the helpfulness of this tip.
Click on a star to rate it!
https://www.theinsidetips.com/wp-content/uploads/2019/09/Tips-Logo-700x150.jpg00Larry Jordanhttps://www.theinsidetips.com/wp-content/uploads/2019/09/Tips-Logo-700x150.jpgLarry Jordan2021-01-14 01:30:002021-01-08 18:02:38Tip #1317: An Example of a B-spline Mask
We may request cookies to be set on your device. We use cookies to let us know when you visit our websites, how you interact with us, to enrich your user experience, and to customize your relationship with our website.
Click on the different category headings to find out more. You can also change some of your preferences. Note that blocking some types of cookies may impact your experience on our websites and the services we are able to offer.
Essential Website Cookies
These cookies are strictly necessary to provide you with services available through our website and to use some of its features.
Because these cookies are strictly necessary to deliver the website, refuseing them will have impact how our site functions. You always can block or delete cookies by changing your browser settings and force blocking all cookies on this website. But this will always prompt you to accept/refuse cookies when revisiting our site.
We fully respect if you want to refuse cookies but to avoid asking you again and again kindly allow us to store a cookie for that. You are free to opt out any time or opt in for other cookies to get a better experience. If you refuse cookies we will remove all set cookies in our domain.
We provide you with a list of stored cookies on your computer in our domain so you can check what we stored. Due to security reasons we are not able to show or modify cookies from other domains. You can check these in your browser security settings.
Google Analytics Cookies
These cookies collect information that is used either in aggregate form to help us understand how our website is being used or how effective our marketing campaigns are, or to help us customize our website and application for you in order to enhance your experience.
If you do not want that we track your visit to our site you can disable tracking in your browser here:
Other external services
We also use different external services like Google Webfonts, Google Maps, and external Video providers. Since these providers may collect personal data like your IP address we allow you to block them here. Please be aware that this might heavily reduce the functionality and appearance of our site. Changes will take effect once you reload the page.
Google Webfont Settings:
Google Map Settings:
Google reCaptcha Settings:
Vimeo and Youtube video embeds:
Other cookies
The following cookies are also needed - You can choose if you want to allow them:
Privacy Policy
You can read about our cookies and privacy settings in detail on our Privacy Policy Page.