… for Adobe Premiere Pro CC

Tip #1096: Select the Right Proxy Format

Larry Jordan – LarryJordan.com

For most projects, choose ProRes; though use H.264 where file size is critical.

Ingest options for Media Browser, indicating the default proxy options.

Topic $TipTopic

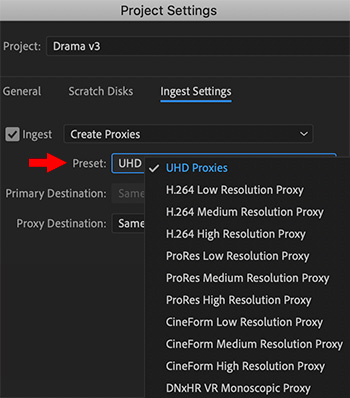
Premiere continues to improve its proxy workflow, most recently by adopting the ProRes family of codecs across all apps, both Windows and Mac. When it comes to creating proxies, we can now choose between four different codecs:

  • H.264
  • ProRes
  • CineForm
  • DNxHR VR

If you want the smallest possible proxy file size, H.264 is the choice. However, this is not an efficient format to edit, especially on older computers.

My personal preference is ProRes, though CineForm is an excellent alternative.

The DNx options are specifically for 360° VR video, either monoscopic or stereo.

NOTE: Resolution refers to the frame size of the proxy file: full resolution, half resolution or quarter resolution. For most projects and rough cuts, half resolution is the best balance between file size and image quality.

EXTRA CREDIT

UHD Proxies, in case you were wondering, use ProRes Proxy at 1/4 resolution, which makes the files efficient to edit, but small in size at 960×540.


Please rate the helpfulness of this tip.

Click on a star to rate it!

… for Adobe Premiere Pro CC

Tip #1097: Creative Color Tints

Larry Jordan – LarryJordan.com

Shadow & Highlight Tints are quick ways to affect the dominant grayscale values in an image.

An image as captured (left) and after tints were applied. (Image courtesy of J. Putch and “Route 30, Too!“)

Topic $TipTopic

There’s an unlimited range of looks and emotions we can evoke with the color tools in Premiere. Here’s a technique using two tools I haven’t worked with before to boost the emotion in a scene.

In the screen shot, the image on the left is how it was shot. The image on the right was adjusted using three settings in the Lumetri Color > Creative panel:

  • Vibrance was decreased 30% to reduce saturation.
  • Shadow Tint was pushed deeply toward dark blue affecting the darker portions of the frame.
  • Highlight Tint was pushed slightly toward red.

Look how much more stressed and anguished she looks, just in changing these simple settings.

The benefit to using Shadow and Highlight Tints is that you can quickly alter the color balance of a scene by affecting shadows, which our eye responds to at a much deeper level than highlights.

EXTRA CREDIT

When altering saturation, Vibrance is a better tool than Saturation, because Vibrance only affects mid-tone values.


Please rate the helpfulness of this tip.

Click on a star to rate it!

… for Adobe Premiere Pro CC

Tip #1098: Move Clips Faster!

Larry Jordan – LarryJordan.com

Lift and Extract simplify moving edited media between sequences.

Lift (left) and Extract (right) allows fast transfer of clips between sequences.

Topic $TipTopic

OK, I confess, this is a long-time feature in Premiere that I’ve never used: Lift and Extract. Sigh… so much to learn. Here’s how these work.

In Sequence “A,” set an In and/or an Out for the section you want to move. (You can move portions or all of one or more clips.)

NOTE: Selections won’t work.

  • Lift. Copies the edited media to your clipboard and removes it from the timeline and leaves a gap in the timeline.
  • Extract. Copies the edited media to your clipboard, removes it from the timeline, and closes the gap.

BIG NOTE: Lift ignores any clips on inactive tracks. Extract copies all clips, whether on active tracks or not.

Then, move to Sequence “B,” position the playhead where you want these clips to appear and paste.

NOTE: If you don’t press any modifier keys, the clips will overwrite the timeline. If you press Shift while pasting, the clips will insert into the timeline.


Please rate the helpfulness of this tip.

Click on a star to rate it!

… for Adobe Premiere Pro CC

Tip #1072: Preserve Your Projects – Long-term

Larry Jordan – LarryJordan.com

XML is the only file format that can be shared between apps.

The File > Export > Final Cut Pro XML dialog in Premiere.

Topic $TipTopic

Some projects are one-and-done. Never to see the light of day again. However, in these days of stock media and multiple versions, we often go back to the same project for years.

Yet, technology marches on. How do we protect our edit for the long-term? There’s only one answer: export an XML of every finished project.

How? File > Export > Final Cut Pro XML.

  • XML files describe every element of your edit – but DON’T include media. (You will need to archive media separately.)
  • XML files can be transferred between applications, native project files can’t.

The best option, always, is to reopen your project in the application that created it. But, when that isn’t possible, XML makes sure you can recover your edit. Media links, edits and transitions are preserved in XML. When moving an XML file to other applications, though, you will lose most effects and color grading settings.

Because XML files are small, take almost no time to export, and provide the greatest amount of flexibility for the future, always export an XML version of the finished timeline when you are done with a project.


Please rate the helpfulness of this tip.

Click on a star to rate it!

… for Adobe Premiere Pro CC

Tip #1075: Adobe Beefs Up Learning

Larry Jordan – LarryJordan.com

Adobe’s Learn panel is refreshed with new Adobe training.

The top of the Learn panel in Premeire.

Topic $TipTopic

Adobe continues to improve its training and tutorial access inside Premiere. If you haven’t seen what’s available lately, here’s where to look.

At the top of the Premiere interface is the Learn workspace; or choose Window > Learn. Click it and a new panel appears on the left side of the screen filled with tutorials.

Click the blue “New Tutorials Available” button to download the latest material. From what Adobe has told me, this section will continue to grow.


Please rate the helpfulness of this tip.

Click on a star to rate it!

… for Adobe Premiere Pro CC

Tip #1076: Favorite Icons in the Button Editor

Larry Jordan – LarryJordan.com

The Button Editor allows you to customize the buttons displayed in the Source or Program Monitors.

The Button editor. Arrows are explained in the text.

Topic $TipTopic

Over the years, Adobe has significantly slimmed down the Premiere interface. There are a fraction of the on-screen buttons compared to when the Creative Cloud first premiered. (Um, so to speak.)

One of those changes reduced the number of buttons displayed at the bottom of both the Source and Program Monitors. However, we can get many of these back using the Button Editor (screen shot). This customizes the buttons displayed in the Source or Program Monitors.

To open it, click the Plus icon in the lower right corner of either the Source or Program Monitor panels. (Each panel can have its own customization. The two Button Editors are essentially identical.)

NOTE: The Plus icon is indicated by the bottom arrow in the screen shot.

The screen shot displays most, but not all, of the Button Editor choices. Here are my three favorite additions.

  • Left arrow. Exports a still frame based on whatever is under the playhead. This feature supports exporting stills using DPX, JPEG, OpenEXR, PNG, Targa or TIFF formats.
  • Center arrow. Opens Comparison View. (See Tip #253).
  • Right arrow. Toggles between enabling camera native or proxy media.

I’ve added all three of these to my customized monitor panel.


Please rate the helpfulness of this tip.

Click on a star to rate it!

… for Adobe Premiere Pro CC

Tip #1056: Move a Mix from Audition to Premiere

Larry Jordan – LarryJordan.com

Take the time to verify the technical quality of your mix using Amplitude Statistics.

The four key fields I check for every exported WAV file.

Topic $TipTopic

Recently, when I was preparing my webinar An Overview of Adobe Audition, I was reminded of an important tip I learned a while ago.

When sending an audio mix from Audition back to Premiere, don’t use Multitrack > Export to Adobe Premiere. Why? Because you don’t know what you are getting. There’s a better way.

Instead, choose File > Export > Multitrack Mixdown > Entire Session.

This displays a window where you can set various parameters for your exported mix. In general, for video, choose:

  • WAV
  • 48K sample rate
  • 16-bit depth
  • Stereo
  • Check Open files after export

When the mix is complete, the exported file will be displayed in the Files panel. Double-click it to open it the Waveform Editor. This next step is the reason for this whole process: choose Window > Amplitude Statistics and click Scan in the lower left corner of the window.

This analyzes your clip for a variety of technical parameters. Here are the four fields I ALWAYS check:

  • True Peak. This is the loudest level in your mix. This must be below 0.
  • Possibly clipped samples. This must be 0. Anything larger means you have distortion in your mix.
  • DC Offset. This should be at or very close to 0
  • LUFS. This measures the average level of the total mix.

For broadcast, digital cinema and cable, LUFS should be -24 ±1. For the web, LUFS should be around -16. (LUFS is also referred to as LKFS.)

Once I verify that my audio meets all technical specs, I import it into Premiere and add it to the timeline as the final mix. The benefit to this approach is that I KNOW my audio is good, before final output, rather than HOPING it is good.

EXTRA CREDIT

Here’s a video that shows this process in operation.


Please rate the helpfulness of this tip.

Click on a star to rate it!

… for Adobe Premiere Pro CC

Tip #1057: What Does this Blue Button Do?

Larry Jordan – LarryJordan.com

By default, sequences are edited as nests – but you can change that with a click.

This button determines how sequences are treated when they are edited into the timeline.

Topic $TipTopic

I’ve been using Premiere for years and have never paid attention to this blue timeline button. Here’s what it does.

When this button is blue, inserting or overwriting a sequence from the Files panel into a different sequence in the Timeline edits it as a nest.

When this button is white, inserting or overwriting a sequence from the Files panel into a different sequence in the Timeline edits it as a separate clips. (That is, it deconstructs the sequence into its component elements.)


Please rate the helpfulness of this tip.

Click on a star to rate it!

… for Adobe Premiere Pro CC

Tip #1058: What is the Events Panel

Larry Jordan – LarryJordan.com

The Events panel explains alerts and warnings in Premiere.

An empty Events panel in Premeire.

Topic $TipTopic

The Events panel is located in the Windows menu. What does it do? Here’s the answer from the Adobe Support Community:

The Events panel lists warnings, error messages, and other information you can use to identify and troubleshoot problems, particularly those associated with plug-ins and other components from third-party developers.

An alert icon on the status bar notifies you of an error. Double-clicking the icon opens the Events panel, and clearing the associated item from the Events panel removes the icon from the status bar.

Do either of the following:

  • Double-click the alert icon in the status bar.
  • Choose Window > Events.

Then do any of the following:

  • To learn more about an item in the list, select it and click Details.
  • To clear the events list, click Clear All.

Please rate the helpfulness of this tip.

Click on a star to rate it!

… for Adobe Premiere Pro CC

Tip #1035: Bugs in Automatic Scene Detection

Larry Jordan – LarryJordan.com

Scene Detection works reliably provided you don’t unlink audio from video.

Scene detection options in Adobe Premiere Pro v. 14.4.

Topic $TipTopic

There are two significant bugs in the new automatic scene detection feature in the 14.4 update to Adobe Premiere Pro.

Scene detection reviews a clip, then adds cuts where the scene changes. This is a big help when you need to deconstruct an already-edited piece, or need to chop up DV or HDV footage where multiple takes are contained in a single clip.

NOTE: Scene detection can also create subclips or add clip markers, if that is your preference.

However, in preparing my recent webinar on the “New Features in Adobe Premiere Pro” I discovered two significant bugs in this process.

First, if you unlink audio from video for the clip you want to process, scene detection will fail more than 90% of the time. (If the clip is not unlinked, scene detection works reliably.)

Second, if you don’t want the audio cut, Adobe says you can merge the audio back into a single clip after scene detection cuts a clip. However, when the audio segments are selected in the timeline, the Merge option is disabled.

EXTRA CREDIT

The best option, if you want to cut video and not audio, is to leave the audio and video clips linked, use scene detection to cut the clip, then, delete all the audio segment except the first one, then roll trim the first clip back to its original length.


Please rate the helpfulness of this tip.

Click on a star to rate it!