… for Adobe Premiere Pro CC

Tip #987: Share Creative Cloud Libraries

Larry Jordan – LarryJordan.com

Libraries allow sharing assets between projects, computers or team members.

An empty library – waiting for you to add something in Premiere.

Topic $TipTopic

Creative Cloud libraries got a bad rap for Premiere users when they were first introduced because they were optimized for Photoshop and limited to still images. Since then, Adobe added new features and, now, they may be worth a second look.

Creative Cloud Libraries let you gather design elements for specific projects, clients, or teams for use within any of your Creative Cloud apps. Libraries help ensure you and your team access the same elements for a project throughout its life-cycle.

Creative Cloud Libraries are displayed in the Libraries panel in Premiere Pro.

Whatever you save in the Libraries panel becomes available for use across Premiere Pro projects that you are working on. You can also access libraries across projects in the following ways:

  • Across computers. Libraries are synced to Creative Cloud. Your Library becomes available on any computer that you are signed into using your Creative Cloud ID.
  • Across apps. Whatever you save in the Libraries panel becomes automatically available across desktop and mobile apps that support Creative Cloud Libraries. For example, you can access Libraries from desktop apps such as, After Effects, Photoshop, and mobile apps such as Adobe Hue.

Additionally:

  • You can create multiple libraries to separate elements from different projects.
  • You can add color grading looks to a library.
  • You can add assets from Adobe Stock
  • You can share libraries with other Creative Cloud users.
  • You can share motion graphics templates

EXTRA CREDIT

Here’s a link to learn more about what Libraries can do.


Please rate the helpfulness of this tip.

Click on a star to rate it!

… for Adobe Premiere Pro CC

Tip #952: Adobe MAX 2020 is Now Free!

Larry Jordan – LarryJordan.com

Adobe MAX – the world’s biggest creativity conference.

The Adobe MAX logo.

Topic $TipTopic

Adobe MAX, the world’s biggest creativity conference, will take place virtually October 20 – 22nd, and will feature notable creative luminaries and celebrity speakers such as Ava DuVernay, Keanu Reeves, Tyler the Creator, and Annie Leibovitz; keynotes, technology Sneaks and presentations on the latest innovations across Adobe Creative Cloud; collaborative art projects and challenges; virtual networking opportunities for creatives across the globe; and of course, hundreds of live and on-demand learning sessions for all skill levels.

MAX 2020 registration is open. This year’s creativity conference is virtual, completely free, and jam-packed with 56 hours of non-stop inspiration and learning. With live content demos, luminary speakers, Sneaks, celebrity appearances, and musical performances, this is an immersive experience you don’t want to miss.


Please rate the helpfulness of this tip.

Click on a star to rate it!

… for Adobe Premiere Pro CC

Tip #971: A Secret Tip to Moving Markers

Larry Jordan – LarryJordan.com

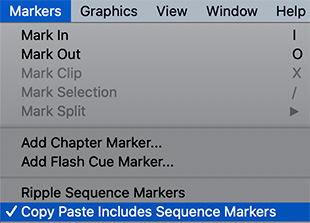
Including sequence markers means all your marker data travels with your clips.

The Markers menu, showing Copy Paste Includes Sequence Markers (I removed the middle section.)

Topic $TipTopic

There’s a feature in Premiere that’s turned off by default that you might want to enable if you use markers a lot. Here’s what it does.

At the bottom of the Markers menu is a choice that is disabled by default: Copy Paste Includes Sequence Markers.

If you are someone who adds lots of markers to your sequence, or uses marker names, colors or descriptions, you probably noticed that when you copy a clip from one sequence to another all that timeline marker information is lost when you paste. Sigh…

NOTE: This is not true if the markers are in the clips themselves; clip markers always travel with a clip.

However, when you turn this setting on, whenever you select timeline clips that have timeline markers above them, the markers will copy and paste as well as the clips.

Cool!


Please rate the helpfulness of this tip.

Click on a star to rate it!

… for Adobe Premiere Pro CC

Tip #972: A Second Secret Marker Tip

Larry Jordan – LarryJordan.com

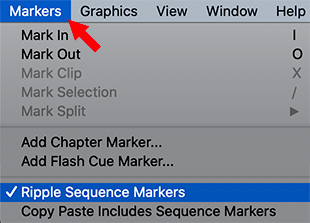
Unchecking this option locks timeline markers in place, regardless what you do with your clips.

The Ripple Sequence Markers menu option. (I removed the middle of this menu.)

Topic $TipTopic

There’s another marker secret hidden in plain sight in the Markers menu.

Ripple Sequence Markers, which is on by default, means that when you delete a clip, insert a clip, close a gap or trim a clip, if there are timeline markers above the clip you just changed, the markers will be adjusted as well.

In early versions of Premiere, timeline markers were locked into position, regardless of what you did with your clips.

Now, if you find your markers changing position when you don’t want them to, go to the Markers menu and uncheck this option.


Please rate the helpfulness of this tip.

Click on a star to rate it!

… for Adobe Premiere Pro CC

Tip #943: What is a Stacked Panel Group?

Larry Jordan – LarryJordan.com

Stacked menus are often better when working on a smaller monitor.

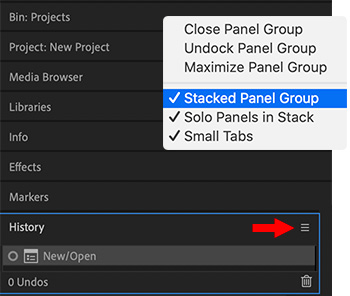
Premiere panels displayed stacked, and the menu that activates them (inset).

Topic $TipTopic

In the fly-out menu for most panels, there’s an option for “Stacked Panel Groups.” Ever wonder what this does? Here’s the answer.

When you click the fly-out menu (pancakes) next to most panel names, one of the options is Panel Group Settings.

Click it and the menu shown in the screen shot appears.

The default setting has both Stacked Panel Groups and Solo Panels in Stack unchecked.

When you check Stacked Panel Groups, all panels in that group are listed vertically (see screen shot).

When Solo Panels in Stack is checked, only the contents of the currently active panel are displayed. Otherwise, the contents of all open panels are visible.

NOTE: The Solo option only applies when panels are stacked. The benefit to using Solo is that it keeps the interface cleaner on smaller monitors.


Please rate the helpfulness of this tip.

Click on a star to rate it!

… for Adobe Premiere Pro CC

Tip #947: When to Use the Work Area Bar

Larry Jordan – LarryJordan.com

The Work Area Bar controls which section of the Premiere timeline will render.

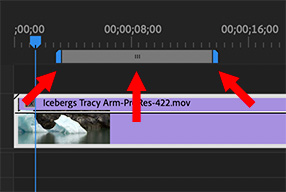
The three control areas for the work area bar: Start, Position and End.

Topic $TipTopic

The work area bar is a hold-over from the days of slower computers, but, even today, it can save you time. Here’s how to use it.

The work area bar determines what will render, when a rendering option is selected.

To enable it:

  • Click the fly-out menu next to the project name in the top left corner of the timeline and select Work Area Bar.
  • A bar (see screen shot) appears at the top of the timeline.
  • Click the small lines in the center (center arrow) and drag left or right to change its position in the timeline.
  • Drag the left or right blue edges (left and right arrows) to change its duration.

The Sequence menu has three options specific to the Work Area Bar:

  • Render Effects in Work Area. This only renders effects contained within the Work Area.
  • Render Entire Work Area. This renders everything that needs rendering within the Work Area.
  • Delete Work Area Render Files. This provides a controlled way to delete render files for a portion of the timeline without deleting all render files.

The benefit to using the work area is that you can control what you render and when. If you have a complex project, or a slow computer, rendering in small sections allows you to see the finished result for just the section you are working on quickly, without wasting time with a length render of your entire project.


Please rate the helpfulness of this tip.

Click on a star to rate it!

… for Adobe Premiere Pro CC

Tip #948: What’s a Rectified Waveform?

Larry Jordan – LarryJordan.com

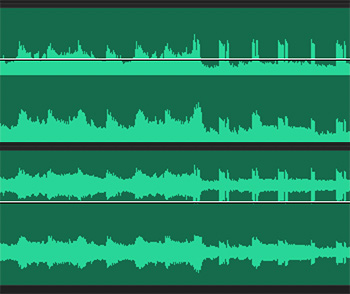
Rectified audio displays only the positive half of an audio waveform.

The same audio clip displayed as rectified audio (top) and full audio wave (bottom).

Topic $TipTopic

Another timeline display option in Premiere is “Rectified Audio Waveforms.” Any guesses what these are – and why you might use them?

All audio is a wave that travels through the air from its point of origination to our ears; or a microphone. When the sound is recorded, it is recorded as a wave, where the audio has both positive and negative values above and below a centerline. That centerline is defined as the place where audio has no volume.

The farther audio gets from the centerline, the louder it becomes.

However, seeing audio as a wave makes it harder to determine volume, because the loudest portions of a clip are at both the top and bottom of the wave.

To solve this problem, Premiere, like other NLEs, displays only half the audio wave – the positive values which are above the zero (center) line. This “sliced” version of audio is called “rectified.”

The entire wave is still captured and processed, but only the top half is displayed.

You can turn this display on or off using the fly-out (pancake) menu in the top-left corner of the timeline, next to the sequence name and uncheck Rectified Audio Waveforms.

The benefit to seeing the full wave is that, rarely, there may be audio level differences on one side of the wave but not the other. Most of the time, though, displaying audio as rectified will be fine.


Please rate the helpfulness of this tip.

Click on a star to rate it!

… for Adobe Premiere Pro CC

Tip #929: Create & Remove Proxies FAST!

Larry Jordan – LarryJordan.com

Proxies are becoming increasingly easy to manage in Premiere.

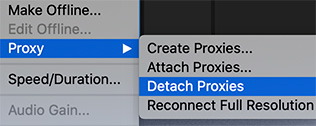
The options in the Proxy menu for the Premiere July, 2020, update.

Topic $TipTopic

A new feature in the July, 2020, update to Premiere is the ability to remove proxies from your clips. Here’s how this works.

CREATE PROXIES

If you don’t create proxies during import, you can easily create them once files are in the Project Panel.

  • Right-click one or more selected clips in the Proxy panel and choose Proxy > Create Proxies.

DELETE PROXIES

  • When you are done with your edit and want to save storage space, right-click one or more deleted clips in the Project panel and choose Proxy > Delete Proxies.

This delete feature is new with the latest update to Premiere.


Please rate the helpfulness of this tip.

Click on a star to rate it!

… for Adobe Premiere Pro CC

Tip #930: A Quick Way to Focus Faster

Larry Jordan – LarryJordan.com

This is a fast way to focus on what you need to see right now.

Topic $TipTopic

A new feature in the July, 2020, update to Premiere Pro is the ability to close all projects EXCEPT the one you are working on. This is a great way to quickly get rid of clutter to focus on what you are working on right now. Here’s how this works.

If you are working in a production, or if you have multiple projects open, you can now close all other projects except for the one you are working on.

You can do this by:

  • Click File > Close All Other Projects
  • Select one or more projects in the Production panel, right-click and choose Close All Other Projects.
  • In the Project panel menu, choose Close All Other Projects.

Please rate the helpfulness of this tip.

Click on a star to rate it!

… for Adobe Premiere Pro CC

Tip #931: What is a Project Shortcut?

Larry Jordan – LarryJordan.com

Project shortcuts allow you to import projects as separate project panels.

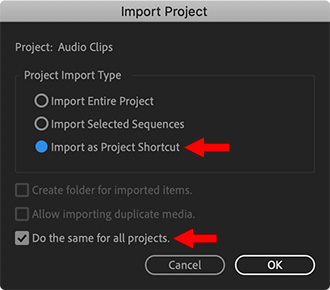
The Import Project dialog. Premiere seems to ignore the bottom checkbox.

Topic $TipTopic

Something new appeared in the File menu in the spring of 2020: a Project Shortcut. What is this?

Starting with Premiere Pro 14.1, Shared Projects have been renamed as Project Shortcuts. Project Shortcuts are quick links to open other projects. You can import projects as project shortcuts.

To import projects as project shortcuts:

  • Click File > Import and select the project file that you want to import.
  • In the Import Project dialog box, select Import as Project Shortcut and click OK.

The project is imported and can be seen in the Project panel as a folder icon with an icon indicating that it is a link to the project.

Double-click this link to open a new Project panel for that imported project.

You can make this the default option for all imported projects by checking the “Do the same for all projects” checkbox at the bottom. But, even when you check this, the Project Import dialog will appear each time you open a new project. So, I’m not sure what good checking this box does.

EXTRA CREDIT

If you have shared projects from older versions of Premiere Pro, continue to work with them using Project Shortcuts. If you are collaborating on new projects with others, consider trying the Production workflow.


Please rate the helpfulness of this tip.

Click on a star to rate it!