… for Adobe Premiere Pro CC

Tip #856: Create a New Sequence Preset – FAST!

Larry Jordan – LarryJordan.com

Sequence presets are used to conform clips to match a standard.

Click the “stacked pancakes” icon to reveal a hidden timeline menu.

Topic $TipTopic

The problem with creating sequence presets is that you need to know a LOT of technical specs to accurately create one. Wouldn’t it be great if there was an easier way? There is! Here’s how.

  • Create a sequence by dragging a clip with the specs you need – codec, frame size, frame rate and so on – onto the “folded paper” icon in the low-right corner of the Project panel. Most of us do this all the time.
  • Go to Sequence > Sequence Settings and verify those are the specs you need. (This step isn’t required, but it’s a good idea to double-check.)
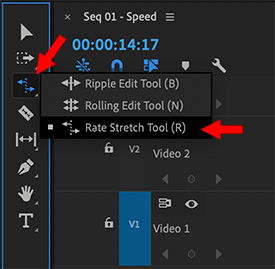
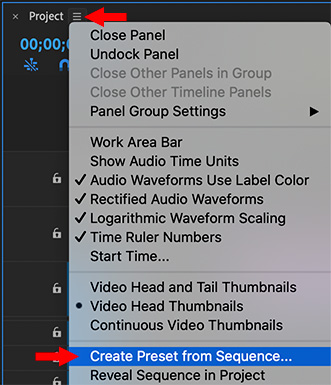
  • Then, click the “stacked pancakes” icon next to the Project name in the timeline (see screen shot) and select Create Preset from Sequence.
  • The Sequence Preset dialog window opens, allowing you to name this new setting and add a description.
  • Click OK to save it.

Done.

EXTRA CREDIT

The benefit to creating a sequence preset is that when you add clips to the sequence that don’t match the setting, they will automatically be “conformed” or transcoded to math the sequence settings.

This solves the problem of not having a clip with the right specs to initially configure a sequence.


Please rate the helpfulness of this tip.

Click on a star to rate it!

… for Adobe Premiere Pro CC

Tip #857: Customize Your Playback Controls

Larry Jordan – LarryJordan.com

Customizing playback controls simplifies proxy workflows, creating still frames and other tasks.

The Button Editor panel for the Program Monitor in Premiere Pro.

Topic $TipTopic

One of Adobe’s goals over the last several releases was to simplify the Premiere interface. (Because, truthfully, it was getting pretty darn crowded…) This simplification took the form of removing buttons. But… what if you need one of those buttons back? Not to worry – here’s how.

  • In the Program Monitor or Source Monitor, click the small plus sign in the lower-right corner.
  • This displays the Button Editor. (See screen shot.)
  • Hover over a button to read a description of what the button does.
  • To add a button to the control panel, drag it from the upper section into the blue controls box. For example, I added the Proxy button to the controls box to make it easy to toggle between Proxy and High-quality view.
  • To remove a controls button, drag it out of the blue box.
  • To reset the controls box back to factory defaults, click the Reset Layout button.
  • Then, when you are done, click OK.

Please rate the helpfulness of this tip.

Click on a star to rate it!

… for Adobe Premiere Pro CC

Tip #834: An Even Faster Way to Change Clip Speed

Larry Jordan – LarryJordan.com

The Rate Stretch tool is a fast way to change the speed of clip.

Select the Rate Stretch tool from the tools palette.

Topic $TipTopic

When you need to change the speed of a clip, you can use the Rate/Duration window. Or… you can use this tool – which is MUCH faster!

The Rate Stretch tool (Shortcut: R) changes the speed of a clip as you drag an edge.

Select it from the Tools palette, then drag the edge of a clip whose speed you want to change. The new duration is displayed next to the tool as you drag the edge of a clip.

Dragging a clip longer slows it down, dragging a clip shorter speeds it up.

EXTRA CREDIT

The Speed/Duration dialog (Shortcut: Cmd + R) provides more options and greater precision, but for sheer speed, the Rate Stretch tool can’t be beat.


Please rate the helpfulness of this tip.

Click on a star to rate it!

… for Adobe Premiere Pro CC

Tip #838: A Visual Way to Animate Effects

Larry Jordan – LarryJordan.com

The timeline provides an easy way to add keyframes and animate effects.

Control-click the small Fx badge to display keyframe controls for a clip.

Topic $TipTopic

You probably know that you use keyframes to animate effects and that you can create keyframes in the Effects Panel. But… there’s a faster way, hidden in plain sight.

Control-click the small Fx badge in the top right corner of the clip you want to animate.

From the pop-up menu (see screen shot) select the parameter you want to animate with keyframes. The benefit to using the timeline to create keyframes is that you can sync them more easily with other clips located above or below the clip you are adjusting.

A thin, horizontal, white line appears in the selected clip.

  • Cmd-click to add a keyframe
  • Drag the keyframe up/down to change the value.
  • Drag the keyframe left/right to change the timing.
  • Control-click the keyframe to add curves or acceleration.
  • Control-click the keyframe to delete it.

EXTRA CREDIT

Use the Pen tool (Shortcut: P) to select and change multiple keyframes at once.


Please rate the helpfulness of this tip.

Click on a star to rate it!

… for Adobe Premiere Pro CC

Tip #839: FX Badge Colors Actually Mean Something

Larry Jordan – LarryJordan.com

Badge colors can help you quickly spot which clips have effects applied.

The four colors of clip Fx badges.

Topic $TipTopic

Have you ever wanted to know which clips in your sequence have effects applied to them? Or, have you ever want to know which clips have specific effects applied to them? Well, there’s an easy way to find out – check the color of the FX badge!

  • Gray. No effects applied.
  • Green. A Motion effect (position, scale…) is applied to a clip.
  • Yellow. A speed change or keyframe effect is applied.
  • Purple. An effect from the Effects panel is applied.

EXTRA CREDIT

I looked these up, here’s Adobe’s official list of badge colors:

FX badge color Denotes
Gray No effect applied (default badge color)
Purple Non-intrinsic effect applied (like, color correction, blur)
Yellow Intrinsic effect modified (like, position, scale, opacity)
Green Intrinsic effect modified and additional effect applied
Red underline Master Clip effect applied

Please rate the helpfulness of this tip.

Click on a star to rate it!

… for Adobe Premiere Pro CC

Tip #821: Export a Sequence Range

Larry Jordan – LarryJordan.com

Premiere makes it easy to export full sequences – or just segements.

The blue line at the bottom of the Export Media window supports setting an In or Out.

Topic $TipTopic

When you need to export just a portion of a sequence, Premiere makes it easy – but not obvious. Here’s how.

  • Open the sequence you need to export.
  • Set an In and Out in the timeline to mark the section you want to export.
  • Choose File > Export > Media (Shortcut: Cmd + M).
  • In the export window, on the left, the In and Out are shown in the blue timeline at the bottom (screen shot, red arrow).

EXTRA CREDIT

If you select Export Media, and forget to set an In or Out, no problem. In the timeline on the left of the Export Media window you can set the In or Out by dragging a white triangle or typing “I” and/or “O”.

To alter or remove an In or Out, regardless of how it was set, drag the white triangle left or right. There is no “instant reset button.”


Please rate the helpfulness of this tip.

Click on a star to rate it!

… for Adobe Premiere Pro CC

Tip #823: Voice-Over Recording Settings

Larry Jordan – LarryJordan.com

The secret is to Control-click the mic icon for the track you want to record in.

The Voice-Over Recording dialog window.

Topic $TipTopic

Another hidden feature inside Premiere is the voice-over recording settings. Most of the time, when you need to record audio, you’ll do that outside Premiere. But, to quickly create narration scratch tracks, nothing beats recording directly in Premiere. Here’s how.

  • Control-click the small, white mic icon in the track header for the track you want to record on.
  • Select Voice Over Recording Settings from the pop-up menu. This displays the dialog shown in the screen shot.

OPTIONS

  • Name. This names the clip you are about to record. As always, you can change the clip name later.
  • Source. The specifies which mic to use. I use an external headset mic, digitized using a Scarlet 2i2 A/D conveter.
  • Input. This specifies which channel the mic is on. A stereo input has two channels.
  • Sound cues. When you start recording, Premiere displays a countdown. If you also want the countdown to beep, check this box.
  • Preroll. When you start recording, this determines how many seconds to back up before starting recording.
  • Postroll. If you set an Out to determine the end of a recording, this determines how many seconds after the Out to continue recording, in case the voice talent’s timing isn’t perfect.
  • Click OK to accept the revised settings.

NOTE: The audio meters at the bottom display the input level of your mic. In general, set levels so that you are recording around – 12 dB. You can adjust these later during the final mix.

RECORDING

  • You can mark an In and Out in the timeline to specify where the recording will start and end. Or simply place the playhead where you want the recording to start.
  • Click the Mic icon again to start recording.
  • Press the spacebar to stop.

EXTRA CREDIT

I rarely set an In or Out, most voice talent, including me, wants the freedom to make mistakes. It is easy to edit a recording later to clean up mistakes, or configure it to hit a specific time.


Please rate the helpfulness of this tip.

Click on a star to rate it!

… for Adobe Premiere Pro CC

Tip #824: A Fast Way to Change Clip Speed

Larry Jordan – LarryJordan.com

All changes adjust the speed of the entire clip by the same amount.

The Clip Speed / Duration dialog in Adobe Premiere Pro.

Topic $TipTopic

A lot of key features in Premiere are hidden – unless you know where to look. Here’s another one: the Clip Speed/ Duration dialog. Here’s what it does.

To open the dialog shown in the screen shot, select one or more clips and type Cmd + R. (You can also choose Clip > Speed/Duration, but menus are boring.) This dialog allows changing the speed of a clip by typing in a percentage change or the duration you need it to match.

NOTE: Not all speed changes yield good results. I’ve found the best success using speed percentages that divide equally into 200.

The Reverse Speed checkbox plays a clip backwards.

By default, changing the speed of a clip also changes its duration. This means that an upstream clip, that is slowed down, will crash into the clip next to it. Checking the Ripple Edit box moves downstream clips out of the way.

Time Interpolation is only relevant when the speed of a slow-motion clip goes below 15%. Most of the time, you’ll get the best results leaving this set to Frame Sampling.


Please rate the helpfulness of this tip.

Click on a star to rate it!

… for Adobe Premiere Pro CC

Tip #799: A Faster Way to Remove Keyframes

Larry Jordan – LarryJordan.com

The Pen tool does more than draw, it can also select… keyframes, for instance.

The Pen tool is selecting audio keyframes to modify or remove.

Topic $TipTopic

I discovered this tip while researching a recent webinar covering the basics of editing in Premiere.

During my demo, I found myself with a number of audio keyframes that I needed to remove. While I could – and did – Control-click each keyframe to remove it, I wondered if there was a faster way.

And there is!

  • Select the Pen tool (Shortcut: P), then drag a selection rectangle INSIDE the clip. It will select any keyframe that it touches.
  • Then, press the big Delete key to remove them.

Done!

NOTE: The cool thing about this process is that you can quickly remove one, several or all the keyframes in a clip. This isn’t an “all-or-nothing” technique.


Please rate the helpfulness of this tip.

Click on a star to rate it!

… for Adobe Premiere Pro CC

Tip #801: Change the Default Video Transition

Larry Jordan – LarryJordan.com

Any video transition can be set as the default.

Control-click any video transition to set it as the default transition.

Topic $TipTopic

I re-discovered this tip while researching a recent webinar covering the basics of editing in Premiere.

The default video transition is a standard cross-dissolve, but you can change this setting at any time. Here’s how.

  • In the Effects panel, find the video transition you want to use as a default.
  • Control-click the name of the transition, then select Set Selected to Default Transition.

That’s it.

NOTE: To quickly apply the default video transition, select the edit point, clip, or clips you want to apply it to, then type Cmd + D. (Windows type Cntrl + D).

EXTRA CREDIT

The default audio transition is a cross-fade. You can change the default duration for both audio and video transitions in Preferences > Timeline.


Please rate the helpfulness of this tip.

Click on a star to rate it!