… for Adobe Premiere Pro CC

Tip #803: Optimize the Audio Meters

Larry Jordan – LarryJordan.com

Modifying the audio meter display helps us better control audio levels.
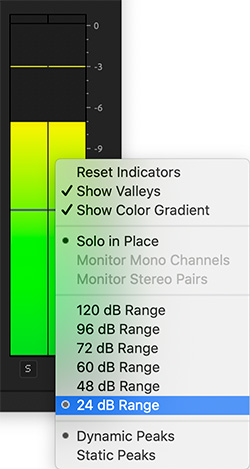
Control-click inside the audio meters to display this configuration menu.

Topic $TipTopic

The configuration settings for the audio meters in Premiere aren’t “bad,” but they can be optimized to better monitor audio for the video editing most of us do.

Control-click inside the audio meters to display the configuration menu shown in this screen shot. These settings illustrate how I customize the audio meters for my work.

  • Dynamic Peaks. This is the yellow bar at the top, showing the loudest level of your audio for the last second.
  • Show Color Gradient. This displays a smooth color shift from green to red as levels increase.
  • 24 dB Range. We don’t really care about how soft our audio is. We care about how loud it is. This displays just the top 24 dB of a mix. Since we want peaks to bounce between -3 and -6 dB for video posted to social media, this provides the clearest indication of audio level.
  • Show Valleys. These are the blue bars in the middle of the color gradient, showing how soft our audio has been during the last second.

Try these settings and see if they don’t give you a better idea of your audio levels.


Please rate the helpfulness of this tip.

Click on a star to rate it!

… for Adobe Premiere Pro CC

Tip #766: Faster Ways to Import Media

Larry Jordan – LarryJordan.com

I knew these tips – once – but over the years I forgot them. Here they are, again.

Double-click in an empty area of the Project panel to open the Import dialog.

Topic $TipTopic

As I was researching last week’s webinar on Adobe Premiere, I re-discovered two tips for faster imports and easier clip organization. It was good to relearn these, because both can save you time.

TIP #1

I’m a keyboard junkie, so I long ago developed the habit of typing Cmd + I to import media.

But, sometimes, the mouse is even faster: Double-click anywhere in the dark gray area of the Project panel (red arrow) to open the Import dialog.

TIP #2

I’m a fan of organizing media as much as possible on my hard disk before starting a project. Specifically, I create a single master folder for project media, then create subfolders. This could be subfolders for each camera card or stills or audio or whatever grouping makes sense to you.

Then, when it’s time to import, I select all the subfolders and Premiere imports each folder into its own bin; as you can see in the screen shot.

EXTRA CREDIT

These folders are not dynamic. That means that if you add clips to a Finder folder after importing, Premiere does not automatically update the bin with the new media.


Please rate the helpfulness of this tip.

Click on a star to rate it!

… for Adobe Premiere Pro CC

Tip #769: Two Keyboard Shortcut Secrets

Larry Jordan – LarryJordan.com

Shortcuts in Premiere are far more flexible than you might at first think.

Two shortcuts are applied to the top “Fit,” while both “Fits” share the same shortcut.

Topic $TipTopic

As I was researching last week’s webinar on Adobe Premiere, I re-discovered some hidden secrets about keyboard shortcuts.

Tip #1

You can apply multiple keyboard shortcuts to the same menu. For example, in the screen shot, I applied two shortcuts to the top menu (right red arrow).

  • To add a shortcut, double-click in the shortcut column to open a shortcut field.
  • To add a second shortcut, double-click just to the right of any existing shortcut.

NOTE: I added a second shortcut in the screen shot just to illustrate where to click and what it looks like.

An example of where two shortcuts are helpful is that I applied both “V” and “A” to the Selection tool. Why? Because I frequently shift between Premiere and Final Cut and trying to figure out which shortcut to use to access the most basic of tools was driving me nuts.

Tip #2

You can apply the same shortcut to two different menu items. (See screen shot.)

For example, there is no default “Fit to Window” shortcut for either the Source Monitor or Program panel. So, I searched for “fit” in the Keyboard Shortcuts panel, then applied a new shortcut (Shift + Z) to both.

Now, whether I’m in the Source Monitor or Program panel, typing Shift + Z fits the image into the window.

Cool.

EXTRA CREDIT

I don’t know the actual upper limit, but you can add at least five different shortcuts to the same menu, if you want to get that carried away.


Please rate the helpfulness of this tip.

Click on a star to rate it!

… for Adobe Premiere Pro CC

Tip #787: Change Label Color Defaults

Larry Jordan – LarryJordan.com

Labels can help organize complex projects.

The Label Defaults section of Preferences > Labels.

Topic $TipTopic

As I was researching last week’s webinar on Adobe Premiere, I re-discovered some interesting facts about labels.

Labels can be used to:

  • Color clips in the timeline
  • Add color patches to media and sequences in the Project panel

I often use colors to flag dialog, B-roll, or stock footage clips. While totally optional, colors can help you organize a complex project. You can assign any color to anything, though there are default settings (see Tip #3).

To apply a color to an element in the Timeline or Project panel, select the object(s), then choose Edit > Label.

NOTE: You can also control-click a clip and choose Label, but the Edit menu allows you to select multiple elements and change them all at the same time.

TIP #1

  • In Preferences > Labels, there are 16 different colors you can select from.
  • To change a color, double-click the color chip.

TIP #2

  • To change the name of a color, double-click the name and type the new text.

TIP #3

  • To change the default color of a type of clip – for example, a sequence – select the color name from the Label Defaults section of the Labels preference panel.

Please rate the helpfulness of this tip.

Click on a star to rate it!

… for Adobe Premiere Pro CC

Tip #770: Enable Automatic Project Saving

Larry Jordan – LarryJordan.com

Save projects automatically whenever autosave creates a backup.

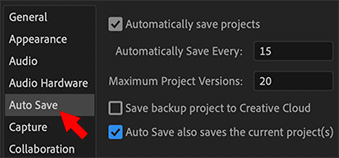
The Auto Save preference with automatic project saving enabled.

Topic $TipTopic

A hidden feature in Premiere is the ability to save projects whenever Auto Save creates backups. However, this feature is off by default. Here’s how to turn it on.

Open Preferences > Auto Save and check the bottom checkbox: “Auto Save also saves the current project(s).”

Now, when Premiere creates a backup of your current project, it will also save that project.

EXTRA CREDIT

Auto Save is designed to save every 15 minutes (or whatever time you’ve entered for “Automatically Save Every”). However, Auto Save does not run if nothing has changed in the project during that time.

Keep in mind that this should NOT substitute for you saving your work. This feature simply makes sure that, if a crash occurs, you don’t lose everything. For this reason, don’t rely exclusively on Premiere to save your work. Cmd/Cntrl + S is still your best friend.


Please rate the helpfulness of this tip.

Click on a star to rate it!

… for Adobe Premiere Pro CC

Tip #771: Add Keyboard Shortcuts for Marker Colors

Larry Jordan – LarryJordan.com

These shortcuts can add new markers or change existing ones.

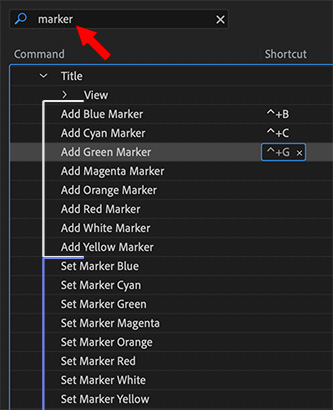
The Add and Set marker color options in the keyboard shortcuts panel.

Topic $TipTopic

A new feature in the May, 2020, update for Premiere is the ability to add keyboard shortcuts for marker colors. This means that we can easily color-code new or existing markers to help us organize our projects.

However, by default, these keyboard shortcuts are not assigned. Here’s how to enable them.

  • Open the Keyboard Shortcuts panel.
  • Search for “marker”
  • Scroll down to the Title section.
  • Add keyboard shortcuts for the colors you want to use.
    • Add [color] Marker. Changes the marker color and adds a marker with that color at the position of the timeline.
    • Set [color] Marker. Changes the marker color of an existing – and selected – marker.

Please rate the helpfulness of this tip.

Click on a star to rate it!

… for Adobe Premiere Pro CC

Tip #772: A Preference for Faster Trimming

Larry Jordan – LarryJordan.com

These preference settings are off by default.

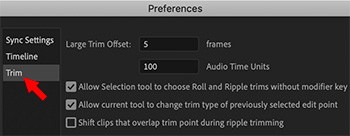
Trim preference settings in Premiere. Check the top box.

Topic $TipTopic

There is a trimming preference setting that can speed trimming your clips. However, it is off by default. Here’s what you need to know to turn this on.

Open Preferences > Trim and check the top box.

  • Allow Selection tool… This changes the cursor to the Ripple or Roll trimming tools depending upon where it is located relative to the edit point.

For example, hover the cursor near the Out and the cursor changes to a Ripple trim. Hover it over the edit point, and it automatically changes to a Roll trim. Near the In switches to the Ripple tool again.

When this option is not checked, hovering over an edit point displays the Trim In/Out tool, which is less helpful than Ripple and Roll.


Please rate the helpfulness of this tip.

Click on a star to rate it!

… for Adobe Premiere Pro CC

Tip #753: Basic Color Correction

Larry Jordan – LarryJordan.com

These controls provide detailed control over the grayscale values in your image.

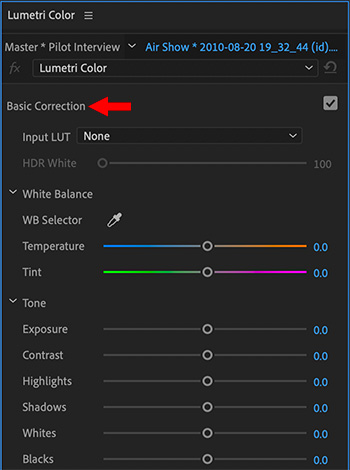
The Basic Color Correction controls in the Lumetri Color panel.

Topic $TipTopic

Using controls in the Basic Correction section, you can correct video that’s too dark or too light, and adjust both the hue (color or chroma) and luminance (exposure and contrast) in your clip. Here’s how the Basic Color Correction controls work.

WHITE BALANCE

  • White Balance. The white balance in a video reflects the lighting conditions under which the video was shot. Adjusting the white balance can effectively improve the ambient color of your video. Adjust the white balance in your clip by changing the Temperature and Tint properties. Use the slider controls to fine-tune the values until you achieve the desired color balance.
  • Temperature. Fine-tunes the white balance using a color temperature scale. Move the slider to the left to make the video appear cooler, and to the right for warmer colors.
  • Tint. Fine-tunes the white balance to compensate for a green or magenta tint. To add green tint to the video, move the slider to the left (negative values), and to add magenta, move it to the right (positive values).

TONE

Adjust the tonal scale of the video clip using the different tone controls.

  • Exposure. Sets the brightness of the video clip. Moving the Exposure slider to the right increases tonal values and expands highlights, and moving the slider to the left decreases tonal values and expands shadows. Adjust the slider until the video looks good with the desired brightness.
  • Contrast. Increases or decreases contrast. Adjusting the contrast mainly affects the midtones of color in your video. When you increase contrast, the middle-to-dark areas become darker. Similarly, decreasing the contrast makes the middle-to-light areas lighter.
  • Highlights. Adjusts bright areas. Drag the slider to the left to darken highlights. Drag to the right to brighten highlights while minimizing clipping.
  • Shadows. Adjusts dark areas. Drag the slider to the left to darken shadows while minimizing clipping. Drag to the right to brighten shadows and recover shadow details.
  • Whites. Adjusts white clipping. Drag the slider to the left to reduce clipping in highlights. Drag to the right to increase highlight clipping.
  • Blacks. Adjusts black clipping. Drag the slider to the left to increase black clipping, making more shadows pure black. Drag to the right to reduce shadow clipping.

Please rate the helpfulness of this tip.

Click on a star to rate it!

… for Adobe Premiere Pro CC

Tip #754: Set Grayscale Values FAST!

Larry Jordan – LarryJordan.com

One Button Access to Better Grayscale

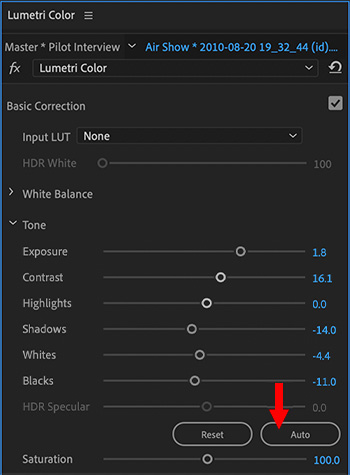
At the bottom of Basic Correction, click Auto to set overall grayscale tonal values.

Topic $TipTopic

The most frequent color adjustment we need to make to a clip isn’t color at all, but grayscale. Here’s a one-button trick to set grayscale values faster and better in Premiere Pro.

  • Open the Lumetri Color panel, then click Basic Correction.
  • At the bottom of that section is Auto.
  • When you click Auto, Premiere Pro sets the sliders to maximize the tonal scale and minimize highlight and shadow clipping.

Clicking this sets all the parameters in Tone automatically. You can then tweak each of them to get precisely the look you want. All changed settings are adjustable.


Please rate the helpfulness of this tip.

Click on a star to rate it!

… for Adobe Premiere Pro CC

Tip #755: What the Creative Looks Adjust

Larry Jordan – LarryJordan.com

Looks are fast, but the settings provide more flexibility.

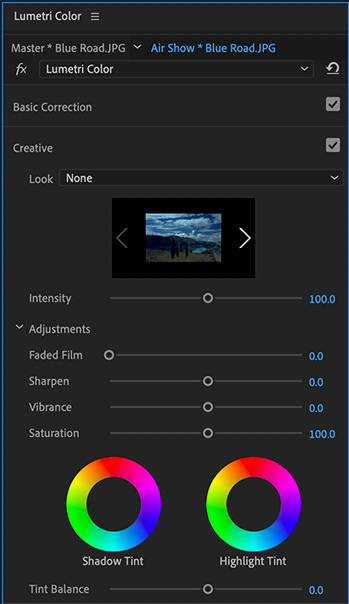
The Creative Looks section of the Lumetri Color panel.

Topic $TipTopic

The Looks section of the Lumetri Color panel provides quick settings to adjust the creative look of a clip. Here’s what the different options do.

  • Faded Film. Applies a faded film effect to your video. Drag the sliders to the right or left until you achieve the desired vintage look.
  • Sharpen. Adjusts edge definition to create a sharper-looking video. Drag the slider to the right to increase the edge definition, and drag to the left to decrease the edge definition. An increased edge definition makes the details in the video more pronounced. So, make sure that you don’t sharpen the edges too much that it looks unnatural.

NOTE: To turn off sharpening, set the slider to zero (0).

  • Vibrance. Adjusts the saturation so that clipping is minimized as colors approach full saturation. This setting changes the saturation of all lower-saturated colors with less effect on the higher-saturated colors. Vibrance also prevents skin tones from becoming oversaturated.
  • Saturation. Adjusts the saturation of all colors in the clip equally from 0 (monochrome) to 200 (double the saturation).
  • Tint wheels. Adjust the tint values in the shadows and highlights using the Shadow Tint and Highlight Tint wheels. Wheels with empty centers indicate that nothing has been applied. To apply the tint, click in the middle of the wheel and drag the cursor to fill in the wheels.
  • Tint Balance. Balances out any excess magenta or green in the clip.

EXTRA CREDIT

My recommendation, if you need to make a saturation adjustment, is to use Vibrance, rather than Saturation, to prevent chroma clipping.


Please rate the helpfulness of this tip.

Click on a star to rate it!