… for Adobe Premiere Pro CC

Tip #736: Auto Save Secrets

Larry Jordan – LarryJordan.com

Auto Save Preferences in Adobe Premiere Pro 2020.

Topic $TipTopic

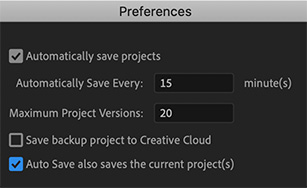
Auto Save makes backups of your projects. But, what do all the Auto Save preference settings do?

  • Automatically Save Projects. By default, Premiere Pro automatically saves your project every 15 minutes and retains the last five versions of the project file on the hard disk.

    You can revert to a previously saved version at any time. Archiving many iterations of a project consumes relatively little disk space because project files are much smaller than source video files. It’s best to save project files to the same drive as your application. Archived files are saved in the Premiere Pro Auto-Save folder.

  • Maximum Project Versions. Enter the number of versions of a project file you want to save. For example, if you type 10, Premiere Pro saves the ten most recent versions.

NOTE: When you specify auto-save to occur at regular intervals, Premiere Pro auto-saves a project on detecting changes to the project file. The auto-save occurs irrespective of whether you manually save the changes to the project or not. Earlier, Premiere Pro would not execute auto-save if you manually saved within the interval setting. If the system goes idle for a period beyond the interval setting, Premiere Pro forces an auto-save.

  • Save Backup Project To Creative Cloud. To let Premiere Pro auto-save your projects directly to your Creative Cloud-based storage, select this preference.

    When Premiere Pro auto-saves a project, a directory named “auto-save” is created in your Creative Cloud online storage. All the backed-up projects are stored in the “auto-save” directory.

    You can access your backed-up projects from the Files tab of your Creative Cloud desktop application.

  • Auto Save also saves the current project(s). When this setting is enabled, Auto Save creates an archived copy of your current projects, but also saves the current working project. This setting is off by default.

    Auto saved versions have a suffix with the date and time it was saved (yy-mm-dd-hh-mm-ss) appended to the project name (for example, ProjectName-2018-08-31_09-53-41.prproj).

    When an auto save occurs, Premiere Pro creates a new backup project file and adds it to the auto-save folder as an emergency project backup. This file is always the latest saved version of that project. Here are some of the characteristics of the emergency back project file:

    • The backup file has the same name as the project, it does not have any suffix.
    • Premiere Pro produces only one emergency backup file per project, and it is overwritten at each Auto Save interval and when you save the current project.

Please rate the helpfulness of this tip.

Click on a star to rate it!

… for Adobe Premiere Pro CC

Tip #737: 5 Interesting Audio Preferences

Larry Jordan – LarryJordan.com

Not all of these are enabled. Check your preferences to be sure.

A detail of Preferences > Audio in Adobe Premiere Pro 2020.

Topic $TipTopic

The last time you looked at all the audio preference settings, you probably just wondered what these did and moved on. Well, let me explain five of the most interesting.

  1. Large Volume Adjustment. This preference lets you set the number of decibels to increase when using the Increase Clip Volume Many command.
  2. Play Audio While Scrubbing. Enables audio scrubbing. You can create a keyboard shortcut called “Toggle Audio During Scrubbing” to toggle audio scrubbing on or off while scrubbing. Using a keyboard shortcut is preferable to returning to the Preferences dialog box each time you want to turn audio scrubbing on or off.
  3. Maintain Pitch While Shuttling. Lets you maintain the audio pitch during scrubbing and playback while using the J,K,L keys. Selecting this preference helps improve the clarity of speech when playback is at a higher or slower than normal speed.
  4. Mute Input During Timeline Recording. To prevent monitoring of the audio inputs while recording the timeline, check this box.
  5. Render Audio When Rendering Video. To let Premiere Pro automatically renders audio previews whenever it renders video previews, select this preference.

Please rate the helpfulness of this tip.

Click on a star to rate it!

… for Adobe Premiere Pro CC

Tip #739: Premiere: No Support for FireWire DV Capture

Larry Jordan – LarryJordan.com

FireWire capture of DV media is no longer supported on Macs.

Topic $TipTopic

This tip first appeared on Adobe’s support page. While this won’t affect a lot of folks, it is still worth knowing.

Starting with macOS 10.15 Catalina, Premiere Pro, Audition, and Adobe Media Encoder no longer support the capture of DV and HDV over FireWire.

This change does not impact other forms of tape capture.
You can still edit DV/HDV files that have previously been captured.
DV/HDV capture is still available with Premiere Pro on Windows.

WORKAROUND

If you need access to DV/HDV ingest you can:

  • On macOS: Use Premiere Pro 12.x and 13.x on macOS 10.13.6 (High Sierra) or 10.14 (Mojave)
  • On Windows: Continue to use the latest versions of Premiere Pro with no impact.

Please rate the helpfulness of this tip.

Click on a star to rate it!

… for Adobe Premiere Pro CC

Tip #697: What Is the Alpha Channel?

Larry Jordan – LarryJordan.com

Alpha channels define the amount of translucency for each pixel.

When viewing alpha channels, black is transparent, gray is translucent and white is opaque.

Topic $TipTopic

Just as the red, green and blue channels define the amount of each color a pixel contains, the alpha channel defines the amount of transparency each pixel contains.

A pixel can be fully transparent, fully opaque or somewhere in between. By default, every video pixel is fully opaque.

NOTE: The reason we are able to key titles over backgrounds is that titles contain a built-in alpha channel that defines each character as opaque and the rest of the frame as transparent.

To display the alpha channel in a clip, click the Wrench icon in the lower-right of the Program Monitor and select Alpha. To return to a standard image, select Composite.

While we can easily work with alpha channels inside Premiere, in order to export video that retains transparency information, we need to use the ProRes 4444 or Animation codecs. No other ProRes, HEVC or H.264 codec supports alpha channels.


Please rate the helpfulness of this tip.

Click on a star to rate it!

… for Adobe Premiere Pro CC

Tip #725: Change Your Look – Use Lighting Effects

Larry Jordan – LarryJordan.com

Lighting Effects provide a range of ways to modify the look of a clip with light.

Lighting effects: Source (left), Spotlight (center), Omnilight (right)

Topic $TipTopic

This tip originally appeared as an Adobe Help page article. This is an excerpt.

You can use up to five lights to introduce creative effects. You can control such lighting properties as lighting type, direction, intensity, color, lighting center, and lighting spread. There is also a Bump Layer control for using textures or patterns from other footage to produce special effects such as a 3D-like surface effect.

NOTE: All Lighting Effects properties except Bump Layer can be animated using keyframes.

You can directly manipulate the Lighting Effects properties in the Program Monitor. Click the Transform icon next to Lighting Effects in the Effect Controls panel to display the adjustment handles and Center circle.

NOTE: If a clip is already selected in a Timeline panel, you can drag the Lighting Effects directly to the Video Effects section of the Effect Controls panel.

  1. In the Effects panel, expand the Video Effects bin, expand the Adjust bin, and then drag the Lighting Effects onto a clip in a Timeline panel.
  2. In the Effect Controls panel, click the triangle to expand the Lighting Effects.
  3. Click the triangle to expand Light 1.
  4. Choose a light type from the menu to specify the light source.
  5. Specify a color for the light.
  6. (Optional) Click the Transform icon to display the light’s handles and Center circle in the Program Monitor. You can directly manipulate the position, scale, and rotation of a light by dragging its handles and Center circle.
  7. In Effect Controls, set each light’s properties.

EXTRA CREDIT

The link above has more details, as well as defining what each setting controls.


Please rate the helpfulness of this tip.

Click on a star to rate it!

… for Adobe Premiere Pro CC

Tip #726: How to Set the Video Scopes

Larry Jordan – LarryJordan.com

In general, set your scopes to Float and uncheck Clamp Signal.

The Lumetri video scope display options.

Topic $TipTopic This article, written by Walter Soyka, first appeared in the Creative Cow forums.

A reader asks: “By default, the Lumetri Scopes in Premiere have “Clamp Signal” checked and the drop-down menu set to “8-Bit” [see attached screenshot]. What do these mean?”

These settings control how the scopes show information to you. Don’t try to match them to specific project settings, but rather use the settings you need for the task at hand.

  • Float displays data based on Lumetri’s internal floating-point processing (0.0 – 1.0 normal scale, plus superblack below and superwhite above).
  • 8-bit displays an 8-bit video interpretation of that float data. This both reduces the precision of the display and effectively limits the waveform range from -7.5 to about 109 IRE, but it does show roughly what the signal would look like after 8-bit digital processing (if that’s part of your pipeline).
  • Clamp signal restricts the input to the scope (but not the actual output of the footage!) to a normal range of 0-255(8-bit) / 0.0-1.0 (float) / 0-100 (IRE). The Lumetri waveform normally uses a variable scale that defaults from 0-100, but can expand when superblack or superwhite colors are present in the signal. During video playback, this can cause the scope to “bounce” as the scale is dynamically adjusted for the data in the current frame. Clamp restores sanity in these situations and keeps the scale constant, but also prevents you from seeing just how much data is beyond the normal display range.
  • HDR is a special monitoring mode that displays a fixed logarithmic scale that goes well beyond the normal range on the high end; it’s meant to be used when grading for HDR displays.

For most cases, I think Float is most appropriate. Turn Clamp off when you’re trying to evaluate the potential for highlight or shadow recovery, and turn Clamp on when you want to keep the scale steady to read the scopes for playback or compare different still frames.


Please rate the helpfulness of this tip.

Click on a star to rate it!

… for Adobe Premiere Pro CC

Tip #658: Tips for Working with Photos

Larry Jordan – LarryJordan.com

Time spent prepping your photos before editing, speeds the editing process.

The Effect Control > Motion panel in Premiere.

Topic $TipTopic

This article, written by Jason Boone, first appeared in PremiumBeat.com. This is an excerpt.

Working with stills in Adobe Premiere Pro is a little bit of a different workflow than when you’re editing video. With images, you’re often dealing with a variety of resolutions and framing, you may event want to add some movement. Here are some tips.

Check the Resolution. Photographs come in all different shapes and sizes. Many have a vertical aspect ratio, while others are square or rectangular. If you plan to scale up a photo, you’ll want to make sure you have a high enough resolution to keep the image sharp, once it’s scaled.

Fit to the Frame. If you’re just looking to match an image to the sequence frame size, there’s a quick, easy way to do this. Once you have an image in your sequence, simply right-click, and select either Scale to Frame Size or Set to Frame Size.

  • Scale to Frame Size will actually resample your image, removing pixels and setting the scale to 100 percent. That means if you scale this image back up at a later time, you’ll be losing quality.
  • Set to Frame Size, on the other hand, will simply adjust the scale attribute so that the image fits perfectly in the sequence frame.
  • To change how Premiere Pro handles your photos by default, go to the Edit > Preferences > Default Media Scaling drop-down menu.

Position the Anchor Point. To reposition the anchor point, select the word “Motion” in Window > Effect Controls panel. This reveals the cross-hairs of the anchor point within the Program panel. With the cross-hairs visible, I can now easily move the anchor point.

Animate the Photo. Use keyframes in Effect Controls > Motion to add movement to your images.

EXTRA CREDIT

The PremiumBeat article, linked above, has more photo tips and a video demo.


Please rate the helpfulness of this tip.

Click on a star to rate it!

… for Adobe Premiere Pro CC

Tip #699: A Fast Way To Color Balance

Larry Jordan – LarryJordan.com

Click the WB Selector on something that’s supposed to be gray to remove color casts.

Click the WB Selector eyedropper on something gray in an image.

Topic $TipTopic

Deep inside the Lumetri Color panel is a tool that makes removing color casts a snap… well, ah, actually, a click. Here’s how it works.

  • Select the clip you want to color correct.
  • Switch to the Color workspace and open Lumetri > Basic Correction.
  • Click the WB Selector eyedropper. It won’t change color when you select it, which is distracting.
  • Click the eyedropped on something in the currently selected image that is supposed to be mid-tone gray or white.

Instantly, the image is corrected so that the color cast disappears.

EXTRA CREDIT

What this tool does is adjust temperature and tint settings to color correct the image. If you don’t like the results, you can manually adjust both sliders to improve the results.

Additionally, once the color correction is to your liking, click the Auto button at the bottom of this section to automatically set grayscale levels for the clip.


Please rate the helpfulness of this tip.

Click on a star to rate it!

… for Adobe Premiere Pro CC

Tip #700: Vibrance vs. Saturation

Larry Jordan – LarryJordan.com

Vibrance adjusts saturation, without risking clipping.

The Vibrance setting is in Lumetri > Creative panel.

Topic $TipTopic

What’s the difference between Vibrance and Saturation? Something significant, actually. Learn more here.

Both these settings are in the Lumetri > Creative panel.

  • Saturation. Adjusts the saturation of all colors in the clip equally from 0 (monochrome) to  200 (double the saturation).
  • Vibrance. Adjusts the saturation so that clipping is minimized as colors approach full saturation. This setting changes the saturation of all lower-saturated colors with less effect on the higher-saturated colors. Vibrance also prevents skin tones from becoming oversaturated.

The short answer is that when you need to adjust saturation, you may get better results by using Vibrance, than Saturation, especially if there are a lot of highlights or shadows in your image.


Please rate the helpfulness of this tip.

Click on a star to rate it!

… for Adobe Premiere Pro CC

Tip #684: System Compatibility Report

Larry Jordan – LarryJordan.com

Having performance problems? Check the System Compatibility Report.

The System Compatibility Report in Premiere Pro.

Topic $TipTopic

Have you ever wondered if your hardware is fighting Premier Pro? The System Compatibility Report holds the answers.

To display the report, choose Help > System Compatibility Report. This displays any hardware compatibility issues between your system and Adobe’s software.


Please rate the helpfulness of this tip.

Click on a star to rate it!