… for Adobe Premiere Pro CC

Tip #562: The Timeline’s Magic Wrench

Larry Jordan – LarryJordan.com

There’s a lot of configuration options in this one menu.
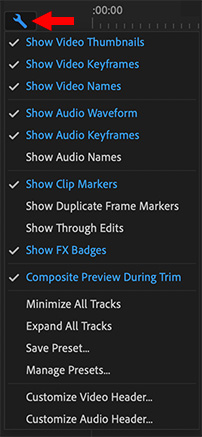
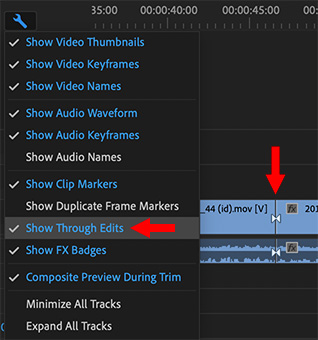
The Wrench configuration menu for Premiere’s Timeline. Blue indicates enabled features.

Topic $TipTopic

In the top-left corner of the Timeline is a wrench icon. This contains a wide variety of configuration settings to enable the timeline to look the way you want for your style of editing.

As the screen shot illustrates, features in blue are enabled, those in white are not. To toggle a feature on or off, click it.

  • Show Duplicate Frame Markers displays a blue bar at the bottom of a clip who’s frames duplicate the same clip used elsewhere in the same sequence. (This is a holdover from the days of film, when there was only one original film negative.)
  • Show Audio Names displays the file name in an audio clip. This is useful when editing dual-system sound where the audio file has a different name from the video file.
  • Show Through Edits is covered in Tip #563.
  • Minimize/Expand All Tracks is a fast way to adjust the height of all tracks in the timeline.
  • Save/Manage Presets saves these configuration settings, then switch between them as needed.
  • Customize Audio/Video Header customizes the icons displayed in the Track Header.

These provide lots of interesting customization options that you can adjust at any time.


Please rate the helpfulness of this tip.

Click on a star to rate it!

… for Adobe Premiere Pro CC

Tip #563: What’s a Through Edit?

Larry Jordan – LarryJordan.com

A Through Edit is a cut in the middle of clip with no changes on either side.

Use the timeline wrench to enable Through Edits, visible on the right.

Topic $TipTopic

There’s a hidden feature in Adobe Premiere that highlights unnecessary edits. But, it’s turned off by default. Here’s how to turn it on.

A Through Edit is a cut in a clip where there is no change on either side of the clip. Most of the time, they exist by mistake.

Still, it is good practice to get ride of them, if, for no other reason, than to avoid confusion over what’s a “real” edit and what’s a mistake.

To see them, click the Wrench icon at the top left of the timeline and enable Show Through Edits.

All Through Edits in the timeline now display a pair of white triangles, as shown under the red arrow in the screen shot.

To remove a Through Edit and rejoin the two sides of the clip, right-click the Through Edit and choose Join Through Edits.


Please rate the helpfulness of this tip.

Click on a star to rate it!

… for Adobe Premiere Pro CC

Tip #564: Master a Linked Selection

Larry Jordan – LarryJordan.com

Linked selections keep audio and video in sync.

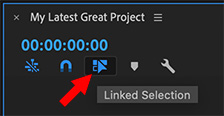
An enabled Linked Selection button in the top left of the Premiere timeline.

Topic $TipTopic

Most of the time, linking is a good thing. Except, ah, when it isn’t. Here’s a description of what it is and two ways to unlink a clip.

Most of the time, when we import a media clip, the audio and video come in together, in sync and ready to work. However, there are times where you may not want both. Perhaps you recorded audio using the camera mic and need to use audio recorded on a boom mic instead.

You could drag the audio volume of the clip to zero. But, that takes time. It would be faster to just delete the audio clip. But, every time you select the audio, the video gets selected as well.

However, the Linked Selection button shown in the screen shot, which is in the top left of the timeline, allows you to unlink the audio from the video. When this button is blue, synced clips are linked. When it is white, you are able to select the audio of a synced clip without selecting the video.

At which point, you can move or delete it.

EXTRA CREDIT

Except…. it is SUCH a hassle grabbing the mouse, dragging it all the way up to the top of the timeline and clicking it.

If only there was the option to select just one side of a clip. An option that allows us to choose just the video, or just the audio…

Smile… Well, there is. Press the Option key when clicking a synced clip and you’ll only select the side of the clip you clicked on.

NOTE: Windows users need to use the Alt key, but “Alt” is a lot harder to work into a joke.


Please rate the helpfulness of this tip.

Click on a star to rate it!

… for Adobe Premiere Pro CC

Tip #523: What is Multicam Flattening in Premiere Pro?

Larry Jordan – LarryJordan.com

Flattening is the last step in editing a multicam sequence.

Screen shots from Activity Monitor.
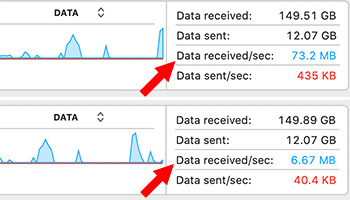
Storage bandwidth during a multicam edit (top) and after flattening (bottom).

Topic $TipTopic

Flattening disconnects unused multicam clips from the timeline. The big benefit is that it decreases the load on your storage system during playback. Here’s what you need to know.

When you are editing a multicam sequence, all the clips in your sequence are playing at once. Depending upon the codec, frame size, frame rate and bit depth you are using, this can require massive speed from your storage.

For example, in this screen shot, the top image show a multicam clip playing at 73 MB/sec. While not huge – or even large by 4K standards – this number indicates how hard your storage is working to supply all those streams in real time. (You can see this for yourself in Utilities > Activity Monitor > Disk.)

When you flatten a multicam clip, you disconnect, permanently, all the angles that you are not using in the final edit. This means that rather than playing all the clips at once, Premiere is only playing the one clip you have on screen at that instant.

As you can see in the bottom screen shot, this cuts total media bandwidth a lot!

While every multicam clip is different, the savings in unnecessary wear-and-tear on your system, combined with faster overall performance, means that when you are happy with your multicam edit flatten it.

To do so, select the multicam clip, then choose Clip > Multicamera > Flatten.


Please rate the helpfulness of this tip.

Click on a star to rate it!

… for Adobe Premiere Pro CC

Tip #532: How to Use the Rate Stretch Tool

Larry Jordan – LarryJordan.com

The Rate Stretch tool is a fast way to change the speed of a clip.

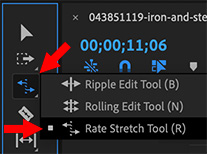
The Rate Stretch tool in the Tools panel.

Topic $TipTopic

This article first appeared in MotionArray.com. This is an excerpt.

What if you need your clip to fit an exact space in your edit? The Rate Stretch tool allows you to click and drag a clip to an exact duration, and Premiere will adjust the speed to fit the duration. To use the Rate Stretch Tool, just select it from the Tools panel, then click and drag either end of your clip to the desired length. Premiere Pro will update the speed of the clip.

Keep in mind that a problem with artificial slow motion is that in order to slow down a “shooting” frame rate, Adobe Premiere Pro must somehow generate new frames. It can do that by repeating existing frames or analyzing your footage, then automatically generating new frames.

When the software repeats existing frames, the result is a little bit choppy (which has a time and a place, too!). When it generates new frames, imperfections in the interpretation can cause warping and artifacting errors.


Please rate the helpfulness of this tip.

Click on a star to rate it!

… for Adobe Premiere Pro CC

Tip #533: Normalize Master Track Audio

Larry Jordan – LarryJordan.com

Adjusting the Master Mix guards against excessive overall levels.

Topic $TipTopic

This article first appeared in the Premiere Help Files. This is an excerpt.

Most of the time, we adjust audio levels for each clip, or create a bus and apply effects to the bus. However, you can also monitor and adjust levels in the Master track. This is a fast way to guard against excessive levels in your mix.

You can set the peak volume level for the master track of a sequence. Premiere Pro automatically adjusts the fader for the whole master track. The loudest sound in the track achieves the specified value. Premiere Pro scales any keyframes on the master track upward or downward, in proportion to the adjustment made in overall volume.

Here’s how:

  • Select the sequence you want to normalize.
  • Select Sequence > Normalize Master Track.
  • In the Normalize Track dialog box, type an amplitude value in the dB field. A good number to start with is -3 dB.
  • Click OK.

Please rate the helpfulness of this tip.

Click on a star to rate it!

… for Adobe Premiere Pro CC

Tip #463: Nests Help Organize Timelines

Larry Jordan – LarryJordan.com

Nests treat a group of clips as if they were a single clip.

Topic $TipTopic

Nesting combines multiple elements, like clips, into one “thing,” called a nest. It’s easier to perform a task on a single nest than repeat the same task on multiple clips. Nests are not only more organized, they are also more efficient. This is the basic theory of nesting in Premiere Pro.

Nesting creates a new sequence that’s stored in the original sequence. Nested sequences can live inside other sequences, and can also contain other nested sequences inside them (a nest within a nest within a nest, etc.).

When a nested sequence is created, it will have the same specifications (resolution, frame rate, etc.) as the current sequence. It will begin at the first frame of the first selected clip in the timeline and end on the last one. It won’t be linked to the parent sequence, and the timecode won’t correlate like a sub-sequence.

NOTE: Nesting high-resolution media (larger than your sequence resolution) will rasterize your footage. Scaling up the nested sequence will pixelate the image. Consider this before nesting your clips.

To create a nest:

  • Select the clips in the timeline you want to nest
  • Right-click any selected clip and choose Nest
  • Name the new sequence and click OK

The new nest appears in the timeline at the position of the selected clips.

To open a nest, double-click it. It opens as an additional sequence in the timeline.

Trim, reposition and apply effects to a nest the same as a clip. All the clips inside the nest will act as though the effect was applied to each of them.

Here’s a link to learn more.


Please rate the helpfulness of this tip.

Click on a star to rate it!

… for Adobe Premiere Pro CC

Tip #470: How to Improve Chroma-keys in Premiere

Larry Jordan – LarryJordan.com

Adjust until the background is solid black, the foreground solid white.

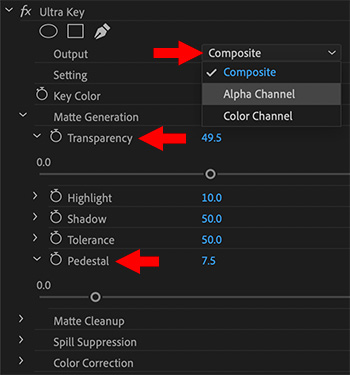
These are the key tweaks to get a clean chroma-key using Ultra Key.

Topic $TipTopic

Premiere has an excellent chroma-keyer in Ultra Key. But, once you’ve applied the effect, how do you clean the key to get the best results? Here’s the tweaks you need to know.

  • Click the eyedropper tool and click near the face of your talent. However, not so close that you run the risk of catching some hair.

NOTE: If the lighting is uneven, a clean key around the face is most important.

  • Switch the Ultra Key effect Output setting fromm Composite to Alpha Channel. The foreground needs to be solid white, no shades of gray. The background needs to be solid black, no “white dust.”
  • If adjustments need to be made, adjust the background first. For example, if the background isn’t solid black, adjust Pedestal until it is.

NOTE: You may need to add a mask to get rid of garbage in the frame. Most keys require masks.

  • If the foreground has shades of gray, adjust Transparency first. If that doesn’t fully solve the problem, gently tweak Tolerance.

EXTRA CREDIT

The best way to get a clean key is to light the background evenly, at around 50% gray scale on the Waveform Monitor and keep talent at least ten feet in front of the screen.


Please rate the helpfulness of this tip.

Click on a star to rate it!

… for Adobe Premiere Pro CC

Tip #511: Relink Missing Media in Premiere

Larry Jordan – LarryJordan.com

Relinking reconnects media that Premiere can’t find; as long as you didn’t erase it.

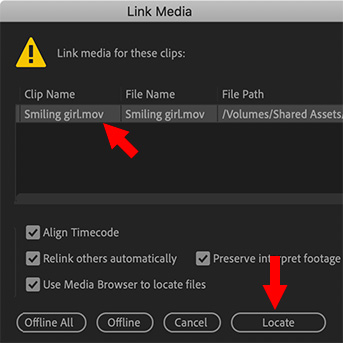
A portion of the Link Media dialog in Premiere Pro CC.

Topic $TipTopic

This article first appeared in MotionArray.com. This is an excerpt.

Media can go offline for a variety of reasons. However, once you show Premiere where the media went, relinking is straight-forward. So, what do you do if you can’t link media in Premiere Pro? In this tip, you’ll learn a couple of ways to relink missing footage or other assets in your projects.

RELINK MEDIA

When the dreaded “Missing Media” dialog appears, it is generally because a hard drive or folder was renamed or turned off. (If a media folder was deleted, this procedure won’t help.)

  1. Click Locate on the pop-up window that points out media is missing.
  2. On the left-hand side, navigate to the folder or directory that holds the missing media (this location may vary with each project).
  3. At the bottom right-hand corner of the dialogue box, click Search. Searching will review your media folders to locate the clip you’re looking for.
  4. Once you have found that, highlight the clip, and click OK.
  5. This will relink all of the footage in that folder or directory.
  6. As Adobe Premiere Pro is doing this, it may also be able to find various other assets that might be missing from the same folder. If it finds all of them, all is well and good.
  7. However, if it doesn’t, click Locate again and search all the folders again. Repeat this step until all of your missing media is located. Now, you should be able to proceed again with your edits, error-free.

FIND OFFLINE MEDIA

When the Offline Media error message appears:

  1. Go to the Project Panel.
  2. Search for the word Offline in the Project panel.
  3. Highlight all of the offline media from the search results.
  4. Right-click and select Link Media.
  5. You’ll see the Link Media box come up again.
  6. Click on Locate and Search the main folder following the steps above.
  7. Once the file is found, click OK.

This will relink all the media, and you’ll be good to go!


Please rate the helpfulness of this tip.

Click on a star to rate it!

… for Adobe Premiere Pro CC

Tip #417: How Do Color Wheels Work?

Larry Jordan – LarryJordan.com

Color wheels combine precision with ease-of-use.

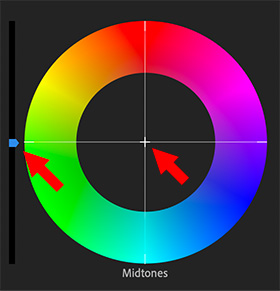
The Midtones color wheel in Adobe Premiere Pro CC.

Topic $TipTopic

I much prefer modifying colors using color wheels than curves. Partly, I think, this is due to long years working with Vectorscopes in video.

In Premiere, when you switch to the Lumetri Color panel in the Color workspace, one of the options is Color Wheels & Match.

Color wheels adjust all three color elements of a pixel: gray-scale, hue and saturation. Each wheel affects one-third of the image: shadows, mid-tones and highlights separately. This gives us a lot of control over different elements of the image.

The slider on the left alters gray-scale; up makes things brighter. The center cross-hair simultaneously alters hue and saturation. Grab the cross-hair and drag it toward the color you want to add. The farther you drag it from the center, the greater the saturation.

The color wheel has a black center when no changes have been made and a solid center when a color adjustment is in place.


Please rate the helpfulness of this tip.

Click on a star to rate it!