… for Adobe Premiere Pro CC

Tip #252: What’s the Reference Monitor?

Larry Jordan – LarryJordan.com

A free-floating monitor with many purposes.

The Reference Monitor in Adobe Premiere Pro CC.
The Reference Monitor floats above the Program Monitor.

Topic $TipTopic

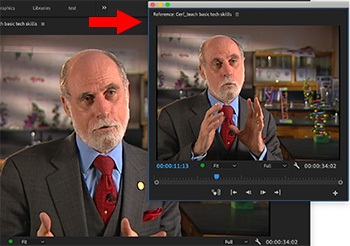
The reference monitor acts like a secondary Program Monitor. You can use it to compare different frames from the same sequence side-by-side, display video scopes, display different text overlays, or view the same frame using different viewing modes.

To open the reference monitor, choose Window > Reference Monitor.

To “gang” (which means to connect) the reference monitor to the program monitor, click the Wrench icon in the lower right-corner of the reference monitor and pick the top option: Gang to Program Monitor.

If the monitors are not ganged, you can drag the playhead to different frames in each monitor for comparison.

EXTRA CREDIT

Click the Wrench icon in the reference monitor to see a variety of other display options.


Please rate the helpfulness of this tip.

Click on a star to rate it!

… for Adobe Premiere Pro CC

Tip #223: What Do Render Bar Colors Mean

Larry Jordan – LarryJordan.com

Premiere is fast, but sometimes not fast enough.

Different render bar colors in Adobe Premiere Pro CC.
Render bar colors indicate what needs to be rendered before playback.

Topic $TipTopic

Most of the time, Premiere can play back your sequence in real-time displaying high-quality, full frame-rate images by harnessing the power of the Mercury Playback Engine.

However, every so often, you’ll create an effect that is so complex, it needs to render for optimum playback.

DEFINITION: Render means to calculate. But “calculate” is a very boring word. “Render” is much sexier. To render an effect means we are calculating the effect and turning it into video.

How can you tell if rendering is necessary? By the color of the render bar at the top of the Timeline.

  • No bar. Everything is playing perfectly. No rendering is necessary.
  • Yellow. An unrendered section that is complex, but may not need to be rendered in order to play back the sequence in real-time and at the full frame-rate.
  • Red. An unrendered section that needs to be rendered in order to play back the sequence in real-time and at the full frame-rate.
  • Green. A fully-rendered section of the sequence.

EXTRA CREDIT

To render some or all of a sequence, select the clips you want to render, then choose Sequence > Render Selection. A dialog appears showing the render status.


Please rate the helpfulness of this tip.

Click on a star to rate it!

… for Adobe Premiere Pro CC

Tip #240: See the Forest for the Trees


A fast way to toggle between the details and the big picture.

Topic $TipTopic

You’ve got your head buried in the details of your edit, but you need to take a quick look at the big picture of the entire Timeline. The problem is typing Plus or Minus takes forever…! What to do?

Zoom to Sequence to the rescue!

Use Zoom to Sequence in the Timeline to switch between detailed and global views of your sequence with one key press. Press once to zoom out. Press again to zoom back to where you were.

What’s the secret key? The back-slash key!


Please rate the helpfulness of this tip.

Click on a star to rate it!

… for Adobe Premiere Pro CC

Tip #241: 3 Faster Ways to Render

Larry Jordan – LarryJordan.com

Render faster by clip or by selecting a portion of the sequence.

An Adobe Premiere Pro CC timeline with In and Out set.
Set an In and Out, then choose Sequence > Render In to Out.

Topic $TipTopic

The only problem with rendering is that it takes time. Sometimes a LOT of time. Worse, Premiere wants to render the entire sequence, when that may not be what you need or have time for. Here are three options.

  • Render and Replace. this lets you flatten video clips and After Effects comps by rendering the clip, then replacing the clip with the render file. Choose Clip > Render and Replace.

NOTE: You can revert to the original clips using Clip > Restore Unrendered.

  • Render In to Out. This allows you to set a range in the sequence using In and Out shortcuts, then rendering only between them. Choose Sequence > Render In to Out.
  • Render Effects In to Out. This only renders the portions of those clip that have video effects applied to them between the In and the Out. This tends to be a much faster option. Choose Sequence > Render Effects In to Out.

EXTRA CREDIT

You can render and replace most of the clips including After Effects compositions except for the following:

  • Special clips or synthetics
  • Nested sequences
  • Adjustment layers

Please rate the helpfulness of this tip.

Click on a star to rate it!

… for Adobe Premiere Pro CC

Tip #217: Growing Files Grow on You

Larry Jordan – https://LarryJordan.com

This is a highlight for sports editors.

Growing file options in Premiere's Media preferences.
For best performance, uncheck these options – unless you need them.

Topic $TipTopic

A Growing file is a file that has not yet finished recording. A classic example is capturing the video from a sports contest. You need to start editing highlights before the game is complete. So, you capture the sports video as a growing file, which Premiere allows you to edit while the capture is on-going.

Not all video formats support growing files. QuickTime, for instance, does not. However, OP1a MXF does, which is why broadcasters depend upon this format.

The growing files preference setting (in the Media panel) allows you to import files that are not yet complete. Additionally, depending upon your preference settings, Premiere will automatically refresh the Project panel and Source Monitor as new material is recorded.

NOTE: The second preference setting allows you to determine how often you want these files refreshed.

If you don’t use growing files, turn this option off, as it will improve Premiere’s performance.

However, if editing sports is in your future, growing files will make your life easier.


Please rate the helpfulness of this tip.

Click on a star to rate it!

… for Adobe Premiere Pro CC

Tip #221: Shortcuts to Extend and Trim Edits

Larry Jordan – https://LarryJordan.com

Power shortcuts to speed trimming.

Topic $TipTopic

It is almost always easier to drag an edit point. But it is faster and, more often, more precise to use a keyboard shortcut. Here are some trimming and playback shortcuts that can speed your work.

NOTE: With the exception of the first shortcut, all remaining shortcuts do not require you to first select the edit point. Plus, all these tricks assume you have sufficient media handles for the trim.


Shortcut What It Does
E Move the selected edit point to the position of the Playhead. (A roll trim.)
W Ripple trim next (downstream) edit to the position of the playhead
Shift – W Extend the next edit to the position of the playhead (no gap)
Option – W Trim the next edit to the position of the Playhead (leaves a gap)
Q Ripple trim the previous (upstream) edit to the position of the playhead
Shift – Q Extend the previous edit to the position of the playhead (no gap)
Option – Q Trim the previous edit to the position of the Playhead (leaves a gap)
Shift – K Play around the Playhead
Shift – Space Play from slightly before the In to slightly after the Out
Cntrl – Space Play from current Playhead position to the Out

NOTE: Preferences > Playback determines how far before an edit and how far after an edit the playhead will play.


Please rate the helpfulness of this tip.

Click on a star to rate it!

… for Adobe Premiere Pro CC

Tip #222: Offline Does Not Mean Inaccessible

Larry Jordan – https://LarryJordan.com

Organize clips without needing media.

The Edit Offline File window
This window allows adding metadata to any offline clip.

Topic $TipTopic

NOTE: This tip originated in the days of capturing media from video tape, but it can still be helpful in working with today’s huge media files.

Normally, when we think of “offline clips,” we think of media that is inaccessible. While it is true that we can’t edit or playback offline clips, we can still organize them.

For example, Control-click an offline clip and this menu appears, which allows us to add metadata (labels) to any offline clip. Then, the next time these clips are either connected or relinked, all this information remains available because it is stored in the project file, not with the clip itself.

The benefit of using this screen is that you can transfer a project to another computer – say a laptop – to add this information, without having to copy and carry all the media files as well.

EXTRA CREDIT

The Metadata panel in Premiere (Window > Metadata) has far more fields available, which can also be used for both online and offline clips.


Please rate the helpfulness of this tip.

Click on a star to rate it!

… for Adobe Premiere Pro CC

Tip #216: Determining “Indeterminate”

Larry Jordan – https://LarryJordan.com

The unknown is not unknowable.

The Premiere Pro CC Media preference panel.
The Media preference panel sets the timebase for still images.

Topic $TipTopic

“Indeterminate” sounds pretty squishy. But, when it comes to Premiere, it is a fancy word for still images, or any other file that doesn’t have a definite duration. Hence – “indeterminate.”

Go to Premiere Pro > Preferences > Media (Windows: Edit > Preferences > Media).

At the top of this panel, you can specify the timebase of all imported still images, the starting timecode for each still image clip, and whether the frame count should start at 0 or 1.

Since still images are timecode-free, my recommendations are:

  • Set the timecode to match the timecode of your sequence.
  • Set the timecode to start at 00:00:00:00
  • Set the frame count to start at 1

Please rate the helpfulness of this tip.

Click on a star to rate it!

… for Adobe Premiere Pro CC

Tip #218: Shortcuts that Move Titles

Larry Jordan – https://LarryJordan.com

These shortcuts give your text direction.

Text box colors indicate status of text in Premiere.
Red means you can edit text. Blue means you can move text.

Topic $TipTopic

The new Title tool in Premiere is really great, when it isn’t also driving me nuts. The problem is that I can never remember when I can edit the text and when I can move it.

Here’s the secret:

  • Select the text clip with the Text tool and the box turns red. Red means you can edit the text with the text tool.
  • Select the text clip with the Selection tool and the box turns blue. Blue means you can move the text box.

EXTRA CREDIT

There are helpful keyboard shortcuts that can help you move text boxes, once you’ve selected them in the Effect Controls.

Shortcut What It Does
Cmd – [arrow key] Moves the selected text box one pixel in the direction of the arrow.
Shift – Cmd – [arrow key] Moves the selected text box five pixels in the direction of the arrow.

Please rate the helpfulness of this tip.

Click on a star to rate it!

… for Adobe Premiere Pro CC

Tip #219: The Coolness of the J-K-L Keys

Larry Jordan – https://LarryJordan.com

Shortcuts that speed playback.

Topic $TipTopic

Most of us are total mouse junkies. But, there are things you can do with the keyboard that are hard to do with a mouse. One of these involves timeline playback.

Since probably the first Avid, we’ve been able to playback clips on the timeline using the J – K – L keys. The benefit to using these keys is that they are conveniently grouped to match the fingers of one hand.

Here are some shortcuts you may not know:

  • J. Plays backward in real-time
  • K. Stops playback (the same as pressing Spacebar)
  • L. Plays forward in real time (the same as pressing Spacebar)
  •  

  • Tap J multiple times. Each time you tap, speed increases by 1X, up to a maximum of 6X
  • Tap L multiple times. Each time you tap, speed increases by 1X, up to a maximum of 6X
  •  

  • Press K & J. Slow-motion backward
  • Press K & L. Slow-motion forward
  •  

  • Press Shift + J. Starts slow, then ramps to high-speed backward
  • Press Shift + L. Starts slow, then ramps to high-speed forward

Please rate the helpfulness of this tip.

Click on a star to rate it!