… for Adobe Premiere Pro CC

Tip #137: Why Use Handles in the Project Manager?

Larry Jordan – https://LarryJordan.com

Handles allow you to make changes later.

Tip Screen Shot

Topic $TipTopic

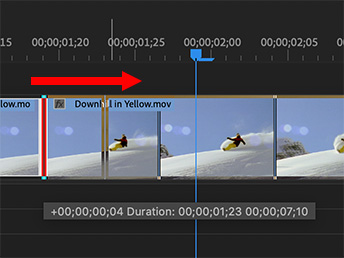
We mark clips by setting an In and an Out. “Handles” are the extra media before the In and after the Out.

When we add a dissolve to a clip, we are using those handles because half of the the dissolve starts before the In on the incoming clip and half after the Out on the outgoing clip. So, also, with trimming. When we move an In earlier or an Out later, we are moving the edit point into the handles of a clip.

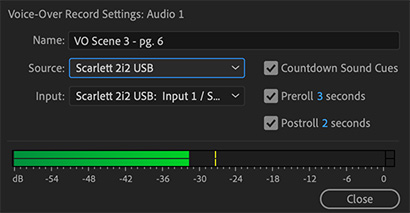
Audio, even more than video, uses handles to establish a sound even before we see the video.

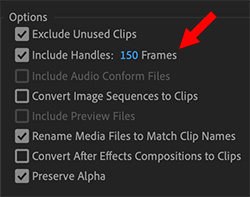
For all these reasons, when you are transcoding clips, or archiving media for the future, be sure to include handles. The default setting in Premiere is 30 frames. In most cases, this is not enough. My recommendation is to save 5 seconds of extra media at the beginning and end of the clip.

Yes, it takes more storage space. But nothing is worse than needing an extra 1/2 second of a shot and not having it.


Please rate the helpfulness of this tip.

Click on a star to rate it!

… for Adobe Premiere Pro CC

Tip #139: Customize the Project Panel

Larry Jordan – https://LarryJordan.com

Freeform View is a new feature hidden in the Project panel.

Tip Screen Shot

Topic $TipTopic

The Project panel provides multiple ways for us to view and organize our clips. What you may not know are the three icons in the lower left that allow you to alter the display of clips and projects:

  • List view (2nd from left). This displays additional information about each asset in a table form. Control-click a column header to customize the information it displays. Drag a column header to change its location in the table.
  • Icon view (3rd from left). This view is great to view the contents of a clip in the Project panel. Press the spacebar to play a clip. Hover your cursor over an icon and the clip plays backwards or forwards as you drag your mouse.
  • Freeform view (4th from left). This view allows you to visually organize your assets and create storyboards with your media. You can use the Freeform view to arrange clips freely into a custom layout, unrestricted by any kind of grid and sort order.

The Freeform view is especially useful when you want to think spatially, stack or group media files, or arrange clips as storyboards and assembly edits. You can also save different layouts for the same project and switch between them.

BONUS

To learn more about Freeform view, see Tip #146.


Please rate the helpfulness of this tip.

Click on a star to rate it!

… for Adobe Premiere Pro CC

Tip #164: 6 “Trim to Playhead” Shortcuts

Larry Jordan – https://LarryJordan.com

Keyboard shortcuts that speed trimming to the Playhead.

Tip Screen Shot

Topic $TipTopic

These six keyboard shortcuts speed trimming an edit point to the playhead.

Shortcut What It Does
Q Ripple trim previous edit to playhead (does not leave a gap)
Shift + Q Extend (Roll) previous edit to playhead
Option + Q Trim previous edit to playhead (leaves a gap)
W Ripple trim next edit to playhead (does not leave a gap)
Shift + W Extend (Roll) next edit to playhead
Option + W Trim next edit to playhead (leaves a gap)

The cool part about these is that you don’t need to select the edit point first.

NOTE: These shortcuts are all from the Adobe Premiere Pro Default keyboard map.


Please rate the helpfulness of this tip.

Click on a star to rate it!

… for Adobe Premiere Pro CC

Tip #140: What’s the Minimum Duration of a Clip?

Larry Jordan – https://LarryJordan.com

Durations are always measured in frames and displayed using timecode.

Tip Screen Shot

Topic $TipTopic

A “duration” is the number of frames between the In and Out of a clip; or the entire clip if no In or Out is set. In Premiere Pro, the In point and Out points specify all durations in any panel. So, how are durations determined?

  • The In INCLUDES the frame it is parked on.
  • The Out EXCLUDES the frame it is parked on.

For example, setting the In point and Out point to the same frame results in a clip with a duration of one frame. In other words, Premiere requires a minimum duration of one frame.


Please rate the helpfulness of this tip.

Click on a star to rate it!

… for Adobe Premiere Pro CC

Tip #141: How to Set a Poster Frame in the Project Panel

Larry Jordan – https://LarryJordan.com

Poster Frames are displayed in the Program Panel when no In or Out is set.

Tip Screen Shot

Topic $TipTopic

A Poster frame is a still image displayed in a clip when you are in thumbnail view in the Project panel. Poster frames are displayed when no In or Out is set. By default, the poster frame is the first frame in a clip, unless you change it.

Here’s how to create a new poster frame.

  • To set a poster frame for the media clip, drag the playhead or hover scrub to the desired frame, and then press Command + P (macOS) or Shift + P (Windows).
  • To clear the poster frame, press Option + P (macOS) or Ctrl + Shift + P (Windows).

Please rate the helpfulness of this tip.

Click on a star to rate it!

… for Adobe Premiere Pro CC

Tip #174: How to Fix a Crooked Horizon

Larry Jordan – https://LarryJordan.com

The human eye really, really likes a level horizon.

Tip Screen Shot

Topic $TipTopic These tips were first suggested in PremiumBeat.

Ideally, you are using both a tripod and a level for all your video shoots. But, in case you left one or both of them at home, here are three quick steps to level up a shot in post.

  1. Rotate the image. Use Effect Controls > Motion > Rotation. This is purely trial and error, but drag the rotation setting slightly until things are level.
  2. Check your corners. As you rotate your image, slices of black will appear at the corners. You’ll need to zoom in until these are gone. Hopefully, not a lot.
  3. Zoom in. Use Effect Controls > Motion > Scale to zoom in slightly so you don’t see the edges of a shot after you rotate it.

NOTE: Remember, the more you scale an image larger than 100%, the blurrier it will look. Ideally, shoot larger frame sizes than you need, if you plan to make these types of corrections in post.

EXTRA CREDIT

I often crop the image just above the edge of the horizon so I have a straight edge to use to determine when the horizon is actually level.


Please rate the helpfulness of this tip.

Click on a star to rate it!

… for Adobe Premiere Pro CC

Tip #136: Hidden Voice-Over Settings

Larry Jordan – https://LarryJordan.com

Premiere can help you record voice-overs.

Tip Screen Shot

Topic $TipTopic

Control-click the microphone icon in a Track Header and choose Voice Over Settings.

This opens a dialog that allows you to name the recording, as you’d name any other clip, set the audio source you want to use for recording, and select the input audio channel; as well as three other options:

  • Countdown Sound Cues. When checked, this will display a countdown and beep every second to alert you to when the recording will start. The default is three seconds prior.

While you can start a voice-over recording anywhere you place the playhead, the best method is to set an In and Out to precisely determine the duration of the recording. When you do, the following two options become relevant:

  • Preroll. This determines how far before the recording starts the playhead will be positioned. Most often, this preroll allows talent to get a sense of the pace and content just prior to their recording.
  • Postroll. This determines how many seconds after the Out playback will continue.

The recording itself only exists between the In and Out.

NOTE: For other audio options in the Track Header, see Tip #143.


Please rate the helpfulness of this tip.

Click on a star to rate it!

… for Adobe Premiere Pro CC

Tip #143: What Do These Audio Track Header Icons Do?

Larry Jordan – https://LarryJordan.com

Track Headers provide more control when editing a sequence

Tip Screen Shot

Topic $TipTopic

(See Tip #134 for an explanation of the video track headers.)

Looking at the audio track headers (located on the extreme left side of the timeline), here’s what each of these icons mean:

  • Blue A1 (far left). This icon indicates the “active track.” When you edit a clip into the timeline using a keyboard shortcut, the audio goes into the track at the position of the playhead with the blue highlight. (Adobe calls this “Source Patching.”)
  • Lock. This locks a track so you can’t make changes. However, be careful with this because if you lock the audio, but don’t lock the video (or vice-versa) you can easily move the unlocked track out of sync.
  • Blue V1 (middle). When you copy a clip, the clip will paste into the LOWEST NUMBERED track with a blue highlight. Drag the blue to change track location, click it to turn it on or off. (Adobe calls this “Track Targeting.”)
  • Sync lock. Normally, when doing an insert edit, you want everything to shift down with the inserted media. This is the default setting. However, turning sync locks off means that when you insert a clip, any clips on tracks where sync lock is turned off will not move. This can be a powerful feature when you want to insert a video clip, but not break the audio tracks.
  • Mute. When clicked it makes all audio clips on this track inaudible.
  • Solo. When clicked, it makes all audio clips on all non-soloed tracks inaudible.
  • Microphone (far right). This instantly enables a track for voice over recording and begins recording according to the current voice over settings. (See Tip #136).

BONUS

Watch what happens when you click one of these controls while pressing Shift, Option or Cmd. These modifier keys allow you to control groups of these switches.


Please rate the helpfulness of this tip.

Click on a star to rate it!

… for Adobe Premiere Pro CC

Tip #146: Secrets of Freeform View

Larry Jordan – https://LarryJordan.com

Freeform view lets you arrange clips however you want

Tip Screen Shot

Topic $TipTopic

The Project panel has three different ways to view clips: list, thumbnail and Freeform. Freeform is new and, as you’ll discover, there are multiple things you can do in Freeform view. For example:

Zoom in and out of clips

  • Hold down Opt/Alt while scrolling the mouse wheel
  • – or – Pinch zoom on a trackpad
  • – or – Use the + and keyboard shortcuts

Snap the edges of a clip to another

  • Press Alt (on Win) or Opt (on macOS) and drag the clip so that its edge snaps to the edge of another clip

Align all or selected clips to grid

  • Select clips, right-click and choose Align to Grid from the context menu.

Adjust the size of clips

  • Select clips, right click, select Clip Size and choose a size option. The default clip size is Medium.

Hoverscrub the clips

  • Move your mouse pointer to the left and right to scrub the clip. Press I and O keys to mark the In point and Out point.

Customize the displayed metadata in Freeform view

  • You can specify the type of metadata displayed on line 1 and 2 of the Freeform view thumbnail. The label color swatch and thumbnail badges can also be toggled on and off.
  • Click the Project panel hamburger menu, and select Freeform View Options.

BONUS

See Tip #139 for more information on the Project panel.


Please rate the helpfulness of this tip.

Click on a star to rate it!

… for Adobe Premiere Pro CC

Tip #129: Hover Scrub Tricks

Larry Jordan – https://LarryJordan.com

“Hovering” is the fastest way to view a clip.

Tip Screen Shot

Topic $TipTopic

Hover scrubbing is most valuable for quickly previewing the contents of a clip before you edit it into a sequence.

To “Hover Scrub” a clip, move (but do not click and drag) the cursor across a thumbnail in the Program panel. You can see the entire duration of a clip when hover scrubbing thumbnails left to right. When you move the mouse outside the boundaries of the clip, or focus is set away from the Project panel, the thumbnail resets to the poster frame. No audio is played during hover scrubbing.

  • To turn off Hover Scrub, press Shift + H.
  • When Hover Scrub is off, you can press the Shift key to temporarily enable Hover Scrubbing.
  • Use the keyboard shortcuts I and O to set In and Out points for the clip while hover scrubbing.
  • While hovering over a portion of a clip, double-click the icon, and the clip loads into the Source Monitor where the pointer was hovering. With this technique, Insert or Overwrite edits can be quickly made to the timeline.

Please rate the helpfulness of this tip.

Click on a star to rate it!