… for Adobe Premiere Pro CC

Tip #1644: How to Create a Fit-to-Fill Edit

Larry Jordan – LarryJordan.com

Fit-to-Fill edits are uncommon – but easy to create when needed.

A marked duration in the Timeline (note the In and Out marks).

Topic $TipTopic

I re-discovered this technique while researching my recent webinar: Clip Speed Effects in Adobe Premiere Pro.

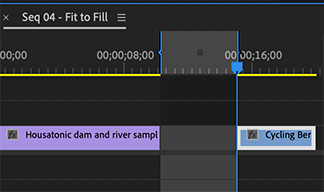
A Fit-to-Fill edit changes the speed of a source clip to match a specific duration in the Timeline. While specialized, they are often used when editing clips to music and you can’t change the timing of the music, but need the action to finish in the duration available.

Here’s how to create one in Premiere Pro:

  • Set an In and Out (Shortcuts: I and O) for the clip you want to use in the Source Monitor.
  • Set an In and Out in the Timeline setting the duration you want that clip to fill.
  • Type [period].

Premiere edits the clip into the Timeline and changes its speed so that the entire duration specified by the In and Out in the Browser is squeezed into the defined space in the Timeline.

EXTRA CREDIT

Fit-to-Fill edits always change the speed of the inserted clip.


Please rate the helpfulness of this tip.

Click on a star to rate it!

… for Adobe Premiere Pro CC

Tip #1645: Create High-Quality Slow Motion

Larry Jordan – LarryJordan.com

High-frame-rate video creates beautiful slow motion. The trick is calculating the playback speed.

The Properties window for a specific clip, with its frame rate highlighted.

Topic $TipTopic

I re-discovered this technique while researching my recent webinar: Clip Speed Effects in Adobe Premiere Pro.

One of the exciting features in mobile phones these days is the easy ability to shoot high-frame rate videos. (The film world calls this “over-cranking.”) This creates extremely high-quality, extremely slow motion videos.

Here’s how to display that glorious slow motion in Adobe Premiere Pro.

  • Go to Sequence > Sequence Settings and verify your Timebase. This is the frame rate of your sequence.
  • Control-click the clip you want to slow in the Files panel and select Properties.
  • In Properties, verify the frame rate of the clip. (See screen shot.)
  • Then, divide the Timebase rate by the clip frame rate to determine the percentage you need to change the clip speed to get every frame to play.

NOTE: As an example, a timebase of 30 fps divided by a clip frame rate of 240 fps equals 0.125, which converts to a percentage of 12.5%. (Multiply the division result by 100. Round 23.98, 29.97 and 59.94 frame rates up to the next whole number.)

  • Select the timeline clip and type Cmd + R to display the Clip Speed / Duration window.
  • Change the Speed setting to match the percentage you just calculated.

Now, when you play the clip, you’ll see liquid slow motion, without artifacts or jerkiness, while playing every frame your camera shot.


Please rate the helpfulness of this tip.

Click on a star to rate it!

… for Adobe Premiere Pro CC

Tip #1646: Timing Trick When Slowing Clips

Larry Jordan – LarryJordan.com

It’s a question of whether you want to adjust the duration or not.

The Clip Speed / Duration window with “Ripple Edit…” checked.

Topic $TipTopic

I re-discovered this technique while researching my recent webinar: Clip Speed Effects in Adobe Premiere Pro.

There’s a “hidden” option when you change the speed of a clip in the Timeline that can make your editing life easier. But, it is off by default. When you want to change the speed of a clip, for example to create slower or faster motion:

  • Select the clip in the timeline and type Cmd + R.
  • This opens the Clip Speed / Duration window (see screen shot).
  • To alter the speed, change the Speed setting.

However, down lower, is an equally important option.

  • When Ripple Edit is off, changing the speed of a clip will not change its duration. (Unless you are increasing the speed of the clip and don’t have enough frames to fill the existing duration.) This means that all downstream clips don’t move.
  • When Ripple Edit is turned on, changing the clip speed will always change the duration of the clip AND adjust the position of all downstream clips so that there is no gaps.

The problem with Ripple Edit turned off is that not all frames in the original clip will be displayed. Once the original duration is reached, any unplayed frames are ignored.

The problem with Ripple Edit turned on is that, while all frames will play, the clip duration will change, altering the position of all downstream clips and, ultimately, the duration of your sequence.

There are reasons for selecting either option – and I’ve used both in projects – but it is important to know you have a choice.

Ripple Edit is turned off by default.


Please rate the helpfulness of this tip.

Click on a star to rate it!

… for Adobe Premiere Pro CC

Tip #1627: Adobe Updates Premiere & Audition

Larry Jordan – LarryJordan.com

Monthly update cycle continues for Adobe.

Adobe Premiere Pro logo.

Topic $TipTopic

Last week, Adobe updated both Premiere Pro and Audition. Here’s what’s new.

Adobe Audition

  • Audition now runs natively on Apple M1 systems providing improved performance for recording and mixing high-quality audio content, such as podcasts, broadcast, sound design, audio restoration, and more. Notable gains include faster mixdowns, audio effects rendering, and near-real time updates in the Spectral Display Editor.
  • The new Loudness Meter in both Audition and Premiere Pro provides industry standard ITU-based loudness monitoring for broadcast, podcast, and streaming media content. The new Loudness Meter, which will replace the previous Loudness Radar, transparently measures program loudness for full mixes, single tracks, or buses and submixes.
  • Strip Silence is a much-requested new feature which allows users to identify and remove silent or inactive regions in recorded clips, without losing synchronization in multitrack audio. Use this feature for cleaning up voice recording, interviews, and preparing multi-track edits, such as podcasts or audio documentary content.

In Premiere Pro

  • Text gradients are now part of the modern titling tools in the Essential Graphics panel. Users can apply gradients to add sheen to letters or colorful effects for text and titles.
  • Caption items in the Captions track now have the same label color options as other items on the timeline. Select Label Color Group to assign labels and colors for captions – and use the same keyboard shortcuts.
  • Simple edits with Caption items on the Caption track behave the same as traditional linked video and audio pairs. Selecting, moving, trimming, and blade edits will be applied to video audio and captions items simultaneously.
  • Canon XF HEVC performance improvements
  • Support for DirectX display technology on Windows

Please rate the helpfulness of this tip.

Click on a star to rate it!

… for Adobe Premiere Pro CC

Tip #1633: New! Text Color Gradients in Premiere

Larry Jordan – LarryJordan.com

Text gradients now can be created directly in Premiere.

Text with gradient (top), and the top portion of the Color Picker showing gradient settings (bottom).

Topic $TipTopic

Text gradients have been a part of the legacy Titler in Premiere for a while. Now, however, you can create them directly in Premiere itself. Here’s how.

  • Select the text to which you want to apply the gradient.
  • Switch to the Essential Graphics workspace.
  • In the Appearance section click the Fill color chip.
  • In the Color Picker dialog that opens, select one of the gradient options from the drop-down list at the top left. There are three choices: Solid, Linear Gradient, and Radial Gradient. (Red arrow in the screen shot.)

To adjust the colors in the gradient:

  • Click any of the color stops below the gradient slider to show different color options and change the color.
  • To remove a color stop, click one and either drag it away from the gradient slider and release, or click Delete at the bottom right of the gradient slider.

To adjust the opacity of the gradient:

  • Move the Opacity Stop at the top of the gradient slider.
  • Then change the opacity in the Opacity % field

To adjust the angle and location of the gradient:

  • Angle: Type in a value in the Angle field or drag on the blue hot text to change a linear gradient’s angle.
  • Location: Type in a value in the Location field or drag on the blue hot text for an interactive experience to change the location of a selected stop or midpoint.

As you adjust all the controls in the gradient, you can see your changes to the text live in the Program Monitor.

Click OK to apply the gradient to the text.


Please rate the helpfulness of this tip.

Click on a star to rate it!

… for Adobe Premiere Pro CC

Tip #1634: New! Loudness Meter in Premiere

Larry Jordan – LarryJordan.com

The new Loudness Meter provides very granular details on audio levels.

The new Loudness Meter in Premiere & Audition, using the YouTube setting.

Topic $TipTopic New with the May, 2021, update to both Audition and Premiere Pro is the Loudness Meter; separate from the long-standing Loudness Radar. Here’s how the Meter works.

  • Apply the Loudness Meter (Effects > Audio Effects > Special > Loudness Meter) the same as any other effect.
  • In Effect Controls, scroll down until you see Loudness Meter, then click the Edit button.

The Loudness Meter is displayed (see screen shot).

NOTE: This measures audio levels, it does not adjust them.

  • From the Presets menu, choose the monitoring settings you want to use for your audio.

NOTE: You can adjust these settings using the Settings tab in this panel.

For example, the YouTube setting has a target of -14 LUFS, with a maximum true peak of -1 dBTP.

NOTE: There are four different options for measurement scale: LUFS, LKFS, LU/LUFS and LU/LKFS. My general preference is LKFS.

I like the Radar because it shows audio levels over time. I like the new Loudness Meter because it shows more granular detail about my audio on an instant-by-instant basis.


Please rate the helpfulness of this tip.

Click on a star to rate it!

… for Adobe Premiere Pro CC

Tip #1620: How to Rename Timeline Tracks

Larry Jordan – LarryJordan.com

Scale tracks vertically, then control-click a track to rename.

Control-click a track name in the Timeline to change its name.

Topic $TipTopic

Premiere allows renaming audio or video tracks – if you know where to click.

Here’s how:

  • Load the sequence you want to label into the Timeline.
  • Select the Timeline panel.
  • Type Cmd + [plus] to increase the vertical height of the video tracks until you see the names of the tracks.

NOTE: To increase the height of audio tracks, type Option + [plus].

  • Control-click the name of the track you want to change and select Rename (see screen shot).

These names will show up in the Timeline and Audio Track Mixer.

Once you save the project, these names will stay with that sequence until you change them.


Please rate the helpfulness of this tip.

Click on a star to rate it!

… for Adobe Premiere Pro CC

Tip #1621: Create Custom Workspaces

Larry Jordan – LarryJordan.com

Custom layouts are easy to create and keep using Workspaces.

Window > Workspaces submenu.

Topic $TipTopic

You can create an unlimited number of custom interface workspaces in Premiere. Here’s how.

  • Drag the vertical or horizontal borders between panels to resize panels.
  • Add new panels from the Windows menu.
  • Rearrange things as much as you want.
  • Then, choose Window > Workspaces > Save as New Workspace to save your work.

EXTRA CREDIT

To reset a workspace to its default setting, select it so it is displayed in Premiere. Then, choose Window > Workspaces > Reset to Saved Layout.


Please rate the helpfulness of this tip.

Click on a star to rate it!

… for Adobe Premiere Pro CC

Tip #1622: Reduce Audio Noise in Premiere Pro

Larry Jordan – LarryJordan.com

Adobe licensed their noise reduction tool from Accusonus.

Noise reduction options in the Essential Sound panel.

Topic $TipTopic

One of the new features in Adobe Premiere Pro is a filter to reduce noise in an audio clip.

Generally, you want to use this effect to reduce, not eliminate, noise. Why? Because the more noise you reduce, the more likely you are to damage the quality of the remaining audio.

Still, this effect can salvage otherwise unusable clips. Here’s how it works:

  • Switch to the Audio workspace.
  • Select the audio clip you need to repair in the Timeline.
  • Assign the Dialogue tag by clicking the word Dialogue in the Essential Sound Panel.
  • Check the Repair option.
  • Check Reduce Noise.
  • Drag the slider while playing the clip and adjust to where the noise is reduced while the remaining audio sounds good.

NOTE: Because noise and voice frequencies overlap, there will probably be some degradation of the remaining audio. Try to find the best balance you can – but every clip will be different.


Please rate the helpfulness of this tip.

Click on a star to rate it!

… for Adobe Premiere Pro CC

Tip #1570: Video Scope Settings

Larry Jordan – LarryJordan.com

Float provides the most accurate video scope readings.

The Video Scope bit-depth menu.

Topic $TipTopic

At the bottom right corner of the Lumetri Scopes is a small menu called “float.” This controls the detail visible in the video scopes. Here’s how to set it.

  • 8 Bit. Displays all values on a 0 – 256 scale on the right, IRE on the left.
  • 10 Bit. Displays all values on a 0 – 1024 scale on the right, IRE on the left. Video values remain the same, what’s different is the amount of precision in the values.
  • Float. Displays all values on a 32-bit scale (±2.14 million values).
  • HDR. Displays all values on a scale from 0 – 10,000 (10K). (HD media uses a scale of 0 – 100.

While the scales are different, the display is essentially the same. For non-HDR work, use float. For HDR HLG or PQ use HDR.

NOTE: This setting does not affect your video clips or output.


Please rate the helpfulness of this tip.

Click on a star to rate it!