… for Adobe Premiere Pro CC

Tip #1537: A Fast Way to Improve an Image

Larry Jordan – LarryJordan.com

Basic Correction > Auto provides a quick fix for poorly exposed images.
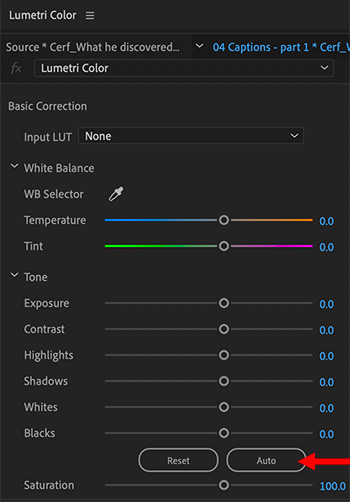
Lumetri Color > Basic Correction panel. Click the Auto button.

Topic $TipTopic

[ This tip was part of a recent webinar: “Color Fundamentals in Adobe Premiere Pro” ].

If you have an image that isn’t exposed properly and you need a quick fix, here’s how.

Select the image in the timeline, then go to: Color workspace > Lumetri Color > Basic Correction and click the Auto button (see screen shot).

This adjusts the sliders in Basic Correction to correct exposure problems.

WHAT THIS DOESN”T FIX

This won’t fix color problems. It won’t fix blown-out areas caused by over-exposure. And it won’t fix black levels that were crushed when the image was taken such that all shadow detail was lost.

So, this doesn’t work miracles, but it can make many images look a LOT better.

Also, because this moved sliders, if you don’t like something in the new settings, the modified settings are easy to adjust manually.


Please rate the helpfulness of this tip.

Click on a star to rate it!

… for Adobe Premiere Pro CC

Tip #1518: Absolute vs. Relative Audio Levels

Larry Jordan – LarryJordan.com

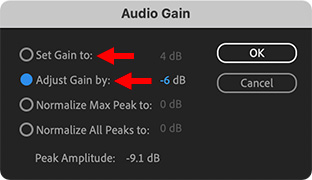
Generally, we adjust clip volumes relatively and monitor them absolutely.

The Gain wndow in Adobe Premiere Pro.

Topic $TipTopic

There are two ways to adjust the volume of any audio clip: Absolute and Relative. Here’s what these terms mean and how they work.

An absolute audio level adjustment sets audio levels regardless of the audio volume of that clip before the adjustment. For example, setting one or more clips to -6 dB. If one clip is at -4 dB and a second clip is at 0 dB before the change, they will both be at -6 dB after the change.

A relative audio level adjustment sets audio levels based upon the audio levels before the adjustment. For example, raising the level of one or more clips by 4 dB. If one clip is at -4 dB and a second clip is at 0 dB before the change, the first clip will be at 0 dB and the second clip will be a +4 dB after the change.

NOTE: Audio meters always show absolute levels, the precise volume of all active clips, regardless of the dB setting of their individual clip volume.

KEYBOARD SHORTCUTS

  • Select the clips you want to adjust in the timeline.
  • Type G, to open the Gain window.
  • Set Gain to performs an absolute audio adjustment.
  • Adjust Gain by performs a relative audio adjustment.

The waveforms in clips you adjust will change, but the volume line will not.


Please rate the helpfulness of this tip.

Click on a star to rate it!

… for Adobe Premiere Pro CC

Tip #1519: Hidden Media Replacement Controls

Larry Jordan – LarryJordan.com

Adjusting where a clip starts is a huge benefit for media replacement.

Placement and timing settings for replaced media in Essential Graphics.

Topic $TipTopic

There’s a hidden feature in the new motion graphic templates that allow media replacement. I mentioned this in last week’s tip, but it deserves more attention.

When you add a template that allows media replacement – and not all of them do – you have a lot of control over which part of the inserted image is displayed in the timeline.

After you drag an image into the placeholder graphic (see Tip #1504) look immediately below the image in the Essential Graphics panel.

  • Scale to… This provides four options for scaling the image to fit within the placeholder.
  • H & W. These scale an image symmetrically, if the chain icon is linked, or asymmetrically, if the chain icon has a line through it.

The four icons across the bottom determine:

  • Horizontal position
  • Vertical position
  • Rotation
  • Timecode where the inserted image should start

This last setting is key. In the past, we would need to create subclips that start where we wanted them to start. Now, all we need to do is enter a timecode. This makes it very easy to experiment with the best place to start an inserted video – the only downside is that every time we change one of these settings, we need to re-render the effect.


Please rate the helpfulness of this tip.

Click on a star to rate it!

… for Adobe Premiere Pro CC

Tip #1520: Caption Track Tricks

Larry Jordan – LarryJordan.com

Captions are now much more flexible and easier to use in Premiere Pro.

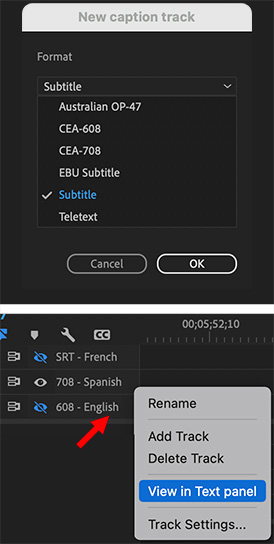
Caption track window (top) and caption track menu (lower).

Topic $TipTopic

One of the exciting new features in Premiere’s new caption workflow is its flexibility. There is no limit to the number of caption tracks (the container for captions) you can create. There is also no limit to the number of captions you can put in each track.

NOTE: Well, there is, I guess. Captions need to display for at least a second, so you are limited by the length of your program. But, um, hold your captions on-screen longer than a second…

When you add a new caption track, you can determine the format for all the captions it contains. However, you can’t mix caption formats in the same track.

You can have tracks for different languages, and each track can be a different format (as illustrated in the lower half of the screen shot).

Control-click a caption track to reveal other options.

Here’s a tutorial from my website that describes captions in more detail.


Please rate the helpfulness of this tip.

Click on a star to rate it!

… for Adobe Premiere Pro CC

Tip #1496: Caption Formats Supported by Premiere Pro

Larry Jordan – LarryJordan.com

All these options exist because there is no single preferred standard.

Topic $TipTopic

The reason there are so many caption formats is that every distributor has a different preference. Here’s a list of the caption formats supported by the 2021 release of Adobe Premiere Pro (v. 15.0.0):

  • SCC
  • MCC
  • XML
    • DFXP (W3C TTML)
    • SMPTE-TT
    • EBU-TT
  • STL
  • SRT
  • DFXMP

Captions can only be embedded in these three pro video formats:

  • MXF OP1a
  • DNxHD
  • ProRes

EXTRA CREDIT

To illustrate the diversity of captions, here’s a link to an article showing which caption formats are preferred and supported by social media.


Please rate the helpfulness of this tip.

Click on a star to rate it!

… for Adobe Premiere Pro CC

Tip #1504: New Feature: Media Replacement

Larry Jordan – LarryJordan.com

This trick is to use the Essential Graphics panel to replace media.

Replacing media in the Essentials Graphics panel.

Topic $TipTopic

The new replaceable media feature in Motion Graphic templates (.mogrt) created in After Effects for use in Premiere Pro is very cool – and easy to use. Once you know one trick. And that trick is HOW to replace the media.

Let me show you.

  • Switch to the Graphics workspace.
  • Using the Browser feature in the Essential Graphics panel, find the template you want to use and drag it into the timeline.
  • Select the template in the Timeline, then click the Edit button in the Essential Graphics panel.
  • Twirl down MEDIA REPLACEMENT, then twirl down Media Replacement (yup, it’s listed twice) until you see the placeholder graphic.
  • Drag the image you want to insert from the Project/Bin panel on top of the placeholder graphic in the Essential Graphics panel.
  • To change the starting time of the inserted video, change the timecode setting for the In, below the image. (Not illustrated in screen shot.)

EXTRA CREDIT

  • This will need plenty of time to render.
  • You can change the image at any time by dragging a different image on top of the placeholder.
  • Trying to change graphics in the Effect Controls panel won’t work.
  • For those that know Apple Motion, this feature is the same as using Drop Zones in Motion.

Please rate the helpfulness of this tip.

Click on a star to rate it!

… for Adobe Premiere Pro CC

Tip #1505: New Feature: Faster Warp Stabilizer

Larry Jordan – LarryJordan.com

The actual stabilization is the same, what’s faster is the analysis.

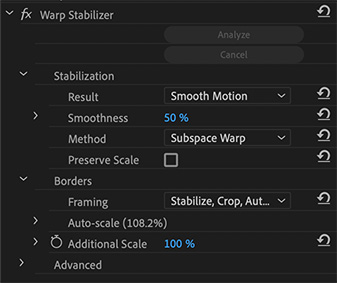
Warp Stabilizer controls in the Effect Panel of Premiere Pro.

Topic $TipTopic

One of the new features in the 2021 update to Premiere Pro is a faster Warp Stabilizer. Here’s what you need to know.

According to Adobe’s release notes:

[We have] “dramatically improved the time it takes to analyze shaky footage while leaving the actual stabilization process unchanged.  The result is that the quality of the stabilization is as good as before – just way faster.”

My guess is that what Adobe has done is move the analysis off the CPU and onto the GPU, which is much faster at analyzing bitmapped media files.

EXTRA CREDIT

Adobe notes: “The Warp Stabilizer effect in Premiere Pro requires that the clip dimensions match the sequence settings. If the clip does not match the sequence settings, you can nest the clip, and then apply the Warp Stabilizer effect to the nest.”

Here’s a link to more details on using the Warp Stabilizer


Please rate the helpfulness of this tip.

Click on a star to rate it!

… for Adobe Premiere Pro CC

Tip #1479: Adobe Updates Premiere Pro

Larry Jordan – LarryJordan.com

This first major upgrade for 2021 sets the scene for the future.

Logos for Adobe Premiere Pro and After Effects.

Topic $TipTopic

This week, Adobe released new versions of its video and audio applications: Premiere Pro, After Effects, Audition, Media Encoder, Character Animator and Premiere Rush. There is a LOT in these new releases. Here are the details.

PREMIERE PRO

  • New Caption workflow
  • Media Replacement
  • Faster Warp Stabilizer
  • Team Project performance improvements
  • Copy and Paste Audio Effects in the Audio Track Mixer
  • Legacy Audio Effects Removed
  • Equitable Language

AFTER EFFECTS

  • Media Replacement in Motion Graphics templates and Essential Properties
  • Real-Time 3D Draft Preview
  • 3D Ground Plane
  • Improved Composition Toolbar
  • Team Project performance improvements
  • Equitable Language

AUDITION

  • Insert Mode in Waveform Editor
  • Keyframe Dragging
  • Equitable Language

MEDIA ENCODER

  • Support import of ARRIRAW footage

CHARACTER ANIMATOR

  • New Example Puppet
  • New project file format
  • Snap to Frames & Snap to Objects
  • Pin Fee When Standing

PREMIERE RUSH

  • New color presets
  • Apply color edits to all the clips in your video
  • Easily flip/mirror videos clips, images, stickers, and overlays
  • New sound effect
  • Performance Improvements

EXTRA CREDIT

Here’s a link to more information and demos of major features.


Please rate the helpfulness of this tip.

Click on a star to rate it!

… for Adobe Premiere Pro CC

Tip #1480: Premiere Speech-to-Text Goes Beta

Larry Jordan – LarryJordan.com

The link in this tip also includes a link to sign up for the beta program.

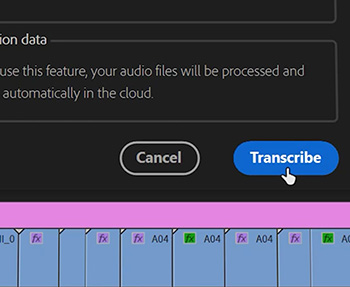
Premiere will soon support automatic transcripts natively within the app.

Topic $TipTopic

Adobe announced that Speech-to-Text is coming to Adobe Premiere Pro. Automatically generate a transcript and add captions to your videos to improve accessibility and boost engagement with Speech to Text.

Currently in beta, it is expected to be released in the next few months. It will require updating to Premiere 15.x. It includes support for: English, Spanish, Japanese, Korean, French, German, Chinese, Hindi, and more.

This web page has more information, along with the opportunity to sign up for Adobe’s beta program.


Please rate the helpfulness of this tip.

Click on a star to rate it!

… for Adobe Premiere Pro CC

Tip #1481: Adobe Stock Has Improved Templates

Larry Jordan – LarryJordan.com

Replaceable media, along with changeable text, improves motion graphic templates.

Templates that allow media replacement in Premiere have special indicators in Adobe Stock.

Topic $TipTopic

Dozens of new Motion Graphics templates allowing media replacement are now available on Adobe Stock. Motion graphics templates with media replacement make it easy for Premiere Pro editors to incorporate their own video or graphics, such as logos.

Media Replacement is a new feature in the latest After Effects release when creating Motion Graphics templates. Now, After Effects artists can flag media in a template such that Premiere editors can use the template, but replace the media.

Template text has always been replaceable, now media can be replaced as well, which makes templates much easier to use between projects. The nice thing is that editors don’t need to know After Effects to change either text or media.

EXTRA CREDIT

Here’s the link to Adobe Stock. Templates that allow media replacement are specially indicated (see screen shot).


Please rate the helpfulness of this tip.

Click on a star to rate it!