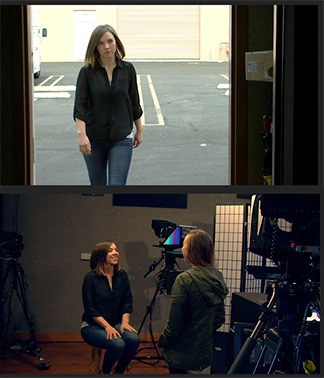
Let’s say you have a shot where the talent walks into an interior scene from the outside. Most cameras need to be white balanced for either daylight or interior and can’t adjust on the fly.
So, now you are looking at a shot in post that either starts blue and goes normal, or starts normal and goes orange. You can’t keyframe color settings, so how do you fix this?
Easy.
Cut the clip in the middle of the transition from outside to inside.
Color correct each side of the clip for the appropriate color.
Then, add a SLOW (4-8 second) dissolve between the two clips.
Because the action matches, the only thing the viewer will see is a smooth transition from an outside color grade to one for the interior.
Please rate the helpfulness of this tip.
Click on a star to rate it!
https://www.theinsidetips.com/wp-content/uploads/2019/09/Tips-Logo-700x150.jpg00Larry Jordanhttps://www.theinsidetips.com/wp-content/uploads/2019/09/Tips-Logo-700x150.jpgLarry Jordan2021-04-13 01:30:002021-04-09 17:13:23Tip #1558: Change Color Grades Within a Shot
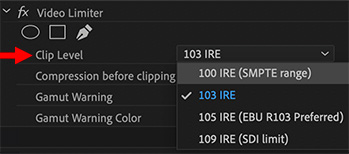
The Video Limiter is an effect that clamps white and black levels to “legal” levels. This means no white levels over 100% or black levels below 0%.
However, there are two significant problems with the Video Limiter you need to be aware of:
1. The default setting is wrong. The Video Limiter defaults to clamping video highlights to 103%. This is wrong. You need to change this to 100 IRE to be totally safe.
NOTE: While some broadcast outlets may allow IRE values greater than 100%, this should be the exception, not the default.
2. Worse, the Video Limiter properly clamps levels adjusted using either Curves or Color Wheels. But it does not clamp levels using the Basic Correction sliders. This, too, is a mistake. The Video Limiter needs to clamp all adjustments to gray scale, no matter where they are made.
Just giving you a heads-up.
EXTRA CREDIT
The Video Limiter is not needed when posting media to the web. But it IS needed for projects destined for broadcast, cable, DVD or many streaming services.
Please rate the helpfulness of this tip.
Click on a star to rate it!
https://www.theinsidetips.com/wp-content/uploads/2019/09/Tips-Logo-700x150.jpg00Larry Jordanhttps://www.theinsidetips.com/wp-content/uploads/2019/09/Tips-Logo-700x150.jpgLarry Jordan2021-04-13 01:30:002021-04-13 01:30:00Tip #1557: Caution When Using the Video Limiter!
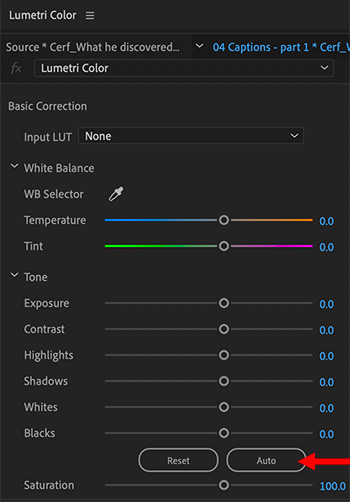
If you have an image that isn’t exposed properly and you need a quick fix, here’s how.
Select the image in the timeline, then go to: Color workspace > Lumetri Color > Basic Correction and click the Auto button (see screen shot).
This adjusts the sliders in Basic Correction to correct exposure problems.
WHAT THIS DOESN”T FIX
This won’t fix color problems. It won’t fix blown-out areas caused by over-exposure. And it won’t fix black levels that were crushed when the image was taken such that all shadow detail was lost.
So, this doesn’t work miracles, but it can make many images look a LOT better.
Also, because this moved sliders, if you don’t like something in the new settings, the modified settings are easy to adjust manually.
Please rate the helpfulness of this tip.
Click on a star to rate it!
https://www.theinsidetips.com/wp-content/uploads/2019/09/Tips-Logo-700x150.jpg00Larry Jordanhttps://www.theinsidetips.com/wp-content/uploads/2019/09/Tips-Logo-700x150.jpgLarry Jordan2021-04-06 01:30:002021-04-06 01:30:00Tip #1537: A Fast Way to Improve an Image
I’m shooting XAVC-L with four discrete audio tracks. No matter which audio option I choose I get the same stereo track with mics 1 & 2 mixed in both tracks. What I want is to maintain separate channel 1 and 2 sources so I can duck each mic if necessary.
Here’s my workaround.
I select the camera 1 source clip and choose: Modify > Audio Channels > Clip Channel:
Format = Stereo
Number of Clips = 1
That gives me a single stereo track with mic one on the left and two on the right.
Then I create my multicam selecting Stereo and the resulting multicam clip has the same stereo channel assignments.
Finally, I select the Multicam clip in the bin, Modify > Audio Channels > Clip Channel:
Format = Mono
Number of Clips = 2
This puts it back to two discrete audio tracks. Seems cumbersome, but it solved my problem.
The key is to convert a PDF to PNG before importing into Premiere.
The Page Options dialog in Photoshop scales the PDF image before import.
Premiere does not support importing PDF documents. This doesn’t mean that you can’t use them. Here are two workarounds.
TWO WORKAROUNDS
If all you need to do is import the entire PDF page without zooming into a portion of the page, use this workaround.
Workaround #1: Open the PDF in Preview, choose File > Export and set the export format to PNG. This exports the PDF at the size it was created, not the frame size of your project.
NOTE: Ignore the Resolution setting on export, even if you choose a higher number, the size and resolution of the exported image won’t change. I consider this a bug.
If you need to zoom into elements on the page – for example to provide closeups of an embedded image – this workaround is a better option:
Workaround #2: Open the file in Photoshop, or another image editing program. In the Page Options dialog (see screen shot) that appears: Set the Resolution to at least 400 Pixels/inch. This enlarges the image – while retaining image quality – so that you can easily zoom in or out of the PDF in the timeline.
EXTRA CREDIT
There are two types of PDFs: those that originated as bitmaps and those that originated as vectors.
Photos, scans and Photoshop documents will not scale very well, if at all. Text, Illustrator files or images created using musical notation should scale perfectly.
Please rate the helpfulness of this tip.
Click on a star to rate it!
https://www.theinsidetips.com/wp-content/uploads/2019/09/Tips-Logo-700x150.jpg00Larry Jordanhttps://www.theinsidetips.com/wp-content/uploads/2019/09/Tips-Logo-700x150.jpgLarry Jordan2021-04-06 01:30:002021-04-06 01:30:00Tip #1536: Working with PDFs in Premiere
Scale PDF images BEFORE bringing them into Final Cut.
The Page Options dialog in Photoshop scales the PDF image before import.
When you import a PDF file into Final Cut, it gets converted into a PNG. This causes problems when you need to scale the image because PDF files, generally, retain image quality when they are scaled. PNGs do not.
Essentially, the PNG is created at 100% of the size of the PDF page AFTER it is scaled to fit within the frame size of your project, not the original size of the PDF itself.
This conversion means that we can’t zoom into a portion of the PNG image without seriously losing image quality.
TWO WORKAROUNDS
If all you need to do is import the entire PDF page without zooming into a portion of the page, use this workaround.
Workaround #1: Open the PDF in Preview, choose File > Export and set the export format to PNG. This exports the PDF at the size it was created, not the frame size of your project. (You could, also, use this as a way to enlarge a PDF image to do a screen grab of a portion of a page.)
NOTE: Ignore the Resolution setting on export, even if you choose a higher number, the size and resolution of the exported image won’t change. I consider this a bug.
If you need to zoom into elements on the page – for example to provide closeups of an embedded image – this workaround is a better option:
Workaround #2: Open the file in Photoshop, or another image editing program. In the Page Options dialog (see screen shot) that appears: Set the Resolution to at least 400 Pixels/inch. This enlarges the image – while retaining image quality – so that you can easily zoom in or out of the PDF in the timeline.
EXTRA CREDIT
There are two types of PDFs: those that originated as bitmaps and those that originated as vectors.
Photos, scans and Photoshop documents will not scale very well, if at all. Text, Illustrator files or images created using musical notation should scale perfectly.
Please rate the helpfulness of this tip.
Click on a star to rate it!
https://www.theinsidetips.com/wp-content/uploads/2019/09/Tips-Logo-700x150.jpg00Larry Jordanhttps://www.theinsidetips.com/wp-content/uploads/2019/09/Tips-Logo-700x150.jpgLarry Jordan2021-04-05 01:30:002021-04-05 01:30:00Tip #1535: Better Options Working with PDF Files
How you replace one image with another makes a difference.
Scott was having a problem:
I use Final Cut Pro to edit a lot of videos with JPEG slides in them. I find that, somewhat randomly, if I have to replace one of the slides by using “Replace with Retime to Fit,” the JPEG I’m replacing will move the order of the previous clip. It’s odd… sometimes it happens, sometimes it doesn’t.
The solution was changing how Scott replaced the images. JPEGs are still images, there’s nothing to “retime.”
So, instead of using Replace with Retime to Fit, I suggested that Scott use Replace from Start. This matches the duration of the timeline image, without moving other clips out of position.
Problem solved.
Please rate the helpfulness of this tip.
Click on a star to rate it!
https://www.theinsidetips.com/wp-content/uploads/2019/09/Tips-Logo-700x150.jpg00Larry Jordanhttps://www.theinsidetips.com/wp-content/uploads/2019/09/Tips-Logo-700x150.jpgLarry Jordan2021-04-05 01:30:002021-04-05 01:30:00Tip #1528: A Better Way to Replace JPEG Images
FFmpeg is the Swiss Army knife of media compression.
This gets pretty geeky. Why? Because this command line tweak describes how to use FFmpeg for HEVC compression that plays on iOS devices.
One of the benefits of using HEVC, especially for videos we don’t plan to edit, is the small file size this codec creates.
This is very helpful for storing media on mobile devices where storage is frequently limited. The problem is that FFmpeg, by default, creates HEVC files which won’t play on an iOS device.
The fix, as Aaron K. reported is changing a command line tag – either before or after encoding – that fixes this problem.
What is especially useful about this technique is that it can be applied after a file is compressed as well as process a group of files stored in a folder.
Please rate the helpfulness of this tip.
Click on a star to rate it!
https://www.theinsidetips.com/wp-content/uploads/2019/09/Tips-Logo-700x150.jpg00Larry Jordanhttps://www.theinsidetips.com/wp-content/uploads/2019/09/Tips-Logo-700x150.jpgLarry Jordan2021-03-30 01:30:002021-03-26 16:26:58Tip #1521: Use FFmpeg to Create HEVC Files for iPhones
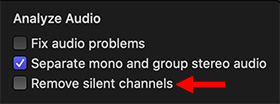
Zoom can cause audio drop out. Here’s a quick fix.
Analyze Audio options in the Media Import window.
Patrick Flaherty shared this tip.
Larry, I’ve been editing videos of interviews that were done on Zoom. I found that because of either buffering or digital drop out, I’m not sure what causes it, but some of the audio disappears, it gives me a small loss. i
I found that when I changed the import preferences by unchecking the Remove Silent Channels it imported without a problem.
Larry replies: Patrick, I’m not sure why this drop-out is occurring, but this is a great tip to help us fix it when it does. Thanks!
You’ll find this option in two places in Final Cut Pro:
Preferences > Import
Media Import window > Analyze Audio settings on the far right side.
Please rate the helpfulness of this tip.
Click on a star to rate it!
https://www.theinsidetips.com/wp-content/uploads/2019/09/Tips-Logo-700x150.jpg00Larry Jordanhttps://www.theinsidetips.com/wp-content/uploads/2019/09/Tips-Logo-700x150.jpgLarry Jordan2021-03-22 01:30:002021-03-22 01:30:00Tip #1498: Fixing a Zoom Audio Problem
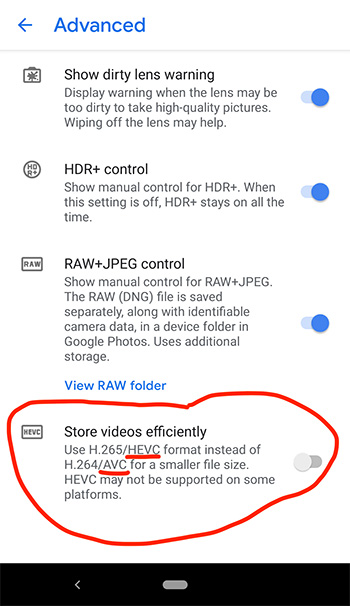
I shot a video on my Google Pixel 3 of my wife opening a birthday present and when I transferred it to my Mac, it wouldn’t play. After some detection, I discovered that an Android update had defaulted to an mp4 version with H.265/HEVC instead of their old H.264/AVC.
I’m not educated enough to know if QuickTime is choking the H.265 or the HEVC portion of this new update. I tested the old setting and it worked just fine.
Users can find this setting by clicking the Advanced link in the main Camera setting (see screen shot).
I’m guessing I’m not the only one who has fallen victim to Google wanting to store smaller video files. Thanks again for all your help over the years!
Please rate the helpfulness of this tip.
Click on a star to rate it!
https://www.theinsidetips.com/wp-content/uploads/2019/09/Tips-Logo-700x150.jpg00Larry Jordanhttps://www.theinsidetips.com/wp-content/uploads/2019/09/Tips-Logo-700x150.jpgLarry Jordan2021-03-16 01:30:002021-03-12 16:53:17Tip #1490: Problems Playing Android Videos
We may request cookies to be set on your device. We use cookies to let us know when you visit our websites, how you interact with us, to enrich your user experience, and to customize your relationship with our website.
Click on the different category headings to find out more. You can also change some of your preferences. Note that blocking some types of cookies may impact your experience on our websites and the services we are able to offer.
Essential Website Cookies
These cookies are strictly necessary to provide you with services available through our website and to use some of its features.
Because these cookies are strictly necessary to deliver the website, refuseing them will have impact how our site functions. You always can block or delete cookies by changing your browser settings and force blocking all cookies on this website. But this will always prompt you to accept/refuse cookies when revisiting our site.
We fully respect if you want to refuse cookies but to avoid asking you again and again kindly allow us to store a cookie for that. You are free to opt out any time or opt in for other cookies to get a better experience. If you refuse cookies we will remove all set cookies in our domain.
We provide you with a list of stored cookies on your computer in our domain so you can check what we stored. Due to security reasons we are not able to show or modify cookies from other domains. You can check these in your browser security settings.
Google Analytics Cookies
These cookies collect information that is used either in aggregate form to help us understand how our website is being used or how effective our marketing campaigns are, or to help us customize our website and application for you in order to enhance your experience.
If you do not want that we track your visit to our site you can disable tracking in your browser here:
Other external services
We also use different external services like Google Webfonts, Google Maps, and external Video providers. Since these providers may collect personal data like your IP address we allow you to block them here. Please be aware that this might heavily reduce the functionality and appearance of our site. Changes will take effect once you reload the page.
Google Webfont Settings:
Google Map Settings:
Google reCaptcha Settings:
Vimeo and Youtube video embeds:
Other cookies
The following cookies are also needed - You can choose if you want to allow them:
Privacy Policy
You can read about our cookies and privacy settings in detail on our Privacy Policy Page.