… for Codecs & Media

Tip #1434: Fix for Intermittent Audio Playback

Larry Jordan – LarryJordan.com

Simply renaming the file fixed the problem!

An audio waveform.

Topic $TipTopic

This tip came from Shaun Fothergill.

I am running macOS Big Sur and the latest version of FCP.

I had a problem with importing an mp4 Teams (Microsoft) video into my timeline. Intermittently, I would see only part of the audio wave form but could see/hear the whole video/audio playback.

When I exported the gaps in the audio waveform were silenced on play back – this got my head scratching!

If I played the video before import in QT or dropped it into Premiere then all seemed good – full audio waveform seen in Premiere for example.

So with a combination of these I was able to use FCP to get through my edit.

Today the dropped audio waveform happened again but, then, I stumbled on a ridiculously easy fix!

Before you import the file into FCP, rename your .mp4 video to .mov . Bingo! Audio is back on the timeline

All it took was renaming the file.


Please rate the helpfulness of this tip.

Click on a star to rate it!

… for Codecs & Media

Tip #1431: Editing ProRes RAW in DaVinci Resolve

Larry Jordan – LarryJordan.com

Converting ProRes RAW to ProRes 4444 allows Resolve to edit the media.

The ProRes RAW logo.

Topic $TipTopic

ProRes RAW is a very popular codec that provides the highest-possible image quality in the smallest possible (but not actually very small) file size.

ProRes RAW can be edited in:

  • Final Cut Pro
  • Adobe Premiere Pro
  • Avid Media Composer

But not DaVinci Resolve. However, there’s a workaround, as reported by Charles Hull on the BMD forum:

“I’m sure this has been discussed here, but there is a very simple work-around for running ProRes RAW in Resolve. When I first heard about it I thought it was too much hassle, and might not work well anyway, so I continued with FCPX for ProRes RAW. So the work-around is to transcode ProRes RAW to ProRes 4444. ProRes RAW is 12 bits, and ProRes 4444 is 12 image bits, so it is a good fit, and it runs well in Resolve. The simple and painless way to do this is to import all the clips into Compressor and bulk export them to ProRes 4444.

“I’ve been shooting ProRes RAW since it first came out. I do mostly HDR, and get very good results with ProRes RAW and Resolve. Coincidently just ordered the Panasonic S1H and was happy to see it will have ProRes RAW via the Atomos NinjaV. I know how to handle this.”


Please rate the helpfulness of this tip.

Click on a star to rate it!

… for Apple Motion

Tip #1406: Lighting Can Bog Down Your System

Larry Jordan – LarryJordan.com

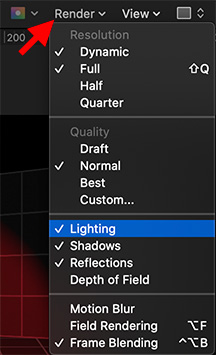
Lighting is render-intensive. Here’s how to turn it off temporarily.

The Render menu, with the Lighting option highlighted.

Topic $TipTopic

(I discovered this tip while researching a recent PowerUP webinar illustrating Lighting Techniques of Apple Motion 5.5.)

Lighting in Apple Motion is very render-intensive, especially for older systems.

If you find yourself unable to play a Motion project, or it plays very slowly, turn off the lighting until you are ready to export.

To do so, go to the Render menu in the top right corner of the Viewer (Canvas) and uncheck Lighting. This displays your project using a generic ambient light which any computer can display easily.

EXTRA CREDIT

If you export a file or still frame, even if rendering is turned off, Motion will render the file using the correct lighting.


Please rate the helpfulness of this tip.

Click on a star to rate it!

… for Adobe Premiere Pro CC

Tip #1369: Premiere Pro, Big Sur & M1 Macs

Larry Jordan – LarryJordan.com

Premiere supports Big Sur, but only partially supports M1 Macs

Topic $TipTopic

Just a quick FYI.

Premiere Pro is compatible with macOS Big Sur (version 11) and there are no known issues at this time. For the best experience, Adobe recommends running the latest version of Premiere Pro.

Premiere Pro 14.6 onwards will run under Rosetta 2 emulation mode on Apple devices with Apple Silicon M1 processors with this known issue: keyboard shortcuts appear grayed-out, but still work.

A new version of Premiere Pro with native support for Apple M1 systems is currently in Beta. You can install the Premiere Pro Beta from the Beta tab in the Creative Cloud Desktop.

Here’s the link to Adobe’s help with more information.


Please rate the helpfulness of this tip.

Click on a star to rate it!

… for Apple Motion

Tip #1363: Change Motion’s Project Properties

Larry Jordan – LarryJordan.com

All project properties can be modified – except frame rate.

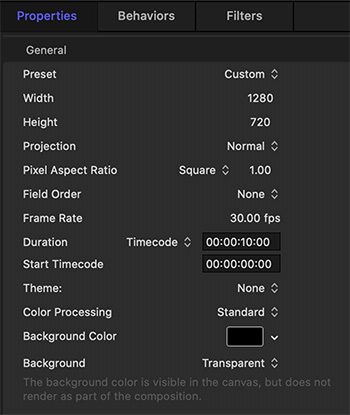
The Project Properties panel.

Topic $TipTopic

Normally, you set essential Motion project properties when you create a project using the Project Browser. But, what happens if you need to change project settings after the project is created?

That’s where Project Properties come in.

  • To change them, select the Project in the Layers panel.
  • Then, go to Inspector > Properties and change what you need to change.

NOTE: A faster way to do this is to type Cmd + J.

This allows you to change all the technical settings of a project EXCEPT frame rate. If you need to change the frame rate, you’ll need to create a whole new project.

NOTE: Unlike Final Cut, even if the project is empty you can’t change frame rate once a project is created.

EXTRA CREDIT

Changing the project duration does not modify the timing of any elements already added to it.


Please rate the helpfulness of this tip.

Click on a star to rate it!

… for Codecs & Media

Tip #1356: Fixing Unix Executable Files

Larry Jordan – LarryJordan.com

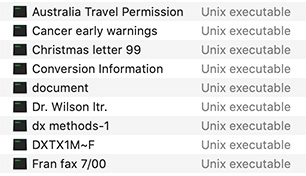
Most of the time, simply adding the correct file extension fixes this problem.

An example of files on a server missing file extensions.

Topic $TipTopic

Most of the time, your images, media and documents open when you need them on a Mac. However, if you discover your files are suddenly unopenable “Unix executables,” here’s how to fix it.

In most cases, a Unix executable is a file stored on a server without a file extension. Most of the time, simply adding the correct file extension fixes this problem.

NOTE: Files stored on a Mac use other indicators to track which application created the file. However, file servers don’t use the Mac operating system and require file extensions to properly store and access files.

The trick is figuring out what’s the right extension. Generally, I try to find a similar file created around the same time. Select the file that works and type CMD + I. In the Get Info window that appears, look in the Name & Extension field to determine the correct extension to use.

For example, most of my early (1995 – 2010) digital videos were saved as QuickTime movies. Simply adding .MOV as a file extension solved the problem.

EXTRA CREDIT

I’ve also run into problems with older image files and word processing documents. Adding file extensions fixed the problem with these, too.


Please rate the helpfulness of this tip.

Click on a star to rate it!

… for Adobe Premiere Pro CC

Tip #1302: Surprising Preview Resolutions

Larry Jordan – LarryJordan.com

Be careful – preview files may not match your source file resolution.

Topic $TipTopic

Render file resolution can vary, depending upon two hidden settings. Here’s what you need to know to avoid problems.

According to the Help files for Adobe Premiere:

If your previews are rendered at a resolution below the sequence resolution, the playback resolution is actually a fraction of the preview resolution.

For example, you can set your preview files to render at 1/2 the sequence frame size (1/2 resolution) and your playback resolution to 1/2 resolution. The rendered previews play back at 1/4 of original resolution (assuming that the resolution of the original media matched the sequence resolution).

NOTE: You can set keyboard shortcuts to change the playback resolution.

Not all resolutions are available for all sequence types. For Standard Definition sequences, such as DV, only Full and 1/2 are available. For many HD sequences up to 1080 frame size, Full, 1/2, and 1/4 are available. For sequences with frame sizes larger than 1080, such as RED, more fractional resolutions are available.

EXTRA CREDIT

This possible resolution difference is why I never use existing preview files when exporting. I always want to be sure exports are at the highest resolution.

Here’s the link to Adobe’s Help for more information.


Please rate the helpfulness of this tip.

Click on a star to rate it!

… for Apple Final Cut Pro X

Tip #1222: Fix a Warbling Music Track

Phil Cutting

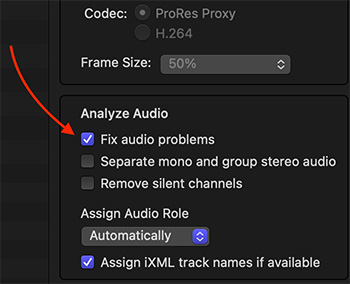
Checking this checkbox makes things worse…!

UNCHECK “Fix Audio Problems” to minimize audio artifacts during import.

Topic $TipTopic

Phil Cutting suggested this tip.

For years I suffered strange audio artifacts on music tracks imported for FCP. I assumed it was a damaged file until I noticed I had Fix Audio Problems checked in the Import Media window.

As soon as I unchecked it, the problem went away!

Larry adds:

Good to know. As a general rule, I DO check both Separate Mono… and Remove Silent Channels. I find these simplify importing dual-channel mono audio.


Please rate the helpfulness of this tip.

Click on a star to rate it!

… for Codecs & Media

Tip #1210: Tips for Faster Video Compression

Larry Jordan – LarryJordan.com

These settings can disable hardware acceleration, without benefitting the image.

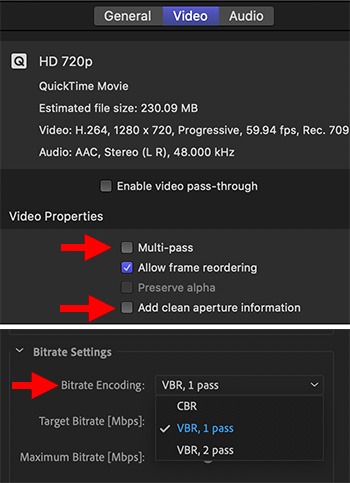
Apple Compressor (top) and Adobe Media Encoder. Preferred settings are shown.

Topic $TipTopic

Last week, I wrote about the hardware acceleration provided by both the T-2 and M-1 chips in Apple computers Tip #1190. As well, most current Intel CPUs also support hardware acceleration of 8-bit H.264 and HEVC media.

However, it is possible to accidentally turn OFF hardware acceleration by changing one setting in either Apple Compressor or Adobe Media Encoder.

NOTE: I can’t think of a single good reason to do this, so, um, don’t do it.

SETTING 1 – COMPRESSOR

Hardware acceleration is always single pass. Enabling multi-pass turns off hardware acceleration. (The top screen shot illustrates this setting in Apple Compressor.)

SETTING 2 – ADOBE MEDIA ENCODER

AME has two Bit Rate settings that can turn off hardware acceleration: CBR and VBR 2-pass. For fastest compression be sure to always select VBR 1-pass.

EXTRA CREDIT

In the past, we used 2-pass software compression because it looked better. Based on my observations, using today’s CPUs, hardware-accelerated compression looks as good as, or better than, media compressed using software.

And, it finished a WHOLE LOT faster, as well.

In Apple Compressor, for digital images, you can also turn off Clean Aperture. Tip #1211 explains why.


Please rate the helpfulness of this tip.

Click on a star to rate it!

… for Apple Motion

Tip #1093: Audio is Motion’s Achilles Heel

Larry Jordan – LarryJordan.com

Always trim an audio clip to end one frame earlier than the end of a fade.

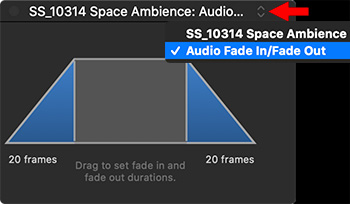
The HUD displaying the arrow to select effects applied to an element.

Topic $TipTopic

Audio is Motion’s Achilles heel. The audio controls in Motion are terrible. However, here’s a trick that can bail you out when you are in a hurry and need to add an audio clip that’s longer than your project.

Motion works best when you add a complete soundtrack, then edit to that, rather than trying to combine multiple audio elements. However, sometimes you need to add an audio fade to the end of a project. Except, every time you do, the audio either doesn’t fade or it fades then pops at the end. What’s going on?

The problem is that effects and audio are separate clips and, most often, their timing doesn’t match. Here’s what you need to do.

  1. Add an audio clip to your project
  2. Go to the Audio tab at the top of the Layers panel and select the audio clip. This displays it in the mini-timeline.
  3. Position the playhead where you want the audio to end and set an Out (type “O“).
  4. With the audio clip still selected, apply Behaviors > Audio > Audio Fade In / Fade Out.
  5. Display the HUD. If the fade controls are not displayed, click the small up/down arrow to the right of the HUD title (see screen shot) and select the effect.
  6. Adjust the duration of the fade out as needed.
  7. Finally, and this is the important step, make SURE the Out of the fade is one frame LONGER than the Out of the audio clip.

Modifying the timing of both the effect and the clip assures the fade will be heard, the audio will disappear and there will not be a pop at the end.


Please rate the helpfulness of this tip.

Click on a star to rate it!