… for Adobe Premiere Pro CC

Tip #1042: Multiple Bugs in Proxy Export

Larry Jordan – LarryJordan.com

For now, use proxies, but avoid using proxy export.
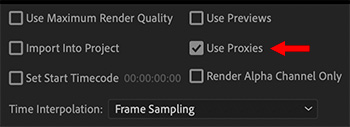
The “Use Proxies” option in Premiere. My advice? Don’t use it.

Topic $TipTopic

New in the 14.4. update to Adobe Premiere Pro is the ability to export proxy files, instead of high-resolution camera masters. The only problem is, this doesn’t work.

While Premiere has supported proxies for a while, new with this release is the ability to export proxy media. Prior, regardless of whether proxies were active or not, it would always export high-resolution media.

While exporting proxy files is a note-worthy feature, this feature does not work in the 14.4 release. After working with this for three days, and talking with Adobe, I have never gotten proxies to export. Instead, regardless of whether proxies are active or not, Premiere always exports high-resolution media.

For now, don’t use this function. Adobe acknowledges that their whole proxy workflow needs more work. I expect to see improvements to proxies in future releases.

EXTRA CREDIT

Compounding this problem, another bug in working with proxies is that if you create a custom proxy ingest setting – say to burn a watermark into the proxy media, Premiere will reject the custom setting due to enabling “Match frame size and frame rate.” However, even when these settings are turned off, Premiere still won’t accept a custom proxy ingest setting.

And, if you create proxies outside of Premiere using Adobe Media Encoder, Premiere will refuse to link to them because AME changes the audio channel mapping, which Premiere needs to link the files.


Please rate the helpfulness of this tip.

Click on a star to rate it!

… for Adobe Premiere Pro CC

Tip #1035: Bugs in Automatic Scene Detection

Larry Jordan – LarryJordan.com

Scene Detection works reliably provided you don’t unlink audio from video.

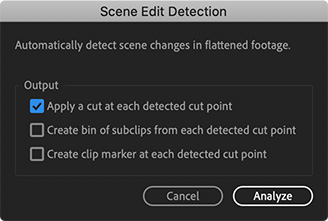
Scene detection options in Adobe Premiere Pro v. 14.4.

Topic $TipTopic

There are two significant bugs in the new automatic scene detection feature in the 14.4 update to Adobe Premiere Pro.

Scene detection reviews a clip, then adds cuts where the scene changes. This is a big help when you need to deconstruct an already-edited piece, or need to chop up DV or HDV footage where multiple takes are contained in a single clip.

NOTE: Scene detection can also create subclips or add clip markers, if that is your preference.

However, in preparing my recent webinar on the “New Features in Adobe Premiere Pro” I discovered two significant bugs in this process.

First, if you unlink audio from video for the clip you want to process, scene detection will fail more than 90% of the time. (If the clip is not unlinked, scene detection works reliably.)

Second, if you don’t want the audio cut, Adobe says you can merge the audio back into a single clip after scene detection cuts a clip. However, when the audio segments are selected in the timeline, the Merge option is disabled.

EXTRA CREDIT

The best option, if you want to cut video and not audio, is to leave the audio and video clips linked, use scene detection to cut the clip, then, delete all the audio segment except the first one, then roll trim the first clip back to its original length.


Please rate the helpfulness of this tip.

Click on a star to rate it!

… for Apple Final Cut Pro X

Tip #1038: Apple Releases Bug Fix Updates

Larry Jordan – LarryJordan.com

Updates fix most of the bugs introduced with the 10.4.9 update.

Topic $TipTopic

Thursday last week, Apple released bug-fix updates to Final Cut Pro X, Motion 5 and Compressor 4. Apple also updated the ProVideo codecs.

The Final Cut update fixed the color flicker problem that first appeared in version 10.4.9, along with a variety of other bugs. It also, at least on my system, fixed the bug preventing voice-overs from actually recording.

One bug that was NOT fixed is the inability to export chapter markers from FCP X. Apple is still researching this.

Here’s the list of fixes from Apple’s release notes:

Final Cut Pro

  • Fixes an issue in which XAVC media from the Sony PXW-FX9 camera is not recognized
  • Fixes an issue where brightness levels shift when switching between Better Quality and Better Performance in the viewer
  • Fixes an issue in which effect keyframes are not added correctly when using onscreen controls
  • Improves stability when using the transform tool with multiple clips in the timeline
  • Improves reliability when exporting an FCPXML that contains Compound clips
  • Addresses an issue which could prevent sharing at certain resolutions
  • Fixes an issue in which sharing a Compound or Multicam clip from the timeline was disabled.

Motion

  • Fixes an issue in which XAVC media from the Sony PXW-FX9 camera is not recognized

Compressor

  • Fixes an issue in which XAVC media from the Sony PXW-FX9 camera is not recognized

EXTRA CREDIT

Here’s the complete list of features and fixes in every version of Final Cut 10.4.

Updates to Final Cut, Motion and Compressor are free and available in the Mac App Store. The ProVideo updates are free and available in System Preferences > Software Update.


Please rate the helpfulness of this tip.

Click on a star to rate it!

… for Apple Final Cut Pro X

Tip #1017: Chapter Marker Export Option Missing

Larry Jordan – LarryJordan.com

The option to include chapter markers on export has disappeared in FCP X 10.4.9.

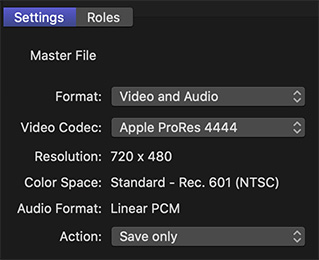
The Master File > Settings panel. The checkbox to export chapter markers is gone.

Topic $TipTopic

Another problem that surfaced with the 10.4.9 update to Apple Final Cut Pro X is that chapter markers can no longer be exported – at least on my system.

As you can see from the screen shot, when exporting a master file, there’s no checkbox to include chapter markers in the export. And, not surprisingly, if I include chapter markers in my project, they don’t export.

This problem did not exist in the 10.4.8 version of Final Cut.

For now, if you need chapter markers, don’t upgrade to 10.4.9.

EXTRA CREDIT

Chapter markers can be included in both QuickTime movies and MPEG/4 movies. I use them in all my webinar downloads and streams, not just DVDs.

I’ve contacted Apple about this problem and they are looking into it.


Please rate the helpfulness of this tip.

Click on a star to rate it!

… for Apple Final Cut Pro X

Tip #1016: Caution: Color Flickering in FCP X 10.4.9

Larry Jordan – LarryJordan.com

FCP X 10.4.9 seems to create color flickering during grading.

Topic $TipTopic

I have received multiple reports this last week from editors reporting color shifts or color flickering when editing camera native media in Final Cut Pro X 10.4.9. This problem did not exist in Final Cut 10.4.8.

As one editor reported:

We have found the following:

  • The jumpiness happens as the clip is being color corrected with or without a camera LUT applied
  • There is no difference whether the timeline is set to “Better Performance” or “Better Quality;” the color levels still jump around
  • Transcoding the media to “proxy” and working with the proxy files eliminates the jumpiness during color correction

I reported the problem to Apple and they are looking at it. For now, until they figure out what’s going on:

  • If you haven’t upgraded to 10.4.9, don’t.
  • If you have, consider doing your color grades in proxy mode until this issue is resolved.

EXTRA CREDIT

Please add a comment if you’ve experienced similar problems. I will forward your comments to Apple.


Please rate the helpfulness of this tip.

Click on a star to rate it!

… for Adobe Premiere Pro CC

Tip #891: Hmm… So, What’s the Benefit?

Larry Jordan – LarryJordan.com

Playback resolution may help rendering, but it won’t help storage or your CPU.

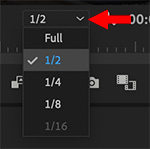
The Playback Resolution setting in the lower right corner of the Program Monitor.

Topic $TipTopic

For years, I’ve thought there was a benefit to changing Playback Resolution. I thought that changing Playback Resolution decreased the load on the CPU, allowing it to play more complex clips more easily. Then, I measured the results. Hmm… surprising.

This week, on the basis of some brief tests and measuring the results using Activity Monitor, I learned that changing Playback Resolution did not affect the CPU, GPU or storage.

I played back a 1.4 GB 4K clip in Premiere. Regardless of where Playback Resolution was set, the first time the clip played the data transfer rate was the same.. (After that, the clip was cached into RAM, thus minimizing the work the storage system needed to do.)

Regardless of the Playback Resolution setting, the CPU expended between 325% – 350% during playback.

And, after applying a Gaussian blur (set to 50), the GPU didn’t change, regardless of Playback Resolution. (Though this result might also reflect Premiere’s lack of GPU support.)

So, for now, I’m leaving it set to 1/2 and doing some more tests.

EXTRA CREDIT

You can measure this yourself using Activity Monitor. Open it along with Premiere and measure the impact Playback Resolution has on your own footage.

NOTE: Keep in mind that Premiere will attempt to cache files in RAM where possible. So if you play the same file more than once, all playbacks after the first will most likely play from cache.


Please rate the helpfulness of this tip.

Click on a star to rate it!

… for Codecs & Media

Tip #883: Don’t Turn Your Hard Disk Into a Camera

Larry Jordan – LarryJordan.com

Don’t panic. This problem is easy to fix. Just pay attention.

Image courtesy of pexels.com.

Topic $TipTopic

Warning! Don’t turn your hard disk into a camera. I was reminded of this today with an email from Jon G. who wrote:

“Sorry to bother as this is probably obvious but it surprised me at first….

“When I went to import from an external drive, FCP saw the entire drive as a camera, not an external device! And started to load all 5,000 plus items individually, not good.”

Agreed. The first time you see this, it can be VERY scary!

This happens when you copy the folders from a camera card directly to your hard disk without putting them into their own containing folder.

If this happens to you, create a new folder on your hard disk and move all the camera card folders into that separate folder.

NOTE: To make sure you find them all, mount a camera card to your computer and use that as a guide to indicate which folders you need to find and move.

Here’s a tutorial from my website that describes this process in more detail.


Please rate the helpfulness of this tip.

Click on a star to rate it!

… for Random Weirdness

Tip #779: Why a Lens is Worse at f/22 than f/8

Larry Jordan – LarryJordan.com

The smaller the aperture, the greater the diffraction.

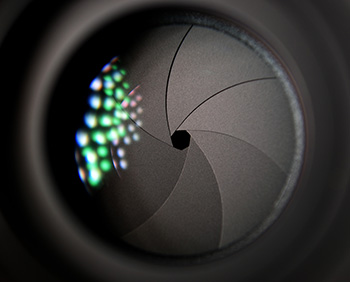
Lens aperture is determined by the iris setting.

Topic $TipTopic

This article first appeared in PetaPixel.com. This is an excerpt.

It’s common knowledge that most lenses are at their best (i.e. sharpest) between f/5.6 and f/8, depending on the lens. But why? The reason a lens is softer at f/22 than it is at f/8 is due to a phenomenon called diffraction.

Two interesting points worth highlighting are:

  • Lenses get sharper as you stop down because stopping down reduces aberration, even while it increases diffraction.
  • It’s only when the “blurry points” caused by diffraction become bigger than an individual pixel that you’ll begin to see the effect in your images.

This has two consequences that are actually noticeable in the real world:

  • All other things being equal, a higher-resolution sensor will show the effects of diffraction sooner, because the individual pixels are smaller.
  • A really well-corrected lens will begin showing the negative effects of diffraction earlier.

EXTRA CREDIT

The link at the top includes more details and a video illustrating diffraction in real life.


Please rate the helpfulness of this tip.

Click on a star to rate it!

… for Apple Final Cut Pro X

Tip #763: Compound clips hide markers

Larry Jordan – LarryJordan.com

There’s no easy way to copy and paste multiple markers.

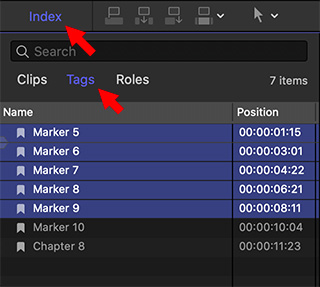
Chapter markers add to a timeline clip.

Topic $TipTopic

Here’s a tip that I discovered this week: if you add chapter markers to a clip, then wrap that clip in a compound clip, the markers won’t export.

Each week, I add chapter markers to my latest webinar to simplify navigation for people who download the QuickTime version.

Normally, as part of the editing process, I send my FCP X project to Adobe Audition for audio mixing; a process that retains all markers. This week, though, for technical reasons, I needed to mix the webinar in FCP X.
The fastest way to do that is to enclose all my timeline clips – and their 42 markers – in a compound clip, then apply the audio filters I needed.

However, when it came time to export, the chapter markers, which were attached to clips, did not export with the compound clip.

Instead, I needed to move the markers to the compound clip itself. However, there is no way in FCP X to select a group of markers to copy and paste them to another clip or project. You can copy individual markers, but not groups.

To get my markers to export I copied each marker individually from each clip to the compound clip. This wasn’t difficult, just really time-consuming.

I’ll add this to my list of “FCP X Features I’d Like To See” … along with a scrolling timeline.


Please rate the helpfulness of this tip.

Click on a star to rate it!

… for Adobe Premiere Pro CC

Tip #685: Troubleshoot Premiere Pro Issues

Larry Jordan – LarryJordan.com

Here are ideas you can try to keep your system running smoothly.

Topic $TipTopic

This tip originally appeared as an Adobe Support article. This is an excerpt.

Having problems with Premiere Pro? The trouble-shooting guide linked above has tips on the following issues:

  • Why is my rendering slow?
  • Why doesn’t my timeline show any video preview?
  • Why am I getting choppy playback and poor performance?
  • What can I do to optimize the playback performance?
  • Checking for issues with applied effects
  • Checking for issues with plug-ins
  • What can I do if I think my hardware setup is not optimal?
  • Why does my audio playback keep getting stuck?
  • How do I get better performance with h.264/h.265 media?

EXTRA CREDIT

Here are more tips on how to optimize your system for video editing with Premiere Pro and After Effects.


Please rate the helpfulness of this tip.

Click on a star to rate it!