… for Random Weirdness

Tip #629: What Makes a Video Tripod Different?

Larry Jordan – LarryJordan.com

Video camera tripods are different – and the difference is in the head.

Tripods and fluid heads make the all the difference in creating usable shots.

Topic $TipTopic

This tip first appeared in Adorama.com. This is a summary.

What exactly is a video tripod, and how does it differ from one that’s used primarily for shooting still pictures? Basically, it’s what’s on top that counts—namely the head that’s affixed atop the legs by means of a mounting screw. The most common and popular video head configuration is the pan/tilt head that’s controlled by one or two extending arms that allow you to easily move the attached camera horizontally (panning) and vertically (tilting) to follow the action.

However, if you expect to shoot smooth, professional looking video without the dreaded herky-jerky “home movie” effect, you must be able move the head very smoothly, evenly, and fairly slowly in either direction as the camera is recording the action.

Not surprisingly, achieving this natural-looking fluid motion consistently requires a fluid head, which provides an effective damping mechanism in the form of a viscous substance like grease or oil contained in a restricted reservoir or channel that’s integral with the head’s panning and/or tilting mechanisms. Without getting into the technical weeds, suffice it to say that there are two main types of fluid heads—fluid-effect heads, and true fluid heads.

  • Fluid-effect heads are simpler, less expensive, and generally provide a fixed amount of damping to smooth out and slow down the panning and tilting action. Fluid-effect heads are more than satisfactory for general use and will yield noticeably better videos than you can get with the typical 3-way pan/tilt head found on a still photography tripod.
  • True fluid heads are more complex in design and construction, more expensive, and provide a range of damping adjustments to suit specific shooting situations. For example, you can set them to provide less damping and more responsiveness when shooting fast moving action, or more damping when you’re using long telephoto lenses and want to pan more slowly. Virtually all professionals and many serious videographers opt for the enhanced performance and flexibility of a true fluid head and consider the extra cost well worth it.

Other features found on video tripods include extended platforms designed to accommodate and position a variety of video rigs for optimal balance, illuminated bubble levels, leg strut supports for added stability, a variety of ball heads that can be locked inn position for panning, and accessory dollies for moving the entire tripod to track the action. Crutch-style legs, once the hallmark of cinematography and video tripods, are still found on some pro-aimed units, but carbon fiber and aluminum legs with flip locks or twist collars now predominate.

EXTRA CREDIT

The article continues with a look at ten different tripods and fluid heads that videographers might consider when upgrading their gear.


Please rate the helpfulness of this tip.

Click on a star to rate it!

… for Codecs & Media

Tip #591: In-Depth Overview of USB

Larry Jordan – LarryJordan.com

USB is ubiquitous and growing in speed.

A USB logo and plug.

Topic $TipTopic

The folks at Juiced Systems created an excellent overview of USB called: “Know Your USB. A Practical Guide to the Universal Serial Bus.” (Juiced Systems, based in Orange County, CA, designs & creates unique high performance computer accessories for power users and enterprise professionals.)

Key Takeaways

  • USB cables, ports, and connectors (hardware) have varying USB versions, generations, and specifications (software) that dictate the speed and performance.
  • USB types are denoted by letters, such as Type-A and Type-B, while USB versions have numbers to them, like USB 3.2 or USB4.
  • A USB device may physically fit into a USB port, but its performance can be hampered by a generation or standard mismatch. For example, your USB 2.0 device can work with a USB 3.0 port, but the speed takes on USB 2.0’s. Similarly, a 3.0 device can work with a USB 2.0 port, and the speed is that of the port. USB devices often specify the highest standard they support and require in their product labels.
  • Speaking of speed, USB 1.0, 2.0, 3.0, and 4 each have maximum data transmission rates. These are theoretical numbers at best, and the actual speed still varies. If you are experiencing slow data transfer, it may have to do with the USB port (transfer speed), as noted above, as well as the read/write speed of the devices involved.

USB has been hailed as the king of connectors or the port that changed everything. But at the end of the day, it is that cable or port that makes your life easier as you charge your phone, save files, or access your peripherals on your laptop.

EXTRA CREDIT

The full report is well-written, in-depth and easy-to-understand. Here’s the link.


Please rate the helpfulness of this tip.

Click on a star to rate it!

… for Codecs & Media

Tip #561: Optimize Compression Settings for YouTube

Larry Jordan – LarryJordan.com

In most compression software, the optimal settings are not the default.

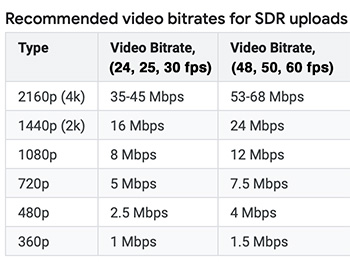
Video compression bitrates for YouTube for SDR media.

Topic $TipTopic

Here are settings you can use to optimize audio and video compression for YouTube. (These are based on published settings from YouTube, a link to which is below.)

Container: MP4

Video codec: H.264

  • Progressive (deinterlace interlaced media)
  • High Profile
  • Closed GOP
  • Variable bit rate
  • Chroma subsampling: 4:2:0

Audio codec: AAC-LC (AAC if no LC choice is available)

  • Bit rate: 384 Kbps stereo / 128 Kbps mono

Frame rate: The frame rate you shot. Do NOT convert frame rates.

Bit rate: See screen shot for table.

If given the choice:

  • Turn off mulitpass compression if your hardware is more recent than 2015.
  • Turn on Frame Reordering
  • Turn off Add clean aperture information

NOTE: These settings differ from the YouTube default settings in Apple Compressor.

EXTRA CREDIT

Here’s the link to YouTube’s Support Site with more details.


Please rate the helpfulness of this tip.

Click on a star to rate it!

… for Apple Final Cut Pro X

Tip #525: Replace Missing Audio – Fast

Larry Jordan – LarryJordan.com

Two keystrokes and done!

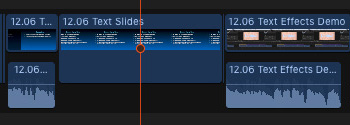
A video clip with missing audio in the Final Cut timeline.

Topic $TipTopic

Have you ever deleted the audio or video of a clip, only to realize later that you need it back? Yup, me too.

Here’s a blindingly fast way to replace the timeline clip:

  • Put the playhead in the clip you want to fix; you can use the skimmer, but I prefer the playhead. You don’t even need to select the clip.
  • Type Shift + F (This creates a match frame of the timeline clip in the Browser.)
  • Type Option + R (This replaces the timeline clip with the clip in the Browser, but matching the In of the Timeline clip.)

Literally, you can replace missing audio in less than 1/2 a second.

Wow…!


Please rate the helpfulness of this tip.

Click on a star to rate it!

… for Apple Motion

Tip #432: Create Your Own Templates in Motion

Larry Jordan – LarryJordan.com

Templates allow you to speed repetitive tasks.

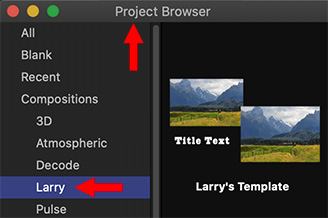
Templates are listed on the left side of the Project Browser in Motion.

Topic $TipTopic

If you find yourself creating the same projects over and over in Motion, here’s fast way to create a template to speed your work.

When you are creating the same thing over and over, only to vary one small detail – for example, the text – a template can save you time and improve your accuracy.

Here are the steps:

  • Create a new Motion project (or open an old one).
  • Make all the changes you want, including adding all media, effects and text.
  • When it is done, choose File > Publish Template.
  • Give your template a name and, ideally, a new Category. In my screen shot, I created a category called “Larry” which is the location where I store all my unique templates.
  • If you want to use this template in Final Cut Pro X, also check Publish as Final Cut Generator.

Once you’ve created a template, it will always be available on the left side of the Project Browser when you first start Motion. Double-click it to open.

Done.


Please rate the helpfulness of this tip.

Click on a star to rate it!

… for Codecs & Media

Tip #428: Better Ways to Create LUTs

Larry Jordan – LarryJordan.com

LUT software allows us to create looks that can’t be achieved any other way.

A red car, re-colored to blue simply by changing the LUT.

Topic $TipTopic

Tip #427 showed how to create LUTs using Photoshop. However, what if you need more, or want to create a radically different look for your media. That requires a 3rd-party LUT utility.

Consider 3D LUT Creator.

3D LUT Creator makes 3D LUTs that can be imported into many programs such as Adobe Photoshop, DaVinci Resolve, Adobe Premiere Pro, Final Cut Pro X, and Adobe After Effects.

Color correction in 3D LUT Creator is made by bending the grid tied to the color plane containing saturation and hue. The use of this interface allows you, in just a few clicks, to completely change the color scheme of the image or work with the desired color ranges separately.

A free trial version, and more details, are available here.

EXTRA CREDIT

LUTs don’t require rendering, making these the fastest way to change the colors in your clip.


Please rate the helpfulness of this tip.

Click on a star to rate it!

… for Random Weirdness

Tip #421: Improve Your Filmmaking Creativity

Larry Jordan – LarryJordan.com

It isn’t your gear, it’s your mind.

Creativity means allowing your mind to wander.

Topic $TipTopic

This article first appeared in TolTips.com. This is an excerpt.

It’s not your gear, but your creativity that will set you apart. Consider these ideas:

  1. Let your mind drift. Boredom is often associated with a loss of productivity but it actually allows the mind to drift, and opens up new forms of input and understanding. Ideas usually don’t come up when your mind is busy.
  2. Follow other creators. Use them to find inspiration. let yourself be influenced, but not copy, story-telling, editing techniques, framing…
  3. Do some research. The more you know about your theme, the higher the chance of finding a nice angle to tell your story.
  4. Challenge yourself. Creativity is the ability to create something unusual. Don’t rest on your laurels. Challenge yourself, go out of your comfort zone.
  5. Be open-minded. Concepts are meant to change through their development. So, remember that it’s better to waste a few hours on a silly idea than waste a potential great idea.

Please rate the helpfulness of this tip.

Click on a star to rate it!

… for Adobe Premiere Pro CC

Tip #385: Build Multicam Clips Faster

Larry Jordan – LarryJordan.com

Selection order makes all the difference.

Topic $TipTopic

If you need to assemble clips with different frame sizes, frame rates or codecs into the same multicam clip into Adobe Premiere Pro CC, here’s a fast way to create a multicam clip with exactly the format you need.

The secret?

When creating a multicam clip, the first clip you select in the Project panel will be the settings that Premiere uses to build a multicam clip.

So if you want to create a 4k multicam clip containing both 4K and 1080p HD media, be sure to select the 4K clip first.

Then, choose Clip > Create Multicam Source Sequence.

Done. All settings are configured automatically, based on that first clip.


Please rate the helpfulness of this tip.

Click on a star to rate it!

… for Random Weirdness

Tip #361: Ask Better Questions

Larry Jordan – LarryJordan.com

Plan so you can “be in the moment” with your guest.

Topic $TipTopic I’ve been doing interviews for decades. Based on that experience, here’s a summary of an article I wrote on how to ask better interview questions. Read the full article here.

  • Plan. Planning is not as sexy as production, but it is just as essential.
  • Handle Guests. Get all your tech checks done before the guest walks onto the set. Once the guest enters, direct your full attention to them.
  • Write Your Questions. Asking questions is part art and part science. The art is really listening to what your guest is saying. Write down your questions so you can focus on the guest, not on what you want to ask next.
  • The Interview. At this point, the interview dance begins. And I view it as a dance — I’m leading and they are following. For me, an interview has an emotional arc, the same as a drama. I always start with easy questions which I never expect to use, just to get the guest comfortable.
  • Questions to Use. WHAT, WHERE, and HOW questions. These cause the guest to describe specific problems, actions, behaviors. These set up a problem and what was done to solve it. I use these for the body of the interview. I also use “For example?” a lot during this section to drill down into specifics. Then, I wrap up with WHY questions. These always elicit emotional responses
  • Questions Not to Use. Questions that start with: could, should, do, can, or any other question that can be answered “yes,” or “no.”
  • Last Question. Just before calling “Cut!,” but when all my questions are done, I always ask the guest: “Is there a question I should have asked that I did not?” This gives them a chance to reflect to see if they want to add, or modify anything.

Finally, when things are done, thank the guest BEFORE you talk to the crew. Reassure them they did a good job – because they are worried you didn’t like what they did.

Then, talk to the crew.

There’s a lot more in the article, I recommend you read it before your next interview.


Please rate the helpfulness of this tip.

Click on a star to rate it!

… for Apple Final Cut Pro X

Tip #320: Should You Copy or Link to Media?

Larry Jordan – LarryJordan.com

Copying is safer, linking is more flexible.

Media import options with Final Cut Pro X.

Topic $TipTopic

There are two options when importing media into Final Cut Pro X: “Copy to library” and “Leave files in place.” Which should you use? The short answer is that copying files is safer, while linking files is more flexible.

  • Copy files to library. This copies all media into the Library. This means that wherever you move the library, the media travels with it. There is no lost media and nothing gets unlinked.

I recommend this option for all new users. However, the downside is that the Library file becomes very big (which is not a problem in-and-of-itself) and that you are doubling the storage needed for all your media.

  • Leave files in place. This creates links in FCP X that point to where your media is stored. This keeps the library smaller, but if you move the library you also need to remember where all your media is stored and move it as well. If you don’t, links break and media in your project won’t play.

This option is preferred when media is shared between libraries, when storage capacity is limited, or when multiple editors are using the same media.

Personally, I use Leave files in place, but I am also VERY careful to keep track of where all my media is stored.


Please rate the helpfulness of this tip.

Click on a star to rate it!