… for Adobe Premiere Pro CC

Tip #286: Slicing and Dicing

Larry Jordan – LarryJordan.com

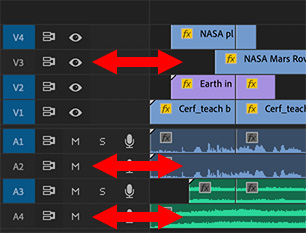
Active tracks become important when cutting clips.

Active tracks are those where the blue buttons on the right side are enabled.

Topic $TipTopic

In addition to the Razor tool, which cuts individual timeline clips wherever you click it, there are two keyboard shortcuts which can cut multiple clips at the same time at the position of the playhead. But they don’t behave the same way.

On the left side of the Timeline are two columns of blue buttons. The ones on the right indicate active tracks (blue is active, gray is not).

Put the playhead where you want to cut a stack of clips, then:

  • Type Cmd – K and only clips on active tracks are cut, as illustrated in this screen shot.
  • Type Shift – Cmd – K and all clips are cut, whether they are on an active track or not.

Cool.


Please rate the helpfulness of this tip.

Click on a star to rate it!

… for Apple Final Cut Pro X

Tip #302: How to Reset a Color Wheel

Larry Jordan – LarryJordan.com

A simple trick to reset any color wheel setting.

A color wheel for color correction in Apple Final Cut Pro X.
To reset any color wheel control to its default, double-click it.

Topic $TipTopic

I’d been using Final Cut Pro X for years before I discovered this tip.

To reset any setting in a color wheel back to its default, double-click it.

So simple! And it took me so long to discover.

Sigh…


Please rate the helpfulness of this tip.

Click on a star to rate it!

… for Apple Final Cut Pro X

Tip #294: Automate Stills Using FCP X Image Exporter

Larry Jordan – LarryJordan.com

This 3rd-party utility simplifies creating stills from an FCP X project.

The main screen from FCP X Image Exporter.

Topic $TipTopic

Do you need to export a lot of images from your Final Cut Pro X timelines but aren’t excited about sitting there and manually doing it?

There’s a very cool 3rd-party utility that can help: FCP X Image Exporter, created by Adam Teale. This provides a blindingly-fast way to create a whole bunch of stills in a hurry.

Simply place markers in your FCP X timeline for each still you want to export, export an FCPXML file, and fcpxImageExporter will do the rest. It accesses your source media, then exports still images at either the source media, project or a custom resolutions.

Learn more here.

CAUTION!

This program works well, however, if you’ve added color grading or effects to your clips, this program won’t apply them to the stills it creates, as it only accesses your source media.

BONUS

Here’s a video tutorial that shows the application in action.


Please rate the helpfulness of this tip.

Click on a star to rate it!

… for Apple Motion

Tip #190: Fast Green-Screen Keys in Motion

Larry Jordan – LarryJordan.com

Four steps to better-looking keys.

Green-screen foreground goes above the background.
Apply the Keyer filter to the foreground and Soft Focus to the background.

Topic $TipTopic

The chroma-key filter, also called a “green-screen key,” in Motion and Final Cut Pro X is excellent at creating a clean key, generally without needing to touch any settings.

Here’s how.

  • Import the foreground shot that has the green background. (The smoother and brighter this background is lit, the better your key. Remember, we are replacing all the green pixels.)
  • Import the new background shot you want to use in place of the original green and place it below the green-screen shot.
  • Apply Filters > Keying > Keyer to the foreground clip.
  • Apply Filters > Blur > Soft Focus to the background clip. Adjust the Amount setting so that you create the illusion of depth-of-field in the shot.

EXTRA CREDIT

Generally, to make a key look really believable, you’ll also need to add some color correction to the foreground. But, in terms of creating the key, these are the steps you need to know.


Please rate the helpfulness of this tip.

Click on a star to rate it!

… for Apple Final Cut Pro X

Tip #262: Libraries: Combine or Split

Larry Jordan – LarryJordan.com

Performance is better when libraries are smaller.

Library icons from Apple Final Cut Pro X.
Put the media you need to access in one library. Use multiple libraries for distinctly different projects.

Topic $TipTopic

Figuring out the best way to manage media in Final Cut is always a challenge because there are so many options. As a recent example, Ron wrote:

I have a challenge with Library’s in FCP X. I have a client that we shoot 4 videos a month. They are only about 5 minutes each. We do this every month and I have one Library (for the year) that has all the months in it along with the usual assets.

This Library is now 450 GB and my question is: would it be more effect if I had a Library for each month rather than a yearly Library.

The short answer is: “Yes.”

If you are not sharing media from one library to the next, putting one month in a library simplifies file management and improves performance. (Keep in mind that libraries need to be open to be accessed.)

There’s nothing wrong with what you are doing, it simply becomes harder to manage the media.

EXTRA CREDIT

Here’s the general rule: Put the media you need to access into a single library.

Keep in mind that the bigger the library, the more RAM you’ll need.


Please rate the helpfulness of this tip.

Click on a star to rate it!

… for Random Weirdness

Tip #144: 4 Steps to Editing Better Interviews

Larry Jordan – https://LarryJordan.com

Don’t do everything at once

Tip Screen Shot

Topic $TipTopic

After shooting and editing hundreds of interviews, the biggest lesson I’ve learned is: Don’t do everything at once. Rather focus on completing very specific tasks. This allows you to better concentrate on the story, rather than the construction.

Specifically, I build an interview in four stages:

  1. The radio cut. Build the foundation of the story by editing all the sound bites in order into the timeline. Don’t worry about the visuals. Create the best story you can first.
  2. Add B-roll. After the story is fleshed out, go back and add B-roll to illustrate what the speaker is talking about. (Adding B-roll before the story is complete just wastes time because the story you are telling keeps changing.)
  3. Add titles and graphics. With the story built and the B-roll in place, you now know where you can fit titles and which graphics you need.
  4. Finally, effects. When everything else is done, add effects. I’ve learned that effects will take as much time as you have between now and the deadline… plus an hour. Don’t get sucked into adding effects until the rest of your story is complete, you’ll run out of time to finish your story.

The benefit of this approach is that you are intently focusing on one element at a time, without wasting time creating, say, an effect for a shot that you ultimately decide not to use.


Please rate the helpfulness of this tip.

Click on a star to rate it!

… for Random Weirdness

Tip #145: Three Tips to Focus Your Editing

Larry Jordan – https://LarryJordan.com

It is easy to get overwhelmed when editing non-scripted material.

Tip Screen Shot

Topic $TipTopic

Editing a documentary, or even a simple interview, can quickly get overwhelming with all the different sound bites and B-roll you need to deal with. Especially if the story is still evolving as you edit.

Here are three tips to help you focus:

  • Prioritize your media. As you review your media make notes on which clips have the most interesting material. Put them in their own bin, or flag them as a favorite.
  • Get your media organized. Sketch out your edit on paper. Tag clips using metadata. Use colors, keywords, favorites or any other organizational tool your NLE supports. The key is to get a sense of where you are going before you make your first edit. Once you get buried in the timeline, it is hard to take a step back and see the whole picture.
  • Edit one sequence at a time. Break your project into scenes, then work on one scene at a time. Otherwise, it is easy to get overwhelmed and frustrated.

Feel free to share your own tips in the comments.


Please rate the helpfulness of this tip.

Click on a star to rate it!

… for Apple Motion

Tip #152: Motion Templates Speed New Projects

Larry Jordan – https://LarryJordan.com

A template is a master file with elements and animation already in place.

Tip Screen Shot

Topic $TipTopic

Let’s say you need to create a new open every week for a program. While each open has the same elements, a few things change. While you could simply copy and reuse an existing project, templates are a better way to work.

Why? Because they store all the elements you need and prevent you from accidentally saving a revised project with the wrong name, thus erasing the older project.

Here’s how this works.

  • Create a new project or work with an existing project.

NOTE: While you can change project settings in Motion at any time, it is always best to set the duration before adding any elements. Changing the duration after elements are added is surprisingly tricky.

  • Modify the project as necessary.
  • When you are done creating, save your work. This is the critical step, choose File > Publish Template. NEVER simply save a template, that only creates a Motion project.
  • Give the template a name, then, if the category you want does not exist, click New Category. (A category is essentially a folder which is displayed in the Project Browser sidebar.)
  • Finally, click Publish. That’s it. You’ve created a new Motion template.

NOTE: You can store multiple templates in the same category. You only need to create a category once.

To access a template, look in the Compositions section of the Project Browser when you create a new project for Motion. Double-click the template you want to use.

Done.


Please rate the helpfulness of this tip.

Click on a star to rate it!

… for Apple Final Cut Pro X

Tip #162: Two Fast Ways to Change Project Properties

Larry Jordan – https://LarryJordan.com

Display Project Properties faster using these two shortcuts.

Tip Screen Shot

Topic $TipTopic

Most of the time, once we create a project, we don’t need to change its properties.

But, all too often, I find myself needing to change something in a project after I’ve started editing.

While you could choose Window > Project Properties, here are two faster ways:

  • Type Cmd + J
  • Select the Project in the Browser

In both cases, the image you see in the screen shot appears in the Inspector.

Click the blue Modify button to display the Project Properties window. At this point, you can make whatever changes you need to make.

NOTE: You can change any project setting at any time except frame rate. The only time we can change frame rates is when a project is empty.


Please rate the helpfulness of this tip.

Click on a star to rate it!

… for Adobe Premiere Pro CC

Tip #130: Edit Without Touching the Mouse!

Larry Jordan – https://LarryJordan.com

The secret is in the Source Monitor.

Tip Screen Shot

Topic $TipTopic

Alex Macleod, writing in the Nov/Dec 2019 issue of KitPlus, pointed out this super-quick way to review and edit clips.

First, keep these keyboard shortcuts in mind:

  • Shift + 1. Makes the Project Panel active
  • Shift + 2. Makes the Source Panel active
  • Shift + 3. Makes the Timeline active
  • Shift + 4. Makes the Program Monitor active.

Second, remember you can load multiple clips into the Source Monitor by:

  • Selecting the clips you want to open in the Project panel
  • Control-click one of the selected clips and choose Open in Source Monitor

Third, as you review these clips in the Source Monitor:

  • Press I to set an In
  • Press O to set an Out
  • Press period [ . ] to edit the clip into the active track in the Timeline.

Everything you need to edit your clips without once touching the mouse.

NOTE: Learn more about the KitPlus Magazine here.


Please rate the helpfulness of this tip.

Click on a star to rate it!